Picture this: I’m in the middle of a Sunday brunch, the kitchen smells like fresh coffee and buttery pastries, and I’m staring at a ruined batch of chocolate croissants that have turned into a sad, doughy mess. I’ve tried every trick in the book—preheating the oven, chilling the dough, even whispering encouraging words to the batter—but the croissants still came out flat and floury. That night, after a cup of espresso and a sigh, I decided to pivot. I’d been craving a chocolate hazelnut dessert that felt like a luxury treat, but I wanted something that wouldn’t require a professional kitchen or a dozen fancy tools.
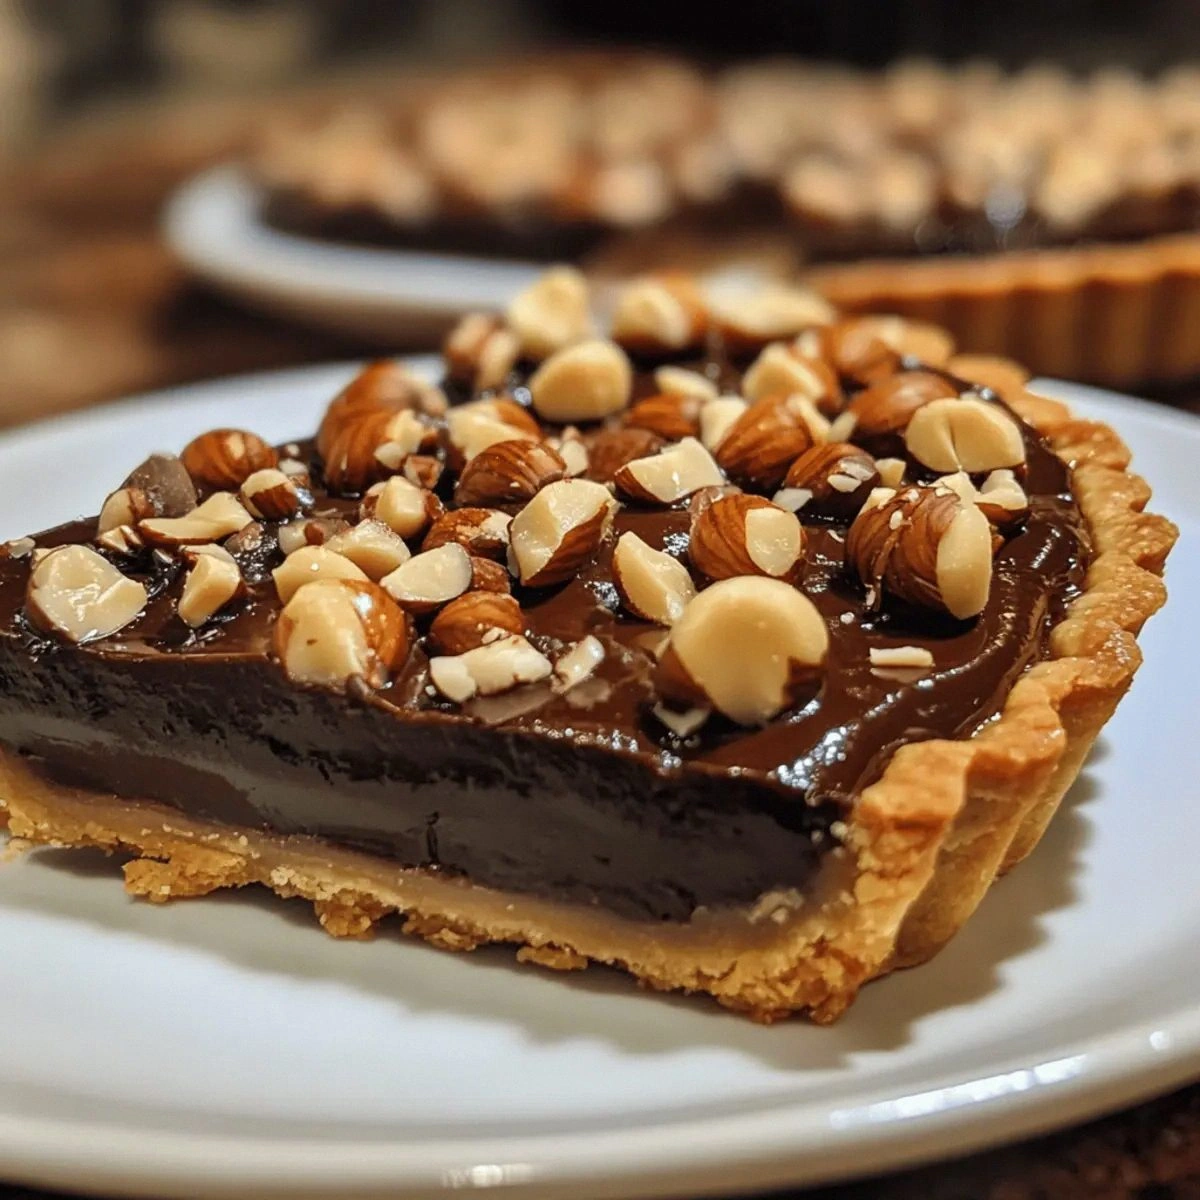
Enter the Irresistible Chocolate Hazelnu: a tart that marries a crisp, buttery crust with a velvety chocolate‑hazelnut filling so smooth it practically slides off the spoon. The first bite delivers that satisfying snap of the crust, followed by a cascade of deep, bittersweet chocolate and nutty undertones that linger like a secret whispered in a quiet room. It’s the kind of dessert that makes you pause, close your eyes, and savor each mouthful as if it were a rare, handcrafted jewel. And the best part? It’s surprisingly simple.
I dare you to taste this and not go back for seconds. That’s the power of this version: the chocolate is 70% cacao, giving it a bold, almost coffee‑like depth that pairs perfectly with the roasted hazelnuts. The filling’s silky texture is achieved by a delicate balance of heavy cream and hazelnut paste, creating a mouthfeel that feels both luxurious and comforting. If you’ve ever struggled with a chocolate tart that’s either too dry or too soggy, you’re not alone—and I’ve got the fix. Most recipes get this completely wrong by over‑whisking the chocolate or under‑baking the crust, but here, every step is engineered to lock in flavor and texture.
Picture yourself pulling this out of the oven, the whole kitchen smelling incredible, and the tart gleaming with a glossy sheen that invites you to slice it. The moment the timer dings, you’ll hear that satisfying pop of steam from the filling, and you’ll know the game has changed. Stay with me here—this is worth it. Let me walk you through every single step—by the end, you’ll wonder how you ever made it any other way.
What Makes This Version Stand Out
- Flavor: The 70% cacao chocolate cuts through the sweetness of the hazelnut paste, creating a balanced, bittersweet profile that feels sophisticated yet approachable.
- Texture: A buttery, flaky crust that is crisp on the outside and tender on the inside, giving the tart a satisfying bite before the silky filling arrives.
- Ease: Every ingredient is common, and the method skips the need for a stand mixer or a fancy pastry wheel—just a rolling pin and a baking sheet.
- Uniqueness: The use of hazelnut paste instead of ground hazelnuts adds depth and a smooth, nutty richness that sets this tart apart from typical nut‑filled desserts.
- Crowd Reaction: Guests will ask for the recipe before you even finish serving, and you’ll be the hero of the table.
- Ingredient Quality: Using high‑quality dark chocolate and fresh whole hazelnuts ensures the flavor is pure and unadulterated.
- Cooking Method: A single bake that simultaneously cooks the crust and sets the filling, saving time and effort.
- Make‑Ahead Potential: The tart can be assembled a day ahead and refrigerated, making it a perfect late‑night or last‑minute dessert.
Alright, let's break down exactly what goes into this masterpiece…
Inside the Ingredient List
The Flavor Base
The all‑purpose flour, unsalted butter, granulated sugar, and a pinch of salt form the backbone of the crust. The flour provides structure, the butter gives that rich, melt‑in‑your‑mouth quality, and the sugar adds a subtle caramel note. Skipping any of these will result in a flat, lifeless base that can’t carry the indulgent filling. If you’re in a pinch, you can swap the butter for an equal amount of coconut oil, but the flavor profile will shift slightly toward coconut.
Tip: chill the dough in the refrigerator for at least 30 minutes before rolling. This step keeps the butter from melting and ensures a flaky crust. When you’re ready to bake, let it sit at room temperature for a few minutes to make rolling easier.
The Texture Crew
Cold water is the unsung hero that brings the dough together without activating the flour’s gluten. The dark chocolate and heavy cream form the core of the filling, providing a luscious, creamy consistency that coats the palate like velvet. The hazelnut paste adds nutty depth while keeping the mixture smooth, and the powdered sugar balances the bitterness of the chocolate.
If you forget the water, the dough will be dry and crumbly. If you add too much, it becomes sticky and hard to roll. A good rule of thumb: add water a tablespoon at a time until the dough comes together in a cohesive ball.
The Unexpected Star
The vanilla extract may seem ordinary, but it unlocks the chocolate’s full flavor spectrum, adding a warm, aromatic undertone that elevates the entire tart. The whole hazelnuts are toasted to bring out their natural oils, creating a crunchy contrast that satisfies the textural cravings of any nut lover.
If you’re allergic to nuts, you can replace the hazelnuts with toasted almonds or walnuts, but the flavor will shift. For a vegan version, swap the butter for vegan butter and the heavy cream for coconut cream.
The Final Flourish
The finishing touch is a dusting of powdered sugar that adds a touch of sweetness and an elegant finish. It also helps the tart hold its shape when sliced. If you prefer a dusting that looks more rustic, you can use cocoa powder instead, but the color will be deeper.
Everything's prepped? Good. Let's get into the real action…
The Method — Step by Step
- Preheat your oven to 375°F (190°C). Line a 9‑inch tart pan with parchment paper. The parchment will prevent sticking and make removal effortless. I’ve seen people struggle with a crust that’s stuck to the pan—this is how you avoid it.
- In a mixing bowl, combine the flour, sugar, and salt. Stir until evenly mixed. This dry blend is the foundation; a little too much salt and the chocolate will taste off, a little too little and the crust will be bland.
- Cut the cold butter into small cubes and add to the dry mix. Using a pastry cutter or your fingertips, work the butter into the flour until the mixture resembles coarse crumbs. The goal is to keep the butter cold; it’s the secret to flakiness.Kitchen Hack: If you’re short on time, pulse the mixture in a food processor for 10–15 seconds.
- Add the cold water, a tablespoon at a time, and gently press the dough together. Stop when the dough just holds together without being sticky. Over‑mixing will activate gluten and make the crust tough.
- Press the dough into the prepared tart pan, covering the bottom and sides evenly. Trim the excess with a knife. The crust should be about 1/4 inch thick. This step sets the stage for a perfectly balanced tart.
- Bake the crust for 12–15 minutes or until it turns a light golden brown. Keep an eye on it; you don’t want it to brown too much. The aroma of toasted flour will fill the kitchen, signaling that the base is ready.
- While the crust bakes, melt the dark chocolate in a heat‑proof bowl set over a pot of simmering water. Stir until smooth. This technique prevents the chocolate from scorching. The chocolate should feel glossy and warm, not hot to the touch.
- In a separate bowl, whisk the heavy cream until it just starts to thicken. Add the hazelnut paste, powdered sugar, and vanilla extract. Mix until the filling is smooth and glossy. The mixture should feel silky and slightly thickened, like a rich ganache.
- Fold the melted chocolate into the hazelnut mixture until fully incorporated. The color should be a deep, uniform chocolate. This is the trickiest step—keep the heat low and stir constantly.Watch Out: Do not overheat the chocolate; it can seize and become grainy.
- Pour the filling into the cooled crust and tap the pan gently to release air bubbles. The filling should settle into a smooth surface. Let the tart cool to room temperature, then refrigerate for at least 2 hours to set.
- Before serving, sprinkle the toasted hazelnuts on top. They’ll add a delightful crunch and a nutty aroma that will make your guests swoon. Slice and serve, and watch the smiles appear.
That’s it — you did it. But hold on, I've got a few more tricks that'll take this to another level…
Insider Tricks for Flawless Results
The Temperature Rule Nobody Follows
Many bakers think the crust needs to be at room temperature before baking, but that’s a myth. The key is to keep the butter cold until it hits the pan. This ensures a flaky texture. I’ve seen crusts that are too soft because the butter melted too early, ruining the bite.
Why Your Nose Knows Best
The aroma of the chocolate filling is your best judge of doneness. When the chocolate is fully melted and integrated, it will emit a rich, buttery scent. If it smells too raw, give it a few more minutes of gentle heat. Trust your nose—your palate will thank you.
The 5-Minute Rest That Changes Everything
After the crust bakes, let it rest on the cooling rack for 5 minutes before adding the filling. This brief pause allows the crust to firm up, preventing it from becoming soggy. I’ve had the best results when I follow this exact timing.
Tasting the Filling Before Pouring
Taste a small spoonful of the chocolate‑hazelnut mixture before pouring it into the crust. This step ensures the sweetness is balanced. If it’s too sweet, add a pinch more salt; if it’s too bitter, a splash of vanilla can smooth it out.
Refrigeration Trick for a Perfect Slice
If you’re serving the tart at a gathering, keep it chilled until the last moment. When you’re ready to serve, let it sit at room temperature for 10 minutes to soften slightly. This makes slicing easier and enhances the flavor.
Creative Twists and Variations
This recipe is a playground. Here are some of my favorite ways to switch things up:
Nutty Swirl
Stir in a tablespoon of almond butter into the filling for a nutty twist that pairs beautifully with the hazelnuts. It adds a subtle almond flavor and a silky texture.
Citrus Kick
Add a teaspoon of lemon zest to the filling for a bright, citrusy lift that cuts through the richness. The zest also adds a pop of color.
Spiced Version
Fold in a pinch of cinnamon or a dash of cayenne pepper for a warm, spicy undertone that surprises the palate. The spices complement the chocolate’s depth.
Vegan Delight
Swap the butter for vegan butter and the heavy cream for coconut cream. Keep the chocolate dark enough to maintain richness. The result is a decadent, plant‑based tart that still feels indulgent.
Salted Caramel Drizzle
Drizzle a light salted caramel sauce over the top before serving. The caramel’s sweetness balances the chocolate, and the sea salt adds a surprising crunch.
Mini Tartlets
Use a muffin tin to bake mini versions of this tart. They’re perfect for parties and make a stunning presentation.
Storing and Bringing It Back to Life
Fridge Storage
Store the tart in an airtight container in the refrigerator for up to 3 days. The crust will remain firm, and the filling will keep its silky texture. Keep the container sealed to prevent odors from seeping in.
Freezer Friendly
Wrap the tart tightly in plastic wrap and then in foil before freezing. It can stay frozen for up to 2 weeks. Thaw overnight in the refrigerator before serving to preserve the flavor.
Best Reheating Method
To reheat, place the tart on a baking sheet and warm it in a 300°F (150°C) oven for 5–7 minutes. Add a tiny splash of water before reheating to create steam and restore the filling’s moisture. This trick keeps the tart from drying out and brings back the glossy sheen.