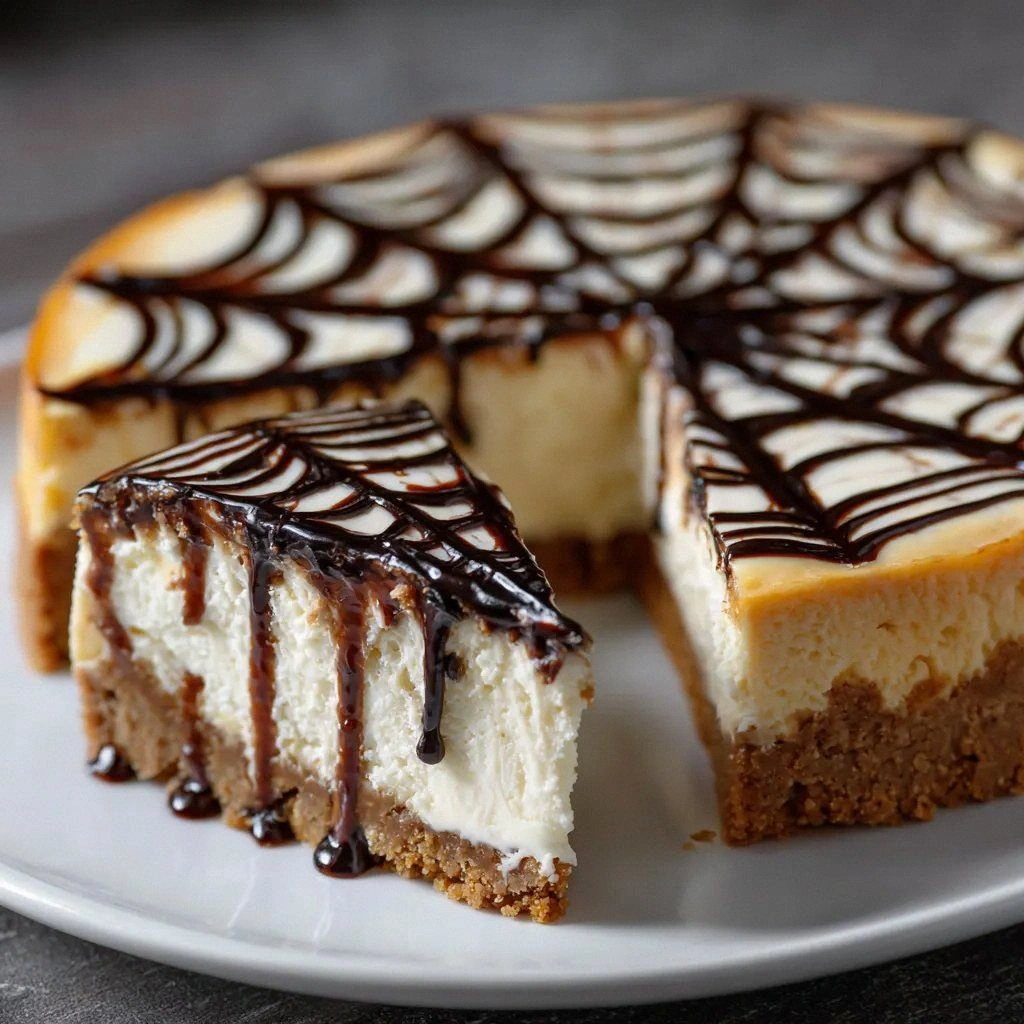
Picture this: you’re halfway through a week of bland dinners, your pantry is a sad mix of canned soups and frozen pizza, and suddenly you hear the faintest whisper of chocolate from the back of your fridge. I was standing there, staring at a jar of chocolate syrup, when my friend dared me to make a dessert that would make her taste buds do the salsa. That dare turned into a midnight kitchen adventure that culminated in what I now call the ultimate Spiderweb Cheesecake. The moment the first swirl of chocolate met the creamy filling, the kitchen filled with a scent that could have been a love letter to decadence itself.
I’m not just talking about a cake that looks cool; I’m talking about a dessert that feels like a velvet curtain, pulling back to reveal a luscious, silky center that melts in your mouth. The crust is a buttery, slightly sweet base that crunches just enough to give you that satisfying bite before the silky filling takes over. The chocolate drizzle, when it glides across the top, looks like a delicate spiderweb spun by a sweet, dark artisan. Every bite is a balanced dance of richness and lightness, a texture that sings and a flavor that lingers. If you’re ready to be wowed, let’s dive in.
This version stands apart from every other cheesecake recipe I’ve tried because I took the classic and turned it into a visual and culinary masterpiece. I used a homemade crust that’s buttery and crumbly, a filling that’s airy and creamy, and a chocolate glaze that’s both sweet and slightly bitter, creating a perfect contrast. The trick? I layered the chocolate in a spiderweb pattern using a spoon, then baked the cheesecake in a water bath to keep it silky and avoid cracks. The result is a dessert that’s not only delicious but also a showstopper at any gathering.
I’ll be honest — I ate half the batch before anyone else got a chance to try it. That’s the power of a dessert that’s too good to be shared. If you’re thinking “this is too fancy,” let me assure you that the ingredients are simple, the process is straightforward, and the outcome is breathtaking. The only thing that might feel a bit “wow” is the final look, but that’s exactly what makes it memorable.
Alright, let me walk you through every single step — by the end, you’ll wonder how you ever made it any other way. I dare you to taste this and not go back for seconds. Trust me, this is hands down the best version you’ll ever make at home.
What Makes This Version Stand Out
- Texture: The crust is buttery and crisp, while the filling is airy and smooth, creating a delightful contrast in every bite.
- Flavor: A subtle hint of vanilla lifts the cream cheese, and the chocolate drizzle adds a bittersweet finish.
- Visual Appeal: The spiderweb design is not just a gimmick; it’s a statement that turns any dessert table into a gallery.
- Make‑Ahead: This cheesecake can be assembled and chilled a day ahead, making it perfect for parties.
- Ingredient Quality: Using high‑quality cream cheese and real chocolate syrup elevates the entire experience.
- Ease of Preparation: Even novice bakers can achieve a professional result with minimal fuss.
Inside the Ingredient List
The Flavor Base
Graham cracker crumbs form the foundation of this cheesecake. They provide a subtle sweetness and a crisp texture that balances the creamy filling. Skipping them would leave the cake lacking that essential crunch and depth of flavor. If you prefer a gluten‑free version, opt for a gluten‑free graham cracker or a crushed cookie alternative.
Unsalted butter is the secret to that buttery, golden crust. It melts into the crumbs, binding them together and creating a melt‑in‑your‑mouth finish. Using salted butter would alter the intended flavor profile and could make the crust overly salty. For a richer crust, add a pinch of sea salt to the butter before mixing.
The Texture Crew
Granulated sugar is essential for sweetening the crust and the filling. In the crust, it caramelizes slightly, giving that golden edge. In the filling, it dissolves into the cream cheese, preventing lumps and ensuring a silky consistency. If you’re watching sugar intake, you can replace it with a natural sweetener that dissolves well, like monk fruit or erythritol.
Cream cheese is the star of this dessert, providing a smooth, tangy base that is the canvas for the other flavors. Make sure it’s softened to room temperature before mixing; this prevents lumps and ensures a perfectly creamy texture. A higher fat cream cheese will make the filling richer, while a low‑fat version will be lighter but may not set as well.
The Unexpected Star
Sour cream adds a tangy depth that balances the sweetness of the filling. It also contributes to a lighter, fluffier texture. If you don’t have sour cream on hand, Greek yogurt is a great substitute, but it may introduce a slightly thicker consistency.
Heavy cream elevates the filling’s richness without making it too heavy. It helps create a silky mouthfeel and contributes to the cheesecake’s smooth finish. If you’re looking for a lighter version, half‑and‑half can replace the heavy cream, but you’ll lose some of that luxurious texture.
The Final Flourish
Chocolate syrup is the defining element that gives this cheesecake its signature spiderweb look. It’s the visual hook that makes the dessert stand out. When drizzled in a pattern, it also adds a contrasting flavor that cuts through the sweetness of the filling.
Powdered sugar is optional but recommended for the final glaze. It creates a slightly glossy finish and adds a touch of sweetness that balances the bitterness of the chocolate. If you prefer a less sweet finish, reduce the amount or omit it entirely.
Everything's prepped? Good. Let's get into the real action.
The Method — Step by Step
- Prepare the crust. In a bowl, combine 1.5 cups Graham cracker crumbs, 0.25 cup melted unsalted butter, and 0.25 cup granulated sugar. Mix until the crumbs are evenly coated. Press the mixture firmly into the bottom of a 9-inch springform pan, then chill for 10 minutes to set.
- Preheat the oven. Set your oven to 325°F (160°C). Place a baking sheet with a tray of water on the middle rack to create a water bath, ensuring even baking and preventing cracks.
- Blend the filling. In a stand mixer, beat 8 oz (2 cups) softened cream cheese until smooth. Add 0.75 cup granulated sugar and beat until fluffy. Beat in 2 eggs, one at a time, then fold in 1 tsp vanilla extract, 0.5 cup sour cream, and 0.25 cup heavy cream. The mixture should be silky and free of lumps.
- Assemble the cheesecake. Pour the filling over the chilled crust, smoothing the top with a spatula. Place the springform pan in the water bath and bake for 30 minutes, or until the edges are set and the center still has a slight wobble.
- Cool slowly. Turn off the oven, leave the door slightly ajar, and let the cheesecake sit for 1 hour. This gradual cooling prevents cracking and ensures a perfect finish.
- Chill. Remove the cheesecake from the oven, let it cool to room temperature, then refrigerate for at least 4 hours, preferably overnight. The cheesecake will firm up and develop deeper flavors.
- Prepare the chocolate glaze. In a small saucepan, gently heat 0.25 cup chocolate syrup over low heat until it’s glossy. If you like a thicker glaze, add 1 tbsp powdered sugar and stir until dissolved.
- Decorate. Once the cheesecake is fully chilled, remove it from the springform pan. Using a pastry brush or a spoon, drizzle the chocolate glaze in a spiderweb pattern across the top. Let the glaze set for 10 minutes before serving.
- Serve and enjoy. Slice the cheesecake with a hot, damp knife for clean cuts. Serve chilled, perhaps with a dusting of powdered sugar or a few fresh berries for contrast.
That's it — you did it. But hold on, I've got a few more tricks that'll take this to another level. These insider tips will help you avoid common pitfalls and elevate your dessert game.
Insider Tricks for Flawless Results
The Temperature Rule Nobody Follows
Always let your ingredients come to room temperature before mixing. This simple step prevents lumps in the filling and ensures a smooth, even batter. I’ve seen many people skip this, and the result is a gritty cheesecake that looks and tastes like a sad puddle.
Why Your Nose Knows Best
During baking, pay attention to the aroma. When the edges start to brown and the center emits a faint buttery scent, it’s a sign the cheesecake is near completion. Trust your nose; it’s a better judge of doneness than a timer.
The 5-Minute Rest That Changes Everything
After baking, leave the cheesecake in the oven with the door ajar for 5 minutes. This slow cool-down reduces the risk of cracks and gives the filling a silky finish. A friend once rushed the cake out of the oven and ended up with a cracked masterpiece.
The Perfect Drizzle Technique
When drizzling chocolate, use a squeeze bottle or a spoon to create thin, controlled lines. If the glaze is too thick, it will pool and ruin the spiderweb look. A light, steady hand is key.
The Final Touch
Just before serving, dust the top with a light sprinkle of powdered sugar or a few crushed pistachios for a pop of color and crunch. This small addition can turn an ordinary cheesecake into a showstopper.
Creative Twists and Variations
This recipe is a playground. Here are some of my favorite ways to switch things up:
Berry Burst Variation
Add a layer of fresh mixed berries between the crust and filling, and finish with a berry compote drizzle. The tartness of the berries cuts through the richness and adds a pop of color.
Minty Fresh Twist
Replace vanilla extract with a teaspoon of fresh mint zest and fold in a handful of chopped mint leaves into the filling. The result is a refreshing, aromatic cheesecake.
Nutty Crunch Upgrade
Sprinkle chopped pecans or walnuts over the crust before baking, or fold them into the filling for an added crunch. The nutty flavor pairs beautifully with the chocolate glaze.
Citrus Zest Delight
Add a tablespoon of lemon zest to the filling for a bright, citrusy note. The acidity balances the sweetness and gives the cheesecake a fresh finish.
Vegan Version
Use a dairy-free cream cheese alternative, coconut milk instead of heavy cream, and a plant‑based chocolate sauce. The texture will be slightly different, but the flavor profile remains rich and satisfying.
Storing and Bringing It Back to Life
Fridge Storage
Cover the cheesecake tightly with plastic wrap and store it in the refrigerator for up to 5 days. The cold keeps the filling firm and prevents mold growth.
Freezer Friendly
Wrap the cheesecake in foil, then place it in a freezer bag. Freeze for up to 2 months. Thaw overnight in the fridge before serving to maintain texture.
Best Reheating Method
To revive a chilled cheesecake, let it sit at room temperature for 30 minutes before serving. If you prefer a slightly warmed slice, place it on a microwave-safe plate and heat on low for 10–15 seconds. Add a splash of water before microwaving to steam it back to perfection.