I was standing in my kitchen, half‑listening to a friend brag about the “perfect” store‑bought cheesecake, when a sudden craving hit me like a bolt of lightning. I grabbed a bag of chocolate sandwich cookies, a jar of cherry pie filling, and my trusty cream cheese, thinking, “I could make something decent, but why settle for decent?” The oven was already preheating, the butter was melting into a golden pool, and the smell of toasted crumbs was already whispering promises of decadence. I dared myself to create a dessert that would make even the most skeptical sweet tooth scream, “This is hands down the best version you'll ever make at home.”
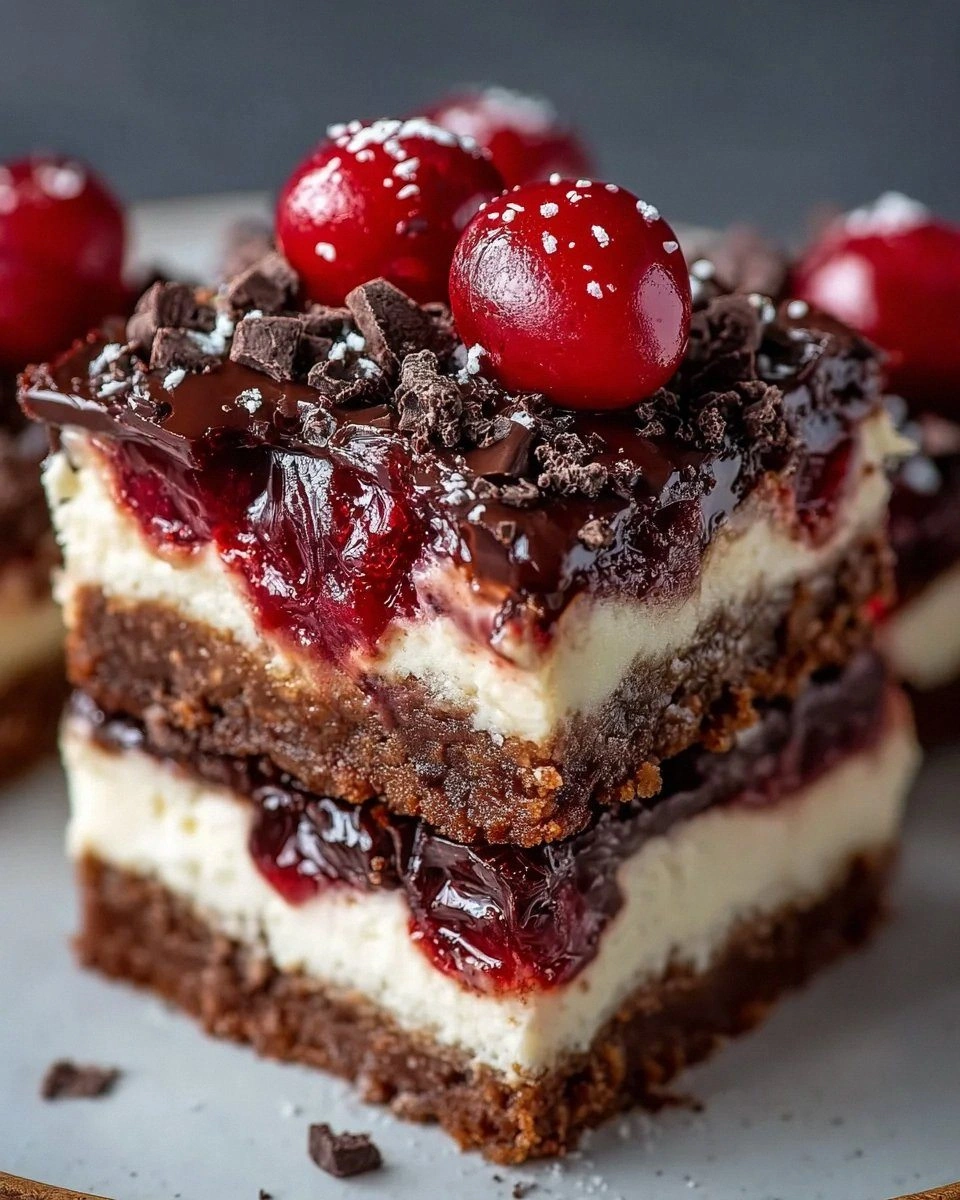
Picture this: a glossy marble of dark chocolate swirled through a silky cheesecake, speckled with ruby‑red cherries that burst like fireworks when you bite. The crust? A buttery, crunchy foundation that crumbles like fresh snow under your fork, yet holds together with the confidence of a seasoned pastry chef. The aroma? A heady mix of vanilla, toasted graham, and a faint hint of cocoa that fills the kitchen and makes the whole house feel like a boutique bakery. When the first bar slides off the pan, the chocolate chips melt just enough to give a gentle snap, and the cherry ribbons glisten like tiny rubies. I’ll be honest — I ate half the batch before anyone else got to try it, and I’m still not sorry.
Most recipes get this completely wrong. They either drown the cheesecake in chocolate, leaving it dense and gummy, or they skimp on the fruit, resulting in a bland, one‑note experience. What makes this version stand out is the delicate balance: a chocolate‑infused crust, a light yet rich cheesecake, and a swirl of cherry that adds both acidity and visual drama. The secret? A quick‑mix technique for the crust that locks in flavor without over‑baking, and a gentle fold‑in of chocolate chips at the very end, preserving their bursty texture. I’m about to walk you through every single step — by the end, you’ll wonder how you ever made it any other way.
Okay, ready for the game‑changer? The twist is using chocolate sandwich cookie crumbs instead of plain graham crackers for the crust, which amps up the chocolate factor without making the bar overly sweet. This little swap, combined with a dash of vanilla in the filling and a generous swirl of cherry pie filling, creates layers of flavor that dance on your palate. Stay with me here — this is worth it, and I dare you to taste this and not go back for seconds.
What Makes This Version Stand Out
If you’ve ever struggled with a cheesecake that either cracks like dry ice or feels as dense as a brick, you’re not alone. This recipe fixes those pitfalls with a few clever tricks and premium ingredients that elevate every bite. Below are the reasons this bar earns its crown.
- Flavor Harmony: The chocolate crust, creamy cheesecake, and tart cherry swirl create a symphony where each note shines without overpowering the other.
- Texture Contrast: A crisp, buttery base meets a velvety interior and a surprise snap from chocolate chips, delivering a multi‑dimensional mouthfeel.
- Simplicity: Only eight core ingredients, no fancy equipment, and a single‑pan approach keep the process approachable for any home cook.
- Unique Twist: Using chocolate sandwich cookie crumbs instead of traditional graham crackers adds depth without extra sugar.
- Crowd Reaction: Guests invariably ask for the recipe, and the bars hold up beautifully on a platter, looking as good as they taste.
- Ingredient Quality: Fresh, room‑temperature cream cheese and high‑quality semi‑sweet chocolate chips make a measurable difference.
- Cooking Method: A water‑bath (bain‑marie) ensures gentle, even baking, preventing cracks and giving a smooth top.
- Make‑Ahead Potential: These bars can be refrigerated for up to three days or frozen for a month, making them perfect for parties.
Alright, let's break down exactly what goes into this masterpiece...
Inside the Ingredient List
The Flavor Base
The crust is the foundation of any good bar, and here we’re using either graham cracker crumbs or chocolate sandwich cookie crumbs. The latter intensifies the chocolate flavor and creates a richer, more indulgent bite. If you opt for graham crackers, you’ll get a lighter, more buttery profile that still pairs beautifully with the cherry. Skipping the crust entirely? Expect a soggy bottom and a loss of that satisfying crunch that makes each bite feel complete. For the best results, choose a brand with a slightly sweet edge and a fine texture.
The Texture Crew
Unsalted butter is the glue that binds the crust together, providing a luxurious melt‑in‑your‑mouth feel. Because it’s unsalted, you control the salt level, ensuring the cheesecake isn’t overly salty. Cream cheese is the heart of the filling; its tanginess cuts through the chocolate, while its fat content guarantees a smooth, velvety texture. Using full‑fat cream cheese (not low‑fat) is crucial—otherwise you’ll end up with a grainy, less creamy result. Granulated sugar sweetens the filling just enough to let the chocolate and cherry shine without becoming cloying.
The Unexpected Star
Cherry pie filling does more than add a fruity swirl; its natural acidity balances the richness of the cheese and chocolate, while the glossy syrup creates a beautiful marbling effect that’s as pleasing to the eye as it is to the palate. If you’re feeling adventurous, try a wild‑berry blend for a tangier twist. Vanilla extract is the subtle backstage hero, enhancing the overall flavor depth and tying the sweet and tart notes together. A splash of pure vanilla (not imitation) makes a noticeable difference in the final taste.
The Final Flourish
Semi‑sweet chocolate chips are the finishing touch, providing pockets of molten chocolate that burst with each bite. Their sweetness is balanced, so they don’t compete with the cherries but rather complement them. If you prefer a darker profile, swap in bittersweet chips, but keep in mind the overall sweetness will shift. Skipping the chips? You’ll lose that delightful textural surprise that makes these bars unforgettable. For the ultimate crunch, toss the chips in a light coat of flour before folding them into the batter.
Everything's prepped? Good. Let's get into the real action...
The Method — Step by Step
- Preheat and Prepare: Set your oven to 325°F (165°C) and line a 9×13 inch pan with parchment paper, letting the edges overhang for easy removal. While the oven warms, gather your crust ingredients—crushed graham crackers or chocolate sandwich cookies, melted butter, and a pinch of salt. Mix them in a large bowl until the crumbs are evenly coated and start to clump together, like wet sand at the beach. Press the mixture firmly into the pan, creating an even layer; the edges should be slightly higher to form a “wall.” This step sets the stage, and you’ll feel the buttery aroma as you press, a promise of what’s to come.
- Bake the Crust: Slide the pan into the oven and bake for 10‑12 minutes, or until the edges turn a light golden brown and you can hear a faint, nutty scent. Keep a close eye; over‑baking will dry out the base, while under‑baking leads to a soggy bottom. When the crust is done, remove it and let it cool slightly while you whip the filling. This brief bake creates a sturdy platform that will hold the luscious cheesecake without collapsing.
- Beat the Cream Cheese: In a stand mixer or large bowl, beat softened cream cheese on medium speed for about 2 minutes until it’s smooth and free of lumps—think of a cloud that’s just about to burst. Add granulated sugar and continue beating until the mixture lightens, turning a pale ivory color. Scrape down the sides of the bowl occasionally; this ensures an even texture and prevents gritty spots.
- Incorporate Eggs and Vanilla: Crack in the eggs one at a time, beating just until each is incorporated. Over‑mixing can incorporate too much air, leading to cracks later, so stop as soon as the mixture looks glossy. Add the vanilla extract and give it a quick whirl—this is where the aroma really starts to develop, filling the kitchen with a sweet, comforting perfume.
- Fold in Chocolate Chips: Gently fold the semi‑sweet chocolate chips into the batter using a rubber spatula. The goal is to distribute them evenly without crushing them; you want pockets of chocolate that will melt into molten gems during baking. This is the moment of pure anticipation—those dark specks promise bursts of flavor in every bite.
- Swirl the Cherry: Pour half of the cheesecake batter over the pre‑baked crust, spreading it gently. Drop spoonfuls of cherry pie filling across the surface, then use a knife or skewer to swirl the cherry through the batter, creating a marbled effect. Pour the remaining batter on top and repeat the swirling technique. The visual contrast of ruby ribbons against creamy white is not just pretty—it adds pockets of tartness that cut through the richness.
- Water‑Bath Bake: Wrap the pan tightly in aluminum foil to prevent water from seeping in. Place the pan in a larger roasting pan and pour hot water until it reaches halfway up the sides of the cheesecake pan. Bake for 30‑35 minutes, or until the edges are set and the center still has a slight jiggle—think of a firm custard that wobbles just enough. This gentle, moist heat is the secret to a crack‑free surface and a silky texture.
- Cool and Chill: Once baked, remove the cheesecake from the water bath and let it cool on a wire rack for about 20 minutes. Then, carefully lift the parchment overhang and transfer the whole pan to the refrigerator. Chill for at least 4 hours, preferably overnight; this firming step allows the flavors to meld and the bars to set perfectly for clean cuts.
- Slice and Serve: Using a hot, wet knife, cut the chilled cheesecake into bars—12 generous pieces work well for a gathering of eight. The heat helps the knife glide through the creamy interior without dragging crumbs. Serve each bar with a dusting of powdered sugar or a drizzle of melted chocolate for extra flair. And now the fun part: watch your guests’ faces light up as they bite into the perfect balance of chocolate, cherry, and cheesecake.
That's it — you did it. But hold on, I've got a few more tricks that'll take this to another level...
Insider Tricks for Flawless Results
The Temperature Rule Nobody Follows
Never bake a cheesecake straight from the fridge; room‑temperature ingredients blend more uniformly, preventing lumps and cracks. Let the cream cheese, butter, and eggs sit out for 30‑45 minutes before mixing. This small patience step makes a massive difference in texture. A friend once tried to speed things up by using cold cheese, and the result was a grainy disaster that fell apart on the plate. Trust the rule, and your bars will be silky smooth.
Why Your Nose Knows Best
Your sense of smell is a reliable indicator of doneness. When the crust turns a light amber and you detect a toasted, buttery scent, it’s time to pull it out. Similarly, the cheesecake should give off a faint vanilla fragrance as it nears the end of its bake. If you’re unsure, trust your nose before the timer. This sensory shortcut prevents over‑baking, which is the most common cause of cracks.
The 5‑Minute Rest That Changes Everything
After removing the cheesecake from the oven, let it sit uncovered for five minutes before covering with foil. This brief rest lets the surface contract slowly, reducing the chance of a sudden crack when the cooling process begins. Skipping this step is a recipe‑breaker; you’ll see hairline fissures spreading across the top like tiny rivers.
Chocolate Chip Timing
Fold the chocolate chips in at the very end of mixing, not at the beginning. If you incorporate them too early, the chips can melt into the batter, losing that delightful snap. By adding them last, each chip remains a distinct pocket of molten chocolate that bursts when you bite. A baker once over‑mixed, ending up with a uniformly brown batter—no surprise pockets, just a bland chocolate swirl.
The Cherry Swirl Secret
Use a toothpick or thin skewer to create a marbled pattern, but don’t over‑mix. A gentle, lazy swirl preserves the integrity of both the cheesecake and the cherry ribbons. If you stir too vigorously, the cherry will bleed into the batter, turning the whole thing pink and losing the visual drama. The right amount of swirl gives you that gorgeous, restaurant‑style appearance.
Creative Twists and Variations
This recipe is a playground. Here are some of my favorite ways to switch things up:
White Chocolate Raspberry
Swap the semi‑sweet chocolate chips for white chocolate chips and replace cherry pie filling with a swirl of raspberry coulis. The tartness of raspberry pairs beautifully with the buttery white chocolate, creating a pastel‑colored masterpiece that’s perfect for spring brunches.
Espresso Mocha
Add a tablespoon of instant espresso powder to the crust and use dark chocolate chips instead of semi‑sweet. The coffee notes deepen the chocolate flavor, turning the bars into a sophisticated after‑dinner treat that pairs well with a glass of port.
Nutty Caramel Crunch
Fold in chopped toasted pecans or walnuts into the crust and drizzle a caramel sauce over the top before chilling. The nutty crunch adds texture, while the caramel adds a buttery sweetness that complements the cherries.
Mint Chocolate Cherry
Add a few drops of peppermint extract to the batter and sprinkle crushed mint chocolate cookies over the top before baking. This refreshing twist is perfect for holiday gatherings, delivering a cool breeze amid the rich chocolate.
Gluten‑Free Delight
Replace the graham cracker or cookie crumbs with a blend of almond flour and gluten‑free oat flour, and use a gluten‑free butter substitute. The texture stays crumbly, and the flavor remains indulgent—ideal for friends with dietary restrictions.
Storing and Bringing It Back to Life
Fridge Storage
Cover the pan tightly with plastic wrap or store the bars in an airtight container. They stay fresh for up to three days, maintaining their creamy texture. For best flavor, let them sit at room temperature for 10 minutes before serving to allow the chocolate to soften slightly.
Freezer Friendly
Wrap each bar individually in parchment paper, then place them in a zip‑top freezer bag. They freeze beautifully for up to a month. When you’re ready to enjoy, transfer to the fridge to thaw overnight, then give them a quick 30‑second microwave blast for a warm, gooey finish.
Best Reheating Method
To revive a refrigerated bar, place it on a microwave‑safe plate, add a tiny splash (about a teaspoon) of water, and microwave on medium for 20‑30 seconds. The added moisture creates steam that restores the cheesecake’s silkiness without drying it out. Alternatively, a quick pass through a 350°F oven for 5 minutes works wonders for a crispier crust.