I was standing in my kitchen, surrounded by a mountain of half‑baked muffins, a burnt batch of brownies, and a lingering sense that something was missing from my dessert arsenal. The smoke alarm had just given me a polite reminder that my attempt at a classic New York cheesecake was more “cheese‑soup” than “cheesecake,” and I swore I would never touch a 9‑inch springform again. That night, a daring friend dared me to make something that could fit in a single bite, look adorable on a platter, and still deliver that creamy, tangy punch we all love. I accepted the challenge, and what emerged from my mini‑muffin tin was nothing short of a revelation – a bite‑size masterpiece that makes you forget you ever tried to slice a giant cake.
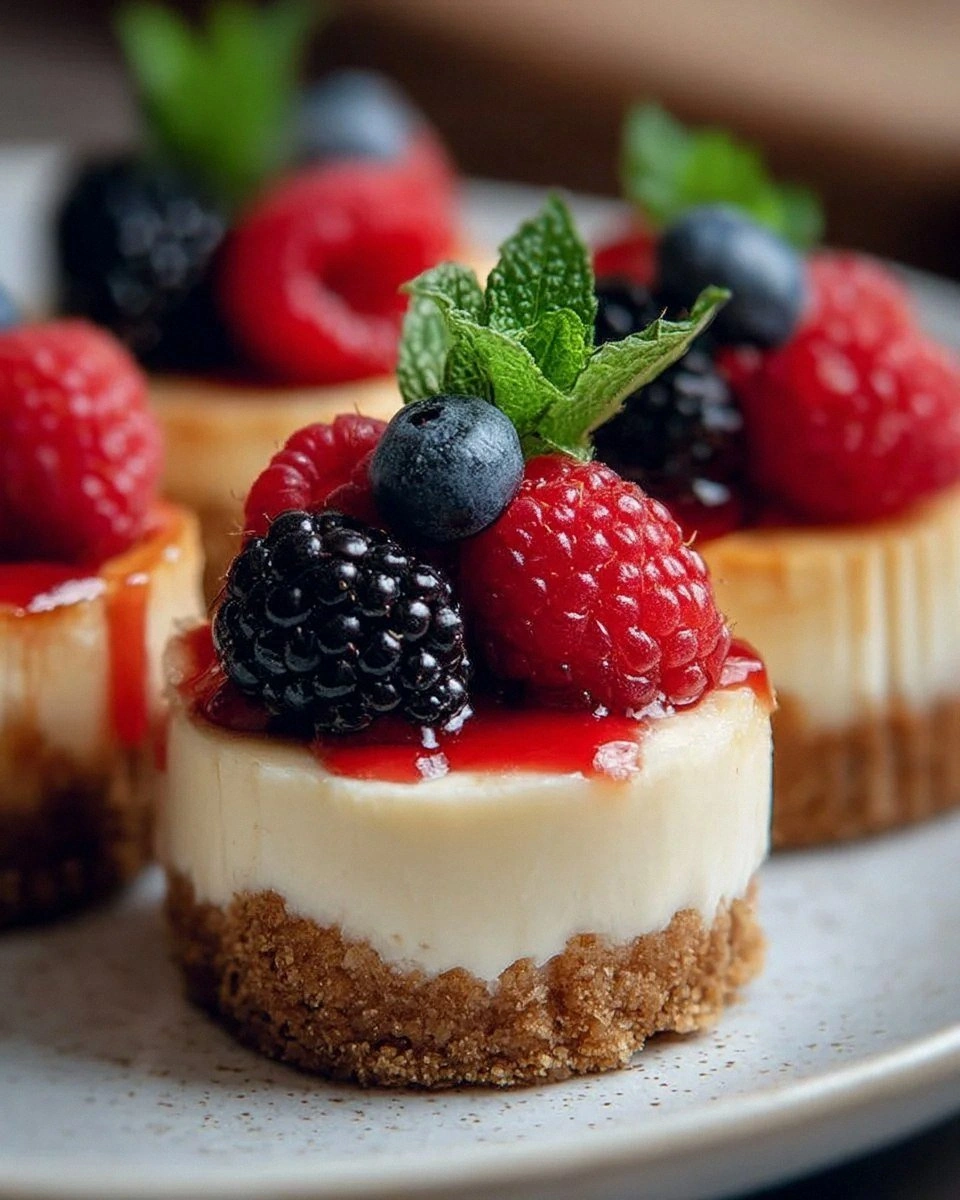
Picture this: the buttery graham crust crackles under your fork like fresh autumn leaves, the filling is as smooth as satin and as bright as a sunrise, and the topping? A glossy drizzle of chocolate that glistens like a runway for fresh berries. As the mini cheesecakes bake, your kitchen fills with a buttery, vanilla‑kissed perfume that makes the whole house feel like a patisserie. When you finally pull them out, the tops are just set, with a gentle wobble that promises melt‑in‑your‑mouth perfection the moment they hit your tongue. The first bite is a symphony – a crunchy base, a creamy middle, and a burst of fruit or chocolate that dances across your palate.
Most cheesecake recipes get the texture wrong – either they’re too dense, too dry, or they crack like old paint. I’ve tried the “no‑bake” route, the “water‑bath” technique, and even the “cook‑in‑the‑microwave” shortcut, and each time something fell short. This version, however, hits every mark: a silky mouthfeel thanks to the perfect balance of cream cheese and sour cream, a subtle tang that cuts through the sweetness, and a crust that stays crunchy without turning soggy. The secret? A quick‑whisk of the eggs at room temperature and a precise bake‑time that locks in moisture while giving the edges a golden kiss.
Let me walk you through every single step — by the end, you’ll wonder how you ever made it any other way. Okay, ready for the game‑changer? I dare you to taste this and not go back for seconds. This is hands down the best version you’ll ever make at home, and I’m about to spill all the details, from the pantry staples you need to the tiny tricks that turn a good cheesecake into a legendary one. Stay with me here — this is worth it.
What Makes This Version Stand Out
- Texture: A buttery crust that shatters like thin ice, a custardy interior that holds its shape yet melts like butter on warm toast.
- Flavor: The perfect sweet‑tart balance, with a hint of vanilla that whispers rather than shouts.
- Simplicity: Fewer than ten ingredients, all pantry‑friendly, and no need for a fancy water bath.
- Speed: From prep to plate in under an hour, making it ideal for last‑minute gatherings.
- Versatility: A blank canvas for fresh fruit, chocolate drizzle, or a dollop of whipped cream – you decide.
- Make‑Ahead: They keep beautifully in the fridge, so you can bake them a day ahead and still serve them fresh.
- Crowd‑Pleaser: Even the most skeptical dessert skeptics have been known to ask for the recipe after the first bite.
- Ingredient Quality: Using halal‑certified sour cream ensures a clean, tangy finish without compromising flavor.
Inside the Ingredient List
The Flavor Base
The graham cracker crust is the unsung hero of any cheesecake, providing a buttery, slightly sweet foundation that contrasts beautifully with the creamy filling. Using 1 cup of finely crushed graham crackers ensures a uniform texture; if the crumbs are too coarse, the crust can feel grainy, and if they’re too fine, it may become soggy. The 1/4 cup of granulated sugar sweetens the crust just enough to enhance the buttery notes without overpowering the delicate cheese flavor. Finally, the 1/2 cup of melted unsalted butter binds everything together, creating a golden, melt‑in‑your‑mouth base that stays firm after cooling.
The Texture Crew
At the heart of the mini cheesecake lies 16 oz of cream cheese, softened to room temperature. This is the key to that silky, velvety mouthfeel – if the cheese is cold, you’ll end up with lumps that never fully dissolve. Pair it with 1 cup of granulated sugar, which not only sweetens but also helps to aerate the mixture when beaten, giving the cheesecake a light lift. The 3 large eggs act as the structural backbone, setting the custard as it bakes; they should be added one at a time, fully incorporated before the next, to avoid curdling. The 1 cup of halal‑certified sour cream introduces a subtle tang that cuts through the richness, keeping the final product from feeling heavy.
The Unexpected Star
A splash of 1 tsp vanilla extract adds depth, turning a simple sweet flavor into something aromatic and inviting. While it’s a small amount, the quality of vanilla matters – pure extract or the occasional dash of vanilla bean paste will make the difference between “good” and “wow”. This is also where you can experiment with other extracts, like almond or orange, if you’re feeling adventurous. The fresh fruit, chocolate sauce, and whipped cream are all “to taste” components that let you customize each bite, making the mini cheesecakes perfect for any occasion.
The Final Flourish
When it comes to toppings, the sky’s the limit. Fresh strawberries add a bright, juicy contrast, while blueberries bring a burst of tartness that pairs beautifully with the creamy base. A drizzle of chocolate sauce adds richness and a glossy finish, turning each mini cheesecake into a work of art. And don’t forget the whipped cream – a light, airy cloud that balances the dense filling and adds an extra layer of indulgence. These finishing touches are not just decorative; they elevate the flavor profile and make each bite a new experience.
Everything's prepped? Good. Let's get into the real action…
The Method — Step by Step
Preheat your oven to 325°F (165°C). While the oven warms, line a 12‑cup muffin tin with paper liners; this not only makes removal easier but also gives each cheesecake a neat, uniform look. I dare you to watch the oven’s light as it warms – that soft glow is the first sign that magic is about to happen.
Combine the graham cracker crumbs, 1/4 cup sugar, and melted butter in a medium bowl. Use a fork or your fingertips to mash everything together until the mixture resembles wet sand. Power transition: Press the crumb mixture firmly into the bottom of each muffin cup, about 1/3 of the way up. The crust should be compact; if it crumbles, press a little harder – you want a solid base that won’t dissolve.
Kitchen Hack: Use the back of a spoon to level the crust, ensuring each mini cheesecake has the same thickness for even baking.Place the muffin tin on a baking sheet and bake the crust for 8‑10 minutes, just until it starts to turn a light golden brown. You’ll hear a faint sizzle as the butter melts – that sound is pure perfection. Remove from the oven and let cool slightly while you prepare the filling.
In a large mixing bowl, beat the softened cream cheese on medium speed until it’s smooth and free of lumps. This step is crucial – any lumps will become visible pockets in the final cheesecake. Once silky, gradually add 1 cup of sugar, beating until the mixture is light and fluffy, about 2‑3 minutes.
Add the vanilla extract and blend in the sour cream, scraping the sides of the bowl to ensure everything is incorporated. The mixture should look glossy and slightly thickened. Watch Out: If the batter looks too thin, you’ve likely over‑mixed; pause and add a teaspoon of flour to bring it back to a proper consistency.
Now, the eggs. Crack them one at a time into the bowl, beating just enough to blend each egg before adding the next. This slow incorporation prevents the batter from curdling and ensures a smooth custard. The batter should be thick enough to hold a spoonful without running off the side of the cup.
Spoon the filling over the pre‑baked crusts, filling each cup about three‑quarters full. The surface should be slightly domed; as the cheesecake bakes, it will rise a little more. Tap the tin gently on the counter to release any air bubbles – those bubbles are the enemy of a flawless surface.
Watch Out: Opening the oven door too early can cause the cheesecakes to crack; wait until the timer hits the 20‑minute mark before checking.Return the tin to the oven and bake for 20‑25 minutes, or until the edges are set and the center still has a slight jiggle when you gently shake the pan. The tops should be just barely golden – not brown. This is the moment of truth: the cheesecake is firm enough to hold its shape but still creamy inside.
Turn off the oven, crack the door open a crack, and let the cheesecakes sit for 10 minutes. This gradual cooling prevents sudden temperature changes that can cause cracks. Afterward, transfer the tin to a wire rack and let them cool completely to room temperature.
Once cooled, cover the tin with plastic wrap and refrigerate for at least 2 hours, preferably overnight. The chill sets the filling, making it slice‑ready and intensifying the flavors. When you’re ready to serve, top each mini cheesecake with fresh fruit, a drizzle of chocolate sauce, and a dollop of whipped cream. Picture yourself pulling this out of the fridge, the whole kitchen smelling incredible…
That's it — you did it. But hold on, I've got a few more tricks that'll take this to another level. Ready for the next part? Pure magic awaits, and trust me, you’ll want to try these insider tips before your next batch.
Insider Tricks for Flawless Results
The Temperature Rule Nobody Follows
Never bake your cheesecake straight from the fridge. Let the batter sit at room temperature for 15 minutes before pouring it into the crust. This small step ensures the edges set evenly and prevents the dreaded “crack line” that appears when a cold batter hits a hot oven. I once tried skipping this step, and the result was a cheesecake that looked like a cracked desert floor – not pretty.
Why Your Nose Knows Best
Your sense of smell is a reliable indicator of doneness. When the cheesecake is nearing the end of its bake, the kitchen will fill with a faint, sweet‑vanilla aroma. If you detect a caramelized scent, it’s a sign the tops are getting too brown. Trust your nose more than the clock; ovens can vary by up to 15 degrees.
The 5‑Minute Rest That Changes Everything
After you pull the cheesecakes from the oven, let them rest inside the turned‑off oven with the door ajar for exactly five minutes. This gentle, residual heat finishes the set without shocking the custard. Skipping this rest often leads to a slightly under‑set center that can wobble when you try to move the cheesecake.
The Secret of the Silky Whip
When you whip the cream for the topping, add a pinch of powdered sugar and a splash of vanilla. The sugar stabilizes the foam, while the vanilla adds depth, turning a plain dollop into a flavor‑enhancing layer. If you over‑whip, you’ll end up with butter – a mistake I’ve made twice, and the result was a greasy topping that ruined the balance.
The Frosted Rim Technique
For a show‑stopping presentation, lightly brush the rim of each mini cheesecake with a thin layer of melted chocolate before adding fruit. The chocolate hardens quickly, creating a glossy border that catches the eye and adds a subtle crunch. This tiny detail makes the cheesecakes look bakery‑grade without any extra effort.
Creative Twists and Variations
This recipe is a playground. Here are some of my favorite ways to switch things up:
Berry Bliss
Swap the chocolate drizzle for a mixed‑berry coulis and fold fresh raspberries into the topping. The tartness of the berries cuts through the richness, making each bite feel light and summery.
Chocolate Overload
Add 2 tablespoons of cocoa powder to the filling and use a dark chocolate ganache for the drizzle. This turns the mini cheesecake into a decadent, fudgy treat that satisfies any chocolate craving.
Citrus Zing
Incorporate the zest of one lemon into the batter and finish with a lemon‑curd swirl on top. The citrus brightens the flavor profile, making it perfect for spring brunches.
Nutty Crunch
Mix chopped toasted pistachios or almonds into the crust for an extra layer of texture. The nutty bite adds complexity and a pleasant surprise with every forkful.
Spiced Autumn
Add a pinch of ground cinnamon and nutmeg to the filling, then top with caramel sauce and a sprinkle of sea salt. This variation feels cozy and is perfect for cooler evenings.
Storing and Bringing It Back to Life
Fridge Storage
Cover the mini cheesecakes with a single layer of plastic wrap or store them in an airtight container. They stay fresh for up to 5 days, retaining their creamy texture and flavor. If you notice a slight surface dry‑out, a quick brush of light maple syrup revives the shine.
Freezer Friendly
These mini delights freeze wonderfully. Place them on a baking sheet lined with parchment, freeze until solid, then transfer to a zip‑top bag. They can be stored for up to 2 months. When you’re ready to serve, let them thaw in the fridge overnight and add fresh toppings just before plating.
Best Reheating Method
If you prefer a warm serving, place the mini cheesecakes on a microwave‑safe plate, add a tiny splash of water (about a teaspoon), and heat for 15‑20 seconds. The steam created by the water brings the filling back to a silky consistency without drying out the crust. This trick works like a charm for those last‑minute dessert cravings.