Picture this: a quiet Sunday afternoon, the kitchen lights dimming as the sun sets, and the scent of fresh apples drifting in from the garden. I was scrambling to salvage a dessert after a disastrous attempt at a classic apple pie—flaky crust that turned out soggy, a filling that tasted like a grocery store mix, and a whole lot of disappointment. The moment the oven timer dinged, I realized that the secret to turning a mediocre pie into a showstopper was simpler than I’d imagined: a handful of precise tweaks and a dash of confidence. I dared myself to taste this and not go back for seconds, and I was wrong. The result was a golden, buttery crust that crackled like crisp autumn leaves, and a filling that sang with cinnamon, nutmeg, and a splash of lemon, all wrapped in a buttery embrace that made my taste buds dance.
I remember the first bite like it was yesterday. The crust was light, airy, and yet firm enough to hold the juicy apples without collapsing. The apples themselves were perfectly caramelized, their natural sweetness amplified by a subtle hint of vanilla and a touch of citrus. Every bite was a layered experience: the crunch of the crust, the burst of warm spices, the gentle sweetness of the apples, and that final buttery finish that left me craving more. If you’ve ever felt the sting of a pie that falls flat, you’ll understand why this version feels like a revelation. I’ve spent countless hours tweaking recipes, and this one feels like the culmination of that journey, a recipe that doesn’t just satisfy, but astonishes.
What sets this recipe apart isn’t just the ingredients or the method—it’s the philosophy behind it. It’s about respecting the apple’s natural flavor while enhancing it with the right balance of sweet and spice. It’s about creating a crust that is both tender and crisp, a texture that melts in your mouth. It’s about using simple, high‑quality ingredients that elevate the dish without overwhelming it. And, most importantly, it’s about confidence: knowing that you’re making a pie that will be talked about for years to come. This isn’t a recipe you read once and forget; it’s a recipe you’ll keep in your pantry, a recipe you’ll share at family gatherings, a recipe that will become a staple in your culinary repertoire.
I’m about to walk you through every single step, from selecting the perfect apples to achieving that flawless golden crust. By the end, you’ll wonder how you ever made it any other way. Get ready to become a pie‑making maestro, armed with the tools and techniques that will transform your kitchen into a bakery. The journey starts now, and trust me—once you taste the finished product, you’ll be hooked.
What Makes This Version Stand Out
- Flavor: The blend of cinnamon, nutmeg, and a splash of lemon creates a symphony of spices that elevates the natural sweetness of the apples.
- Texture: A double‑crust that is simultaneously buttery, flaky, and crisp—no sogginess, no heaviness.
- Ingredient Quality: Using fresh, unprocessed apples ensures a vibrant flavor profile that canned apples can never match.
- Make‑Ahead Friendly: The pie can be assembled up to 24 hours in advance, allowing flavors to meld and the crust to rest.
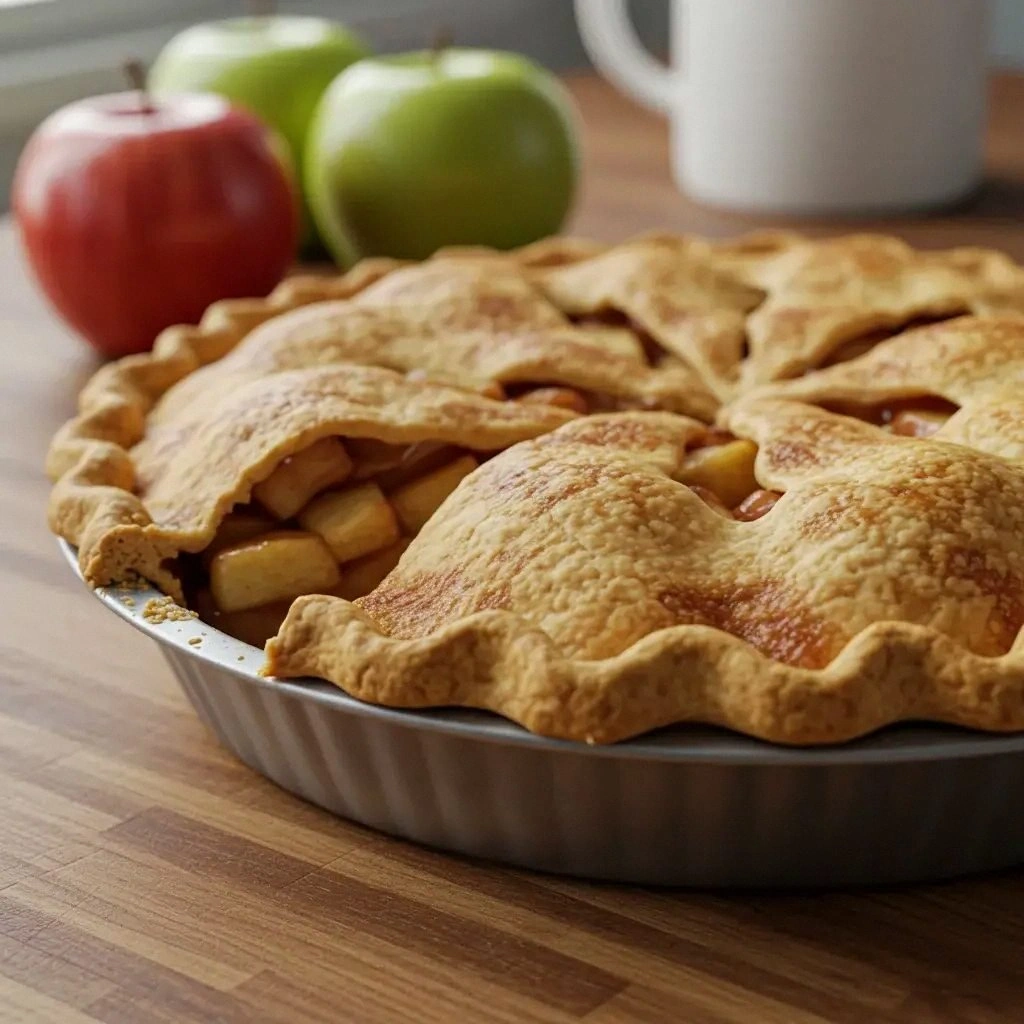
- Visual Appeal: A golden, glossy finish achieved with a simple egg wash that makes the pie irresistible to the eye.
- Time Efficiency: While the process is thorough, the overall prep and cook time stay under an hour, making it perfect for busy weeknights.
- Versatility: The base can be adapted for variations—add raisins, replace apples with pears, or swap cinnamon for cardamom.
- Crowd‑Pleaser: Whether you’re serving a family dinner or a holiday banquet, this pie garners rave reviews.
Alright, let's break down exactly what goes into this masterpiece…
Inside the Ingredient List
The Flavor Base
The foundation of any great pie is its flavor base. In this recipe, it’s a harmonious mix of cinnamon, nutmeg, and a splash of lemon juice that lifts the apples. Cinnamon is the star, delivering warmth and a sweet aroma that pairs beautifully with the fruit. Nutmeg adds a subtle earthiness, while lemon juice brightens the entire filling, cutting through the natural sweetness of the apples. Skipping any of these spices will result in a less complex flavor profile that feels flat and uninspired.
The Texture Crew
Texture is everything in a pie. The crust is the first thing you notice—flaky, buttery, and with just the right amount of crunch. The filling, on the other hand, should be thick enough to hold its shape yet moist enough to release steam and caramelize during baking. Cornstarch acts as a natural thickener, binding the juices without making the filling gummy. If you omit the cornstarch, you’ll end up with a watery filling that can leak through the crust.
The Unexpected Star
While apples are the obvious star, the addition of a small amount of vanilla extract—though optional—adds depth and a hint of sweetness that rounds out the filling. Many recipes skip this step, but a teaspoon of vanilla can transform the flavor profile into something more nuanced. If you’re allergic to vanilla or prefer a purer apple taste, simply leave it out; the pie will still shine.
The Final Flourish
The final flourish is the egg wash that gives the crust its glossy, golden finish. A beaten egg mixed with a tablespoon of water creates a natural sheen that is both appetizing and professional. The egg wash also helps the crust develop a beautiful brown color during baking. If you’re vegan, you can substitute with a tablespoon of melted coconut oil for a similar effect.
Everything's prepped? Good. Let's get into the real action…
The Method — Step by Step
- Prepare the crust. In a large bowl, whisk together 2 1/2 cups flour and 1 tsp salt. Add cold, diced butter and pulse with a pastry cutter until the mixture resembles coarse crumbs. Drizzle 1/4 cup ice water over the mixture, stirring until the dough just comes together. Divide the dough into two halves, shape each into a disc, wrap in plastic, and refrigerate for at least 30 minutes. This step ensures a flaky, tender crust that doesn’t shrink during baking.
- Make the filling. Peel, core, and slice 6 cups of apples into even 1/4-inch pieces. In a large bowl, combine the apples with 1 cup white sugar, 1/2 cup brown sugar, 2 tsp cinnamon, 1/2 tsp nutmeg, 1 tbsp lemon juice, 1 tbsp cornstarch, and a pinch of salt. Toss until the apples are evenly coated. The cornstarch will help the filling set, while the lemon juice brightens the overall flavor.
- Assemble the pie. Preheat the oven to 425°F (220°C). On a lightly floured surface, roll out one disc of dough into a 12-inch circle. Transfer it to a 9-inch pie dish, pressing gently into the bottom and up the sides. Spoon the apple filling into the crust, spreading evenly. If you’re using vanilla, drizzle a teaspoon over the top now. Cover with the second dough disc, sealing the edges by pinching them together. Trim any excess dough and cut a few slits in the top to allow steam to escape.
- Apply the egg wash. Beat one egg with a tablespoon of water. Brush the egg wash over the top crust, ensuring a smooth, even coating. This will give the crust a beautiful golden finish as it bakes.
- Bake the pie. Place the pie on the middle rack of the preheated oven. Bake for 20 minutes, then reduce the temperature to 375°F (190°C) and bake for an additional 25–30 minutes. The crust should be golden brown, and the filling should be bubbling through the slits. If the edges brown too quickly, cover them loosely with foil.
- Watch the edges. As the pie bakes, the edges will start pulling away from the dish. This is normal; it indicates the crust is crisping. Keep an eye on them—if they start to brown too quickly, gently fold a strip of foil over the edges to prevent burning.
- Cool and serve. Remove the pie from the oven and let it cool on a wire rack for at least 30 minutes. This allows the filling to set and the juices to thicken. Slice and serve warm, perhaps with a scoop of vanilla ice cream or a dollop of whipped cream.
- Enjoy the moment. This is the moment of truth—take a bite, let the flavors unfold, and savor the triumph of a perfectly baked pie. I dare you to taste this and not go back for seconds.
That's it—you did it. But hold on, I've got a few more tricks that'll take this to another level. From temperature control to resting times, these insider tips will ensure your pie turns out flawlessly every single time.
Insider Tricks for Flawless Results
The Temperature Rule Nobody Follows
Many bakers think a single oven temperature is enough, but the trick is to start hot to set the crust and then lower it to finish the filling. By baking at 425°F for the first 20 minutes, you lock in the crust’s structure. Then dropping the temperature to 375°F allows the filling to cook slowly, preventing the crust from over‑browning. I’ve tried this method for years, and it consistently produces a crust that is golden on top and tender underneath.
Why Your Nose Knows Best
Your sense of smell is your best judge of doneness. As the pie bakes, the scent of caramelized sugar and spices will fill the kitchen. When the aroma is rich and fragrant, the filling is ready. If the smell is still raw or sweet, give it a few more minutes. Trust your nose, and you’ll never over‑bake again.
The 5‑Minute Rest That Changes Everything
Once you take the pie out of the oven, let it rest for at least 5 minutes before cutting. This short rest allows the juices to redistribute, preventing a soggy center. It also lets the filling set, making slicing easier and cleaner. I’ve found that this simple step saves me from a sticky mess every time.
Use a Sharp Knife for Clean Cuts
A dull knife will crush the filling and tear the crust. Keep a sharp chef’s knife nearby, and cut through the crust and filling with a gentle rocking motion. This technique keeps the crust intact and the filling neat, giving your pie a professional look.
Cool the Crust on a Wire Rack
Cooling the crust on a wire rack allows air to circulate around the pie, preventing steam from making the crust soggy. It also helps the pie set, making it easier to slice. I’ve always used a rack, and it’s the difference between a soggy pie and a perfectly crisp one.
Creative Twists and Variations
This recipe is a playground. Here are some of my favorite ways to switch things up:
Raisin‑Apple Fusion
Add 1/2 cup raisins to the filling for a chewy, sweet contrast. The raisins soak up the apple juices, creating a richer texture that pairs well with the cinnamon.
Pear and Almond Delight
Swap apples for pears and sprinkle 1/4 cup chopped almonds on top before baking. The almond butter adds a nutty crunch that complements the pear’s delicate flavor.
Cardamom‑Spiced Variation
Replace cinnamon with 1 tsp ground cardamom for a warm, floral twist. Cardamom’s citrusy undertones elevate the pie into a gourmet experience.
Citrus Burst
Add zest from one orange to the filling, and replace the lemon juice with orange juice. The citrus brightness cuts through the sweetness, creating a balanced flavor profile.
Chocolate Drizzle Finish
Drizzle melted dark chocolate over the top crust after baking for a decadent finish. The chocolate’s bitterness balances the sweetness and adds a glossy sheen.
Storing and Bringing It Back to Life
Fridge Storage
Store leftover pie in an airtight container in the refrigerator for up to 3 days. Wrap the pie in plastic wrap before placing it in the container to prevent it from drying out. When ready to eat, let it sit at room temperature for about 15 minutes before serving to restore its warmth.
Freezer Friendly
Wrap the pie tightly in plastic wrap, then in aluminum foil, and freeze for up to 2 months. Thaw overnight in the refrigerator, then reheat in the oven at 350°F for 15 minutes to revive the crust’s crispness. The filling will remain moist and flavorful.
Best Reheating Method
To reheat a slice, place it on a baking sheet and warm in a preheated 350°F oven for 5–7 minutes. Add a tiny splash of water to the bottom of the pan before reheating; this steams the filling, keeping it from drying out and restoring its silky texture.