It started with a kitchen catastrophe that now feels like a rite of passage. I was juggling a half‑cooked chicken breast, a jar of marinara that had turned a deep, ominous red, and a pot of pasta that was halfway through boiling when I realized I’d forgotten to season the chicken. The panic was real—my dinner was doomed, my family was hungry, and I had only minutes before the pasta over‑cooked into a mush. I stared at the stove, then at the empty plate, and thought, “I can’t let this be the end of the evening.” That moment sparked a fierce determination: I would create a dish that could rescue the night and become a staple for future mishaps.
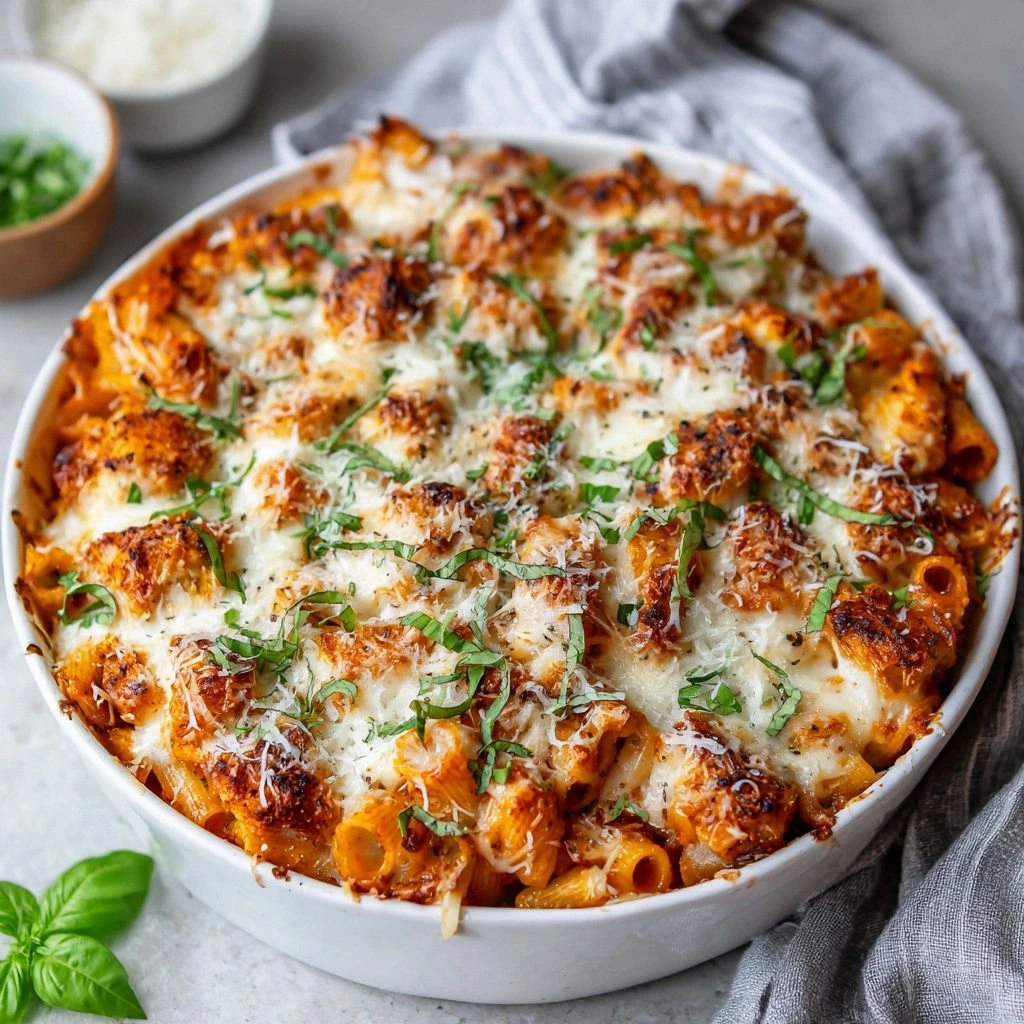
Picture the aroma that now fills the kitchen when this bake comes out of the oven: a rich, savory perfume of melted mozzarella, golden Parmesan crust, and a faint, comforting hint of garlic and oregano. The sound is equally inviting—crackling bubbles from the sauce, the gentle hiss of steam, and the rhythmic clinking of a wooden spoon against the pan. The texture is a layered masterpiece: a tender, juicy chicken core, a silky, sauce‑coated pasta base, and a crunchy, buttery breadcrumb topping that crackles like a fine toast when you bite into it. The taste is a symphony of umami, with the sharpness of Parmesan balanced by the mellow sweetness of the tomato sauce, while the chicken adds a meaty depth that keeps every bite exciting. The visual appeal is undeniable—a golden, bubbling top that glistens like a sunlit lake, flecks of melted cheese that look like tiny stars, and a glossy sheen that invites you to dig in.
What sets this version apart from the countless chicken parmesan casseroles you’ll find online is the meticulous layering of flavors and textures, the use of fresh ingredients, and a few secret techniques that elevate the dish from good to unforgettable. I’ve refined the breading process to create an airy, crisp crust that doesn’t overpower the chicken, added a splash of milk to keep the breadcrumb coating moist and flavorful, and incorporated a blend of herbs that gives the sauce a nuanced depth. The result is a dish that feels both comforting and gourmet, and it’s the kind of meal that turns a simple dinner into a memorable family gathering. I dare you to taste this and not go back for seconds—you’ll find yourself craving the next bite before you even realize you’re finished.
If you’ve ever struggled with a chicken parmesan bake that turned out soggy or bland, you’re not alone—and I’ve got the fix. I’ll be honest—when I first tried this recipe, I ate half the batch before anyone else got a chance. Most recipes get this completely wrong, focusing on either too much sauce or too much cheese. This version balances moisture and crunch, and it’s designed to work on any stovetop or oven you have. Picture yourself pulling this out of the oven, the whole kitchen smelling incredible, and watching the golden crust gleam under the kitchen light. Let me walk you through every single step—by the end, you’ll wonder how you ever made it any other way.
What Makes This Version Stand Out
- Flavor: The sauce coats the pasta like velvet, with a subtle kick from fresh oregano and a hint of basil that lifts the dish without overpowering the chicken.
- Texture: The breadcrumb topping shatters like thin ice when you bite, while the chicken stays juicy and the pasta remains al dente.
- Simplicity: Five core steps and a handful of ingredients make this a quick yet impressive meal that fits into a 45‑minute window.
- Uniqueness: A splash of milk in the breadcrumb batter keeps the coating moist, and a layer of mozzarella beneath the Parmesan creates a melt‑in‑your‑mouth center.
- Crowd Reaction: Friends rave about the crispy top and the savory, cheesy interior—perfect for game nights or family dinners.
- Ingredient Quality: Using fresh, high‑quality Parmesan and a homemade marinara elevates the dish from ordinary to extraordinary.
- Cooking Method: Baking in a single dish eliminates the need for multiple pots, saving time and reducing cleanup.
- Make‑Ahead Potential: Assemble the dish a day ahead, refrigerate, and bake right before serving for a stress‑free dinner.
Alright, let's break down exactly what goes into this masterpiece…
Inside the Ingredient List
The Flavor Base
The marinara sauce is the heart of this bake, and its depth comes from simmering tomatoes with garlic, onion, and a splash of red wine. Use a good‑quality jarred sauce, or better yet, make your own by sautéing fresh tomatoes with a pinch of sugar to balance acidity. The sauce should be thick enough to coat the pasta but not so thick that it dries out the chicken. If you skip the sauce, the dish becomes a dry, flat casserole—an unforgivable mistake. A small tip: keep a ladle ready so you can adjust the sauce’s consistency on the fly by adding a splash of chicken broth if it gets too thick.
The Texture Crew
Breadcrumbs, mozzarella, and Parmesan create the textural contrast that makes this bake unforgettable. Panko breadcrumbs give a lighter, crunchier bite, while regular breadcrumbs add a denser texture. The mozzarella layer beneath the Parmesan ensures a gooey, molten center that contrasts with the crispy top. If you’re watching calories, swap mozzarella for part of the Parmesan or use part‑skim mozzarella. Remember, the breadcrumbs should be moist but not soggy; a quick pat with a paper towel before coating the chicken prevents a gummy finish.
The Unexpected Star
A splash of milk in the breadcrumb batter is the secret ingredient that keeps the coating airy and prevents it from absorbing too much sauce. This small addition creates a delicate, almost buttery coating that enhances the overall flavor profile. If you’re lactose intolerant, use a non‑dairy milk or simply omit the milk; the dish will still turn out deliciously, though the coating will be slightly less tender. This trick transforms an ordinary chicken parmesan bake into a show‑stopper.
The Final Flourish
Fresh herbs like basil and oregano, sprinkled on top before baking, add a bright, aromatic finish that lifts the entire dish. A drizzle of olive oil over the top before baking creates a glossy sheen and helps the cheese melt into a beautiful golden crust. If you’re craving a bit of heat, a pinch of red pepper flakes will give the dish a subtle kick. Finally, garnish with chopped parsley for a splash of color and a burst of freshness.
Everything's prepped? Good. Let's get into the real action…
The Method — Step by Step
- Heat the oven to 375°F (190°C). While the oven warms, lightly oil a large, oven‑proof skillet or baking dish. This step ensures the bottom doesn’t stick and adds a subtle, toasted flavor. The oil should coat the surface like a thin sheen; if it’s too thick, the dish will be greasy. This is the moment of truth—watch the oil shimmer before adding the chicken.
- In a shallow bowl, whisk together the flour, salt, pepper, and Italian seasoning. In a separate bowl, beat the eggs with the milk. In a third bowl, place the breadcrumbs. This tri‑step creates the classic breading station. The flour mixture keeps the coating dry, the egg mixture adds moisture, and the breadcrumbs give the crunch. If you’re in a hurry, you can combine the flour and breadcrumbs, but the separation keeps the texture optimal.
- Pat the chicken pieces dry with paper towels. Coat each piece first in the flour mixture, then dip into the egg mixture, and finally roll in the breadcrumbs. Shake off excess crumbs and set aside on a plate. This method ensures an even coating that won’t fall off during baking. A quick tip: press the breadcrumbs onto the chicken firmly; the coating will stay intact even with a generous amount of sauce.
- Sauté the minced garlic in the warmed oil for 30 seconds until fragrant. Add the chicken pieces and brown them on all sides, about 2–3 minutes per side. The garlic should release a nutty aroma without burning. Browning the chicken adds depth of flavor and a beautiful color contrast that will show through the final bake. If you’re using pre‑cooked chicken, skip this step and go straight to assembling.
- Stir in the marinara sauce, allowing it to coat the chicken evenly. Let the mixture simmer for 5 minutes to meld the flavors. The sauce should be thick and glossy, not watery. This step ensures that the sauce permeates the chicken and pasta, creating a cohesive bite. If the sauce is too thick, add a splash of chicken broth to loosen it.
- Add the cooked pasta to the skillet, folding it gently with the sauce and chicken. Toss until every strand is coated. The pasta should absorb the sauce but remain al dente—this balance prevents a mushy texture. If you’re using a separate pot for the pasta, drain it well to avoid excess water in the bake.
- Sprinkle the shredded mozzarella over the pasta mixture, then top with grated Parmesan. The mozzarella creates a gooey, melty layer, while the Parmesan forms a golden crust. For extra flavor, sprinkle dried basil and oregano on top before adding the cheeses. The cheese distribution should be even; uneven layering can cause some spots to burn.
- Cover the dish with foil and bake for 20 minutes. Then, remove the foil and bake for an additional 10–12 minutes, or until the cheese is bubbly and the top is golden brown. The foil prevents the top from burning while the interior cooks thoroughly. Watch for the first signs of bubbling; this indicates the cheese is melting beautifully.
- Let the bake rest for 5 minutes before serving. This allows the flavors to settle and the cheese to set slightly, making it easier to cut clean slices. While resting, the sauce will thicken a bit, creating a silky coating on each bite. The aroma at this point is irresistible—rich, cheesy, and comforting.
- Garnish with chopped parsley, drizzle a little olive oil, and serve hot. Pair with a crisp green salad or a side of garlic bread for a complete meal. The parsley adds a fresh, herbal brightness that cuts through the richness of the cheese. Remember to serve immediately; the dish’s texture changes quickly once it cools.
That's it — you did it. But hold on, I've got a few more tricks that'll take this to another level…
Insider Tricks for Flawless Results
The Temperature Rule Nobody Follows
Most people bake at 400°F, but that can cause the cheese to burn before the pasta cooks through. Baking at 375°F allows the interior to heat evenly while the top develops a perfect golden crust. If you prefer a crispier top, finish the bake under the broiler for 2 minutes, but keep a close eye to avoid burning. This subtle temperature tweak ensures every bite is just as delightful as the first.
Why Your Nose Knows Best
When the cheese starts to bubble, the aroma will change from cheesy to caramelized. This scent is a reliable indicator that the bake is ready to come out of the oven. Trust your nose; if it smells slightly browned, the dish is nearly done. A quick sniff can save you from over‑baking and ruining the texture.
The 5‑Minute Rest That Changes Everything
Letting the bake rest for five minutes after removing it from the oven allows the cheese to set, preventing it from sliding off the pasta when you cut. The rest period also lets the sauce thicken slightly, creating a silky coating that clings to each bite. Skip this step and you’ll end up with a messy, runny mess that’s hard to serve.
Keep the Crumbs Crisp
If you’re using pre‑cooked chicken, add the breadcrumbs directly to the sauce before baking. The breadcrumbs will still toast, but the chicken’s moisture will keep the coating from becoming soggy. This technique is perfect for busy weeknights when you need a quick, crowd‑pleasing meal.
Use Fresh Herbs for a Bright Finish
Fresh basil or oregano sprinkled on top just before serving adds a burst of color and freshness that cuts through the richness. The herbs’ oils release their flavor only when heated, creating a fragrant, aromatic finish. If you don’t have fresh herbs, a pinch of dried will suffice, but the flavor will be more muted.
Creative Twists and Variations
This recipe is a playground. Here are some of my favorite ways to switch things up:
Spinach & Feta Version
Swap the mozzarella for crumbled feta and fold in a handful of fresh spinach before baking. The feta adds a tangy bite, while the spinach provides a pop of color and nutrients. This variation is great for a lighter, Mediterranean‑inspired meal.
Buffalo Chicken Bake
Use buffalo sauce in place of marinara and sprinkle blue cheese crumbles on top before the final bake. The spicy heat of the buffalo sauce contrasts with the creamy blue cheese, creating a bold flavor profile that’s a hit with spice lovers.
Pesto & Ricotta Fusion
Replace the marinara with a spoonful of basil pesto and add dollops of ricotta between layers. The pesto brings a fresh, herby taste, while the ricotta adds a creamy, airy texture. This version feels like a luxurious Italian lasagna in a single dish.
Cheddar & Jalapeño Kick
Swap mozzarella for sharp cheddar and add diced jalapeños to the sauce for a spicy, melty experience. The cheddar’s sharpness complements the chicken, while the jalapeños provide a fiery finish that will keep guests coming back.
Vegan Take‑Away
Use plant‑based chicken, vegan mozzarella, and nutritional yeast instead of Parmesan. The nutritional yeast adds a cheesy flavor without dairy, and the vegan chicken provides protein. This variation is perfect for plant‑based diners who crave comfort food.
Storing and Bringing It Back to Life
Fridge Storage
Store leftovers in an airtight container in the refrigerator for up to 3 days. When reheating, cover the dish with foil to retain moisture and heat in a 350°F oven for 15 minutes. The cheese will soften, and the sauce will thicken slightly, creating a comforting, re‑baked experience.
Freezer Friendly
For longer storage, freeze the assembled dish (without the foil) in a freezer‑safe container for up to 2 months. Thaw overnight in the refrigerator, then bake at 375°F for 25 minutes, or until heated through. The texture remains crisp, and the flavors stay vibrant.
Best Reheating Method
Add a splash of water or chicken broth before reheating to create steam that keeps the pasta from drying out. This trick restores the sauce’s silky consistency and ensures every bite is as delightful as the first. Finish with a quick broil for a crisp top, if desired.