I still remember the day my stand mixer staged a rebellion right in the middle of a dinner-party countdown. I was racing to crank out a classic New York cheesecake—springform pan, water bath, the whole nine yards—when the paddle attachment clattered to the floor, taking half the crust with it. The mascarpone seized, the raspberry swirl turned into a crime-scene splatter, and I stood there wearing more cream cheese than had made it into the bowl. My guests were due in two hours, there was flour in my hair, and I was one burnt crust away from serving store-bought cookies and calling it a night.
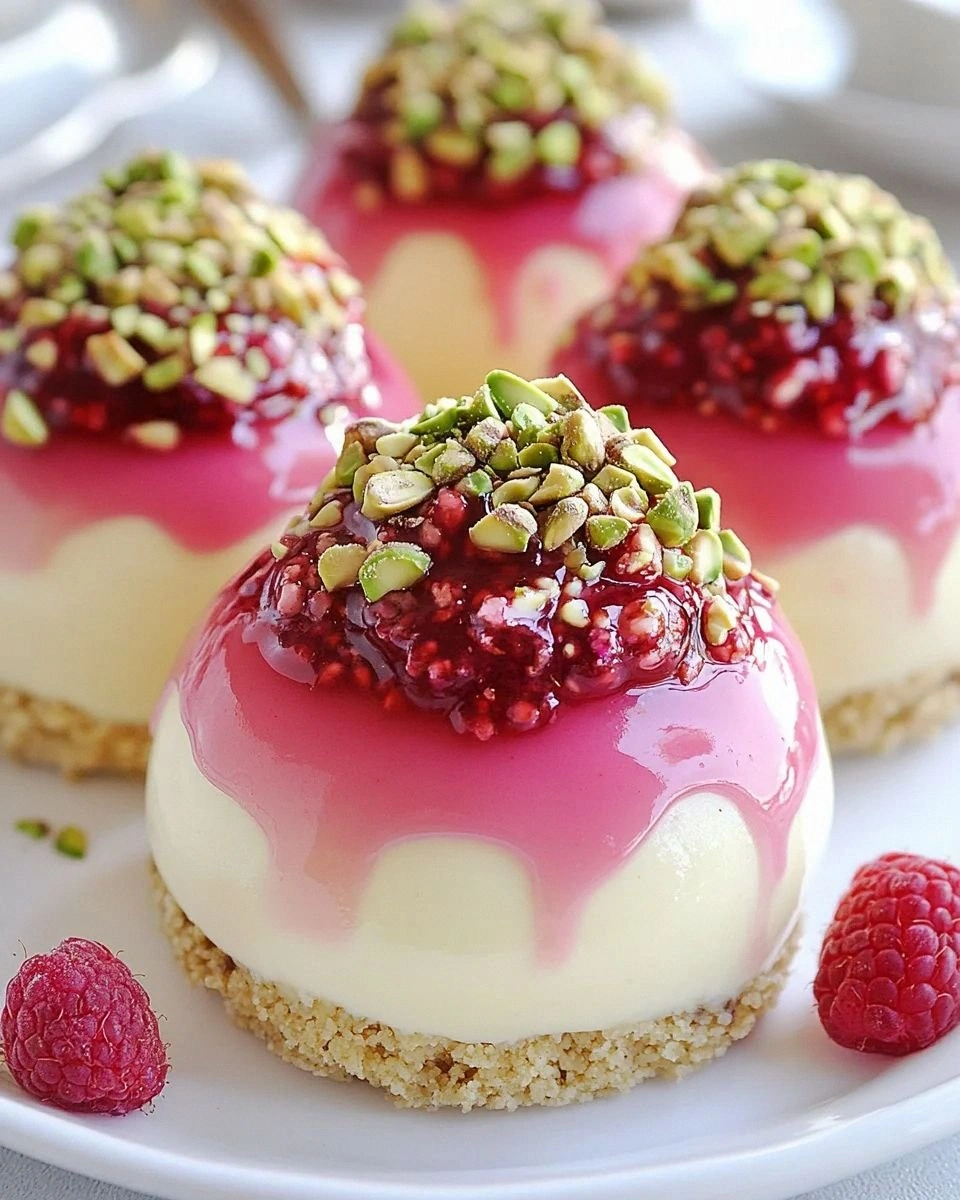
Then I spotted a half-empty bag of pistachios and a punnet of raspberries that had somehow survived my earlier rampage. A light bulb—no, a strobe light—went off in my head. What if I ditched the giant cheesecake format and built individual domes instead? No water bath, no cracks to worry about, and zero risk of serving a wedge that looked like it had been through a windstorm. Twenty minutes of mad-scientist tinkering later, the first silky dome slid out of its mould and onto my spoon. The flavour was electric: grassy pistachio, bright raspberry, and that tangy cheesecake vibe rolled into a single, jewel-like bite. I plated six of them, dotted the plate with leftover coulis, and watched my friends' eyes widen like they'd just discovered dessert could have plot twists.
Since that night of culinary chaos, this recipe has become my secret weapon. It looks like something you'd pay fourteen bucks for at a patisserie, yet it's easier than a boxed brownie mix once you know the choreography. The domes hold their shape like confident little soldiers, the colours stay Instagram-vivid for days, and—best part—you can freeze them ahead and still look like a rock star when you unmould at the table. If you've ever sweated over a cracked cheesecake or felt the sting of soggy crust, prepare to feel liberated.
Picture yourself pulling these domes from the fridge, the condensation beading like morning dew on a green apple. Your knife glides through the thin raspberry veil and hits that pale-pistachio core; the scent is half nutty, half berry perfume. One taste and you'll swear off traditional slices forever. Ready for the game-changer? Let me walk you through every single step—by the end, you'll wonder how you ever made it any other way.
What Makes This Version Stand Out
- Silky Mousse Texture: Instead of dense, brick-like cheesecake, we whip cream into the batter so each dome feels like velvet on your tongue. It collapses softly the moment you bite, no jaw workout required.
- Zero Cracks, Zero Stress: Because everything sets in hemisphere moulds, you bypass the springform pan lottery. No water baths, no parchment collars, no tears of frustration.
- Punch-Packed Pistachio: Most recipes barely whisper "nut." We blitz roasted pistachios into a buttery paste and fold them right into the cream cheese, so every bite tastes like someone distilled gelato into solid form.
- Colour Pop Raspberry Mirror: A glossy raspberry glaze not only seals in freshness but gives you that dramatic red sheen that makes people pull out their phones before their forks.
- Make-Ahead Magic: Assemble on Sunday, unmould on Friday. The domes actually improve as the flavours meld, and you look impossibly organised when guests arrive.
- Portion Control (or Not): Individual domes stop that awkward "just a sliver more" dance. You can plate exactly four, six, or twelve and still have leftovers for midnight fridge raids.
Alright, let's break down exactly what goes into this masterpiece...
Inside the Ingredient List
The Flavour Base
Pistachio paste is the soul of this dessert. You could buy the pricey imported stuff, but blitzing roasted, unsalted pistachios with a touch of honey and neutral oil in a high-speed blender gives you fresher flavour and that gorgeous natural green hue. The oil content keeps the mousse smooth, while the honey rounds out any grassy edges. Skip this and you're basically making vanilla cheesecake with a sprinkling of nuts—no thanks.
Raspberry purée needs to be bright and tangy to cut through all that dairy. Frozen berries work beautifully here; they're picked and processed at peak ripeness, so flavour is consistent year-round. Reduce the purée by about a third to intensify colour and pectin, which naturally thickens the glaze without extra gelatin. Trust me, the extra ten minutes on the stove saves you from a watery mirror that slides off the dome like a bad toupee.
The Texture Crew
Full-fat cream cheese is non-negotiable. Low-fat versions contain stabilisers that turn grainy when frozen and thawed. Leave it on the counter for a solid hour so it blends lump-free with the pistachio paste. Cold cream cheese fights back, and you'll end up over-mixing, which whips in too much air and collapses the mousse later.
Heavy cream at 35 % fat gives you that cloud-like lift. Chill the bowl and beaters in the freezer for ten minutes before whipping; cold equipment traps air faster, so you hit soft peaks in half the time. Stop as soon as the cream forms gentle peaks that curl like a lazy wave—over-whip and you'll get butter flecks that break the smooth texture.
The Unexpected Star
White chocolate isn't here for cloying sweetness; it provides structure. When melted and blended with warm cream, it forms a ganache that sets the mousse once chilled. Go for a bar with at least 30 % cocoa butter and skip the cheap chips loaded with palm oil. The subtle vanilla notes marry pistachio and raspberry without hijacking the flavour profile.
The Final Flourish
Powdered gelatin is the invisible scaffolding. Bloom it in cold water first—never hot—or you'll get grainy flecks that feel like sand between teeth. If you're vegetarian, agar powder works, but use only a third of the amount; it's a stronger gelling agent and can turn your domes into bouncy ping-pong balls if you get heavy-handed.
Everything's prepped? Good. Let's get into the real action...
The Method — Step by Step
- Roast and Blitz the Pistachios: Heat oven to 175 °C / 350 °F. Spread two cups of shelled pistachios on a sheet tray and roast for eight minutes, just until they smell like popcorn and the skins start to flake. Cool completely, then blitz in a food processor with two tablespoons of neutral oil and one tablespoon of honey. Scrape the sides every thirty seconds; you're after a glossy paste the colour of vintage jade. Set aside one cup for the mousse and freeze the rest for future batches—this stuff is gold on toast, in yogurt, or straight off the spoon at 2 a.m.
- Reduce the Raspberry Purée: Combine three cups of frozen raspberries with a third of a cup of sugar in a saucepan. Cook over medium heat until the berries collapse and the mixture looks like lava, about twelve minutes. Strain through a fine sieve to remove seeds, then return the liquid to the pan and simmer until reduced to one cup. The bubbles will become thick and syrupy; when you drag a spatula across the bottom, the trail should hold for three seconds. Cool to room temperature before using; warm purée will melt the white chocolate layer and wreak havoc on your glaze later.
- Make the White Chocolate Ganache Base: Chop 200 g of good white chocolate and park it in a heat-proof bowl. Warm 120 ml of heavy cream until it's steaming but not boiling—tiny bubbles around the edge are your cue. Pour over the chocolate, let it stand for one minute, then whisk from the centre outward until satin smooth. If you spot stubborn lumps, set the bowl over a pan of barely simmering water for thirty seconds and whisk again. Cool to lukewarm; you want it fluid enough to fold but not hot enough to scramble the cream cheese.
- Whip the Mousse Heart: In the bowl of a stand mixer, beat softened cream cheese with the reserved cup of pistachio paste until the mixture looks like green velvet ribbon. Add the cooled ganache in three additions, scraping down after each. The batter should be thick but spreadable—if it looks curdled, warm the bowl slightly with a kitchen torch while mixing; that gentle heat brings everything back together. Fold in one tablespoon of lemon zest; it amplifies both the pistachio and the upcoming raspberry layer.
- Stabilise and Chill: Bloom two teaspoons of powdered gelatin in three tablespoons of cold water for five minutes. Microwave for ten seconds until melted, then whisk into the mousse immediately. Work fast—gelatin sets as it cools and you don't want lumpy surprises. Spoon or pipe the mousse into silicone half-sphere moulds, smoothing the tops with an offset spatula. Freeze at least four hours, preferably overnight; frozen domes are a breeze to unmould and glaze.
- Build the Raspberry Mirror: Combine one cup of the reduced raspberry purée with two tablespoons of sugar and one teaspoon of lemon juice. Bloom one teaspoon of gelatin in one tablespoon of water, melt as before, and whisk into the purée. Cool to 28 °C / 82 °F—any hotter and it'll melt the dome surface; cooler and it'll set before you can swirl. Pour into a narrow cup for easy dipping.
- Glaze Like a Pro: Line a sheet tray with cling film and set a wire rack on top. Pop the frozen domes out of the moulds and skewer each one on a toothpick stuck into a sturdy potato or apple half. Dip straight down into the glaze, lift, and let excess drip for five seconds. Flip upright and park on the rack. The glaze sets in under a minute, leaving a candy-shine that reflects overhead lights like a soap bubble.
- Finish with Crunch: While the glaze is still tacky, press a few chopped pistachios around the base for a green halo. Transfer to serving plates and refrigerate for at least one hour to thaw to the perfect creamy consistency. Serve cold but not frozen-solid; the mousse should yield gently to a spoon, like ice cream on the edge of melting.
That's it—you did it. But hold on, I've got a few more tricks that'll take this to another level...
Insider Tricks for Flawless Results
The Temperature Rule Nobody Follows
Every element must be cold before assembly except the ganache, which should be just lukewarm. If the mousse warms up, it loosens and slumps; if the glaze is too hot, it melts the surface and creates orange-peel texture. Invest in an instant-read thermometer—it's the difference between amateur hour and patisserie perfection.
Why Your Nose Knows Best
When roasting pistachios, rely on aroma, not colour. They go from fragrant to burnt faster than you can say "why is the smoke alarm singing?" The moment you smell popcorn, yank them out; residual heat finishes the job. Over-roasted nuts turn bitter and muddy the dessert's bright finish.
The 5-Minute Rest That Changes Everything
After glazing, resist the urge to plate immediately. Let the domes sit on the rack for five minutes; this allows excess glaze to firm up so it won't smear when you move them. Wipe the base with a warm damp towel to remove drips and you'll get that clean, professional halo every pastry chef hides up their sleeve.
Creative Twists and Variations
This recipe is a playground. Here are some of my favourite ways to switch things up:
Mango-Passion Dome Dream
Swap raspberry purée for equal parts mango and passion fruit. The tropical tang plays beautifully with pistachio's earthiness, and the golden glaze looks like edible sunshine. Top with toasted coconut flakes for extra vacation vibes.
Midnight Chocolate Rebel
Replace white chocolate with 70 % dark, and fold in a shot of espresso for a mocha twist. The bitterness balances the sweet pistachio, making it an adult-only affair. Garnish with gold leaf if you're feeling fancy—or just drizzle more chocolate because we're all friends here.
Strawberry-Balsamic Spark
Use strawberry purée and add a teaspoon of aged balsamic to the reduction. The vinegar's tang amplifies berry flavour and adds a mysterious depth that makes people ask, "What's that incredible note?" before demanding the recipe.
Citrus Burst Trio
Divide the mousse base into three bowls and flavour with yuzu, blood orange, and lime zest. Layer each flavour in the mould for a tri-colour core that looks like a psychedelic gobstopper when sliced. Kids lose their minds over the rainbow effect.
Salted Caramel Hijack
Swirl cooled salted caramel into the mousse before freezing. The caramel ribbons stay soft, creating pockets of gooey surprise. Finish with toasted pecans instead of pistachios for a turtle-candy vibe.
Vegan Glamour Shot
Use coconut cream and vegan cream cheese, swap gelatin for agar, and coat with a shiny cacao-butter raspberry glaze. Even dairy devotees scarf these down and ask why they taste "so light and clean." Your secret is safe with me.
Storing and Bringing It Back to Life
Fridge Storage
Place domes in an airtight container with parchment between layers. They'll keep for four days—though good luck having them last that long. The glaze may dull slightly after day two; a quick puff from a hair-dryer on cool setting restores the shine like magic.
Freezer Friendly
Once fully set, wrap each dome in cling film and stash in a zip-top bag. They'll survive up to two months without flavour loss. Thaw overnight in the fridge or at room temp for thirty minutes before serving. Serve partially frozen for a semifreddo vibe on sweltering days.
Best Reheating Method
These domes are meant to be served cold, but if you over-chill and they freeze solid, give them a ten-minute rest on the counter. The ideal serving temperature is 4 °C / 39 °F—cold enough to hold shape, warm enough to melt on your tongue like ice cream kissed by summer.