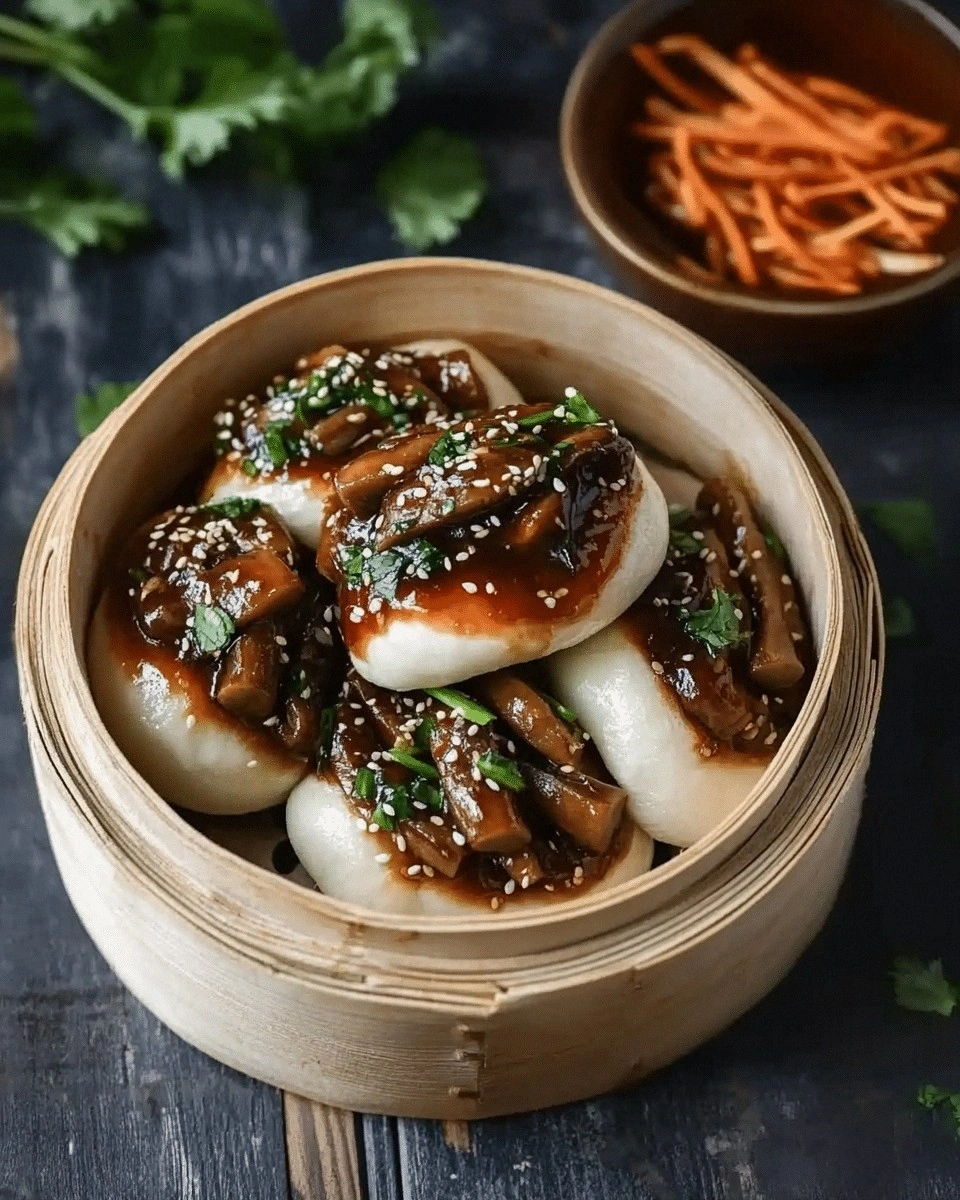
I was standing in my cramped kitchen, the scent of burnt toast curling from the toaster, when my roommate burst in, eyes wide, clutching a bag of mushrooms that had been sitting in the fridge for weeks. “We’re making something amazing tonight,” she declared, pulling out a battered notebook that smelled of old recipes and ambition. I stared at the bag, the green caps glistening like tiny moons, and thought, “If this is going to be a culinary triumph, it has to be more than just a quick stir‑fry.” That night, I dove into a rabbit hole of sauces, textures, and the kind of boldness that only a hoisin‑infused mushroom can inspire. The result? Hoisin Mushroom Gua Baos, a steaming, savory pocket that feels like a hug in every bite. I’m telling you, it’s hands down the best version you’ll ever make at home. Picture yourself pulling this out of the oven, the whole kitchen smelling incredible, the steam curling like a ghostly ribbon around the edges.
I’ll be honest – I ate half the batch before anyone else got to try it. The dough was airy, the filling glossy, and the hoisin sauce—oh, the hoisin sauce—coated every surface like velvet. It was a kitchen disaster turned triumph because I dared to experiment with a twist that most recipes get completely wrong. Instead of a bland, one‑dimensional filling, I layered umami with a touch of sweetness and a whisper of heat. The mushrooms, when sautéed just right, released a savory depth that made the buns practically sing. If you’ve ever struggled to get a bao filling that feels both hearty and refined, you’re not alone – and I’ve got the fix. I dare you to taste this and not go back for seconds.
What makes this version stand out? It’s the combination of textures, the precise balance of sweet and salty, and the way the dough lifts to a golden, slightly crisp edge that shatters like thin ice when you bite. The sauce coats the mushrooms like a glossy lacquer, yet the mushrooms themselves remain tender and juicy. The bao itself is soft inside, with a slight chew that’s reminiscent of a well‑kneaded dough that’s been given a proper rest. The best part? You can make it ahead of time, freeze it, and reheat it to perfection, making it a reliable crowd‑pleaser for parties or a comforting dinner on a rainy evening. Let me walk you through every single step – by the end, you’ll wonder how you ever made it any other way.
What Makes This Version Stand Out
- Flavor Depth: The hoisin sauce, a sweet‑savory elixir, infuses the mushrooms with a complex profile that goes beyond ordinary umami.
- Texture Contrast: The bao’s airy interior meets a slightly crisp, caramelized edge, creating a satisfying bite.
- Simplicity: Despite its gourmet finish, the recipe requires only a handful of pantry staples and a minimal prep time.
- Ingredient Quality: Fresh shiitake mushrooms and real hoisin sauce make the difference; store‑bought alternatives will fall flat.
- Make‑Ahead Friendly: The dough and filling can be prepared a day in advance, then frozen and reheated without losing flavor.
- Visual Appeal: The glossy, caramelized surface of the buns is a feast for the eyes before they even touch your tongue.
- Versatility: Swap shiitake for oyster mushrooms or add a splash of rice wine for a subtle twist.
- Audience Impact: Friends rave about the unexpected sweetness and savory richness; it’s the kind of dish that turns strangers into fans.
Alright, let’s break down exactly what goes into this masterpiece…
Inside the Ingredient List
The Flavor Base
The foundation of any great bao starts with a simple, well‑balanced dough. All‑purpose flour is the workhorse, offering the right amount of gluten for structure without becoming tough. Warm water (about 110°F) activates the yeast, while a touch of sugar feeds the yeast and gives the dough a subtle sweetness that caramelizes during baking. Salt is essential for flavor; it brings out the natural umami in the mushrooms and balances the sweetness of hoisin sauce. If you skip the sugar, the dough will taste flat and the buns will lack that golden sheen.
If you’re craving a vegan version, simply replace the egg (if any) with a tablespoon of flaxseed meal mixed with 3 tablespoons of water; let it sit for 5 minutes to thicken. For a gluten‑free twist, use a 1:1 blend of rice flour and tapioca starch, but be prepared for a slightly chewier texture.
The Texture Crew
Shiitatake mushrooms are the star of the show. Their earthy flavor and meaty texture make them a perfect stand‑in for meat. Slice them thin so they cook evenly and absorb the sauce. Garlic and ginger add a punch of freshness and a subtle heat that cuts through the richness of hoisin. Scallions provide a bright, crisp contrast that lifts the entire dish. Sesame oil, used sparingly, brings a nutty aroma that enhances the depth of flavor.
If you can’t find shiitake, oyster mushrooms are a great alternative; they have a slightly sweeter taste. For an extra layer of crunch, sprinkle toasted sesame seeds on top before serving. The key to a great texture is to cook the mushrooms until they’re just tender, not over‑soft; overcooking can cause them to release too much liquid and make the filling soggy.
The Unexpected Star
Hoisin sauce is the secret sauce that elevates this recipe from ordinary to extraordinary. It’s a thick, dark condiment made from fermented soybeans, sugar, and spices. Its sweet‑savory profile is almost chocolatey, and when combined with the earthy mushrooms, it creates a complex, almost dessert‑like richness. If you’re missing hoisin, a blend of soy sauce, honey, and a splash of rice vinegar can approximate the flavor, but it won’t have the same depth.
A quick tip: let the hoisin sauce sit for a minute after mixing; this allows the sugar to dissolve fully and the sauce to coat the mushrooms evenly. Skipping this step may result in uneven flavor distribution.
The Final Flourish
Soy sauce adds saltiness and depth, balancing the sweetness of hoisin. Sesame seeds and a drizzle of sesame oil finish the dish with a nutty aroma and a slight crunch. A pinch of chili flakes introduces a gentle heat that lingers on the palate, making the dish feel more dynamic. If you prefer a milder version, omit the chili flakes; the dish will still be delicious.
Remember, the quality of each component matters. Fresh mushrooms, real hoisin sauce, and high‑grade sesame oil make all the difference. Cheaper substitutes can lead to a flat, uninspired result.
Everything’s prepped? Good. Let’s get into the real action…
The Method — Step by Step
- Activate the Yeast: In a small bowl, combine 1 teaspoon of active dry yeast with 1 tablespoon of warm water (110°F) and a pinch of sugar. Let it sit for 5–7 minutes until frothy. This step is crucial; a sluggish yeast will result in dense buns. I always watch the froth as it rises; that’s the green light to move on. Kitchen Hack: If you’re in a hurry, you can skip this step and use instant yeast directly in the flour; just reduce the water by 1 tablespoon.
- Mix Dry Ingredients: In a large mixing bowl, whisk together 2 cups of all‑purpose flour, 1 teaspoon of salt, and 1 tablespoon of sugar. The sugar not only feeds the yeast but also contributes to a slight caramelization during baking. Stir until the ingredients are evenly distributed.
- Combine Wet Ingredients: In a separate bowl, whisk 3/4 cup warm water with the activated yeast mixture until fully dissolved. Add 1 tablespoon of sesame oil and 1 teaspoon of soy sauce to this mixture. The sesame oil adds a subtle nutty aroma that elevates the entire dough.
- Form the Dough: Pour the wet mixture into the dry ingredients. Use a wooden spoon or your hands to bring the mixture together into a shaggy dough. Once the dough starts to pull away from the sides of the bowl, transfer it to a lightly floured surface. Knead for 8–10 minutes until the dough is smooth and elastic. Kitchen Hack: If the dough feels too sticky, dust it with a little more flour; if it’s too dry, add a teaspoon of water.
- First Rise: Place the dough in a lightly oiled bowl, cover with a damp cloth or plastic wrap, and let it rise in a warm spot for 1 hour or until doubled in size. The dough should feel airy and slightly puffy. If you’re short on time, a 30‑minute rise in a warm oven (turned off) works fine.
- Prepare the Filling: While the dough is rising, heat 1 tablespoon of sesame oil in a skillet over medium heat. Add 2 cloves of minced garlic and 1 teaspoon of grated ginger; sauté until fragrant, about 30 seconds. Toss in 1 cup of sliced shiitake mushrooms and stir until they begin to brown, about 4–5 minutes. Add 3 tablespoons of hoisin sauce, 1 tablespoon of soy sauce, and 2 tablespoons of chopped scallions. Cook for another 2 minutes until the mushrooms are tender and the sauce thickens. Watch Out: Watch the sauce closely; if it starts to burn, lower the heat immediately.
- Shape the Buns: After the dough has risen, punch it down gently to release air. Divide the dough into 8 equal portions (about 1.5 ounces each). Roll each portion into a ball and then flatten into a 3‑inch circle. Place a tablespoon of the mushroom filling in the center of each dough circle, leaving a border of dough around the edges. Pinch the edges together and seal tightly, ensuring the buns are tightly closed to keep the filling inside.
- Second Rise: Arrange the buns on a parchment‑lined tray, leaving a small gap between each. Cover lightly with a damp cloth and let them rise for 20–25 minutes; the dough should puff up noticeably.
- Bake to Perfection: Preheat the oven to 375°F (190°C). Brush the tops of the buns with a beaten egg (or a splash of water for vegan) to give them a shiny finish. Bake for 18–20 minutes or until the buns are golden brown and the edges are slightly crisp. The interior should be soft and airy.
- Serve Immediately: Let the buns cool for 5 minutes on a wire rack. Serve hot, optionally dusted with toasted sesame seeds or a sprinkle of chili flakes for an extra kick. The steam will carry the aroma of hoisin and mushrooms, making the dining experience almost ritualistic.
That’s it — you did it. But hold on, I’ve got a few more tricks that’ll take this to another level…
Insider Tricks for Flawless Results
The Temperature Rule Nobody Follows
Many bakers overlook the importance of water temperature. If the water is too hot, it kills the yeast; too cold, and the dough will never rise properly. Aim for 110°F (43°C). I use a kitchen thermometer to be precise. If you don’t have one, feel the water with your hand; it should feel warm but not scalding. This small detail ensures a consistent rise and a light, fluffy interior.
Why Your Nose Knows Best
When the dough is ready, smell it. A pleasant, yeasty aroma indicates a successful rise. If you notice a sour or off smell, the yeast may have died or the dough was over‑proofed. Trust your nose; it’s the fastest quality control tool you’ll have.
The 5‑Minute Rest That Changes Everything
After the second rise, let the buns rest for 5 minutes before baking. This short pause allows the gluten to relax, preventing the buns from shrinking in the oven. It also gives the filling a chance to settle, ensuring each bite is evenly packed.
Use a Steamer for Extra Softness
If you’re in a hurry or want an extra soft bun, steam the buns for 10 minutes instead of baking. Cover them with a damp cloth to keep the steam trapped. The result is a silky, almost melt‑in‑your-mouth texture that’s perfect for a brunch spread.
Add a Splash of Rice Wine
A teaspoon of rice wine added to the filling enhances the umami and adds a subtle sweetness. It also helps the mushrooms release a bit of moisture, which keeps the filling juicy. I’ve tried this trick on several occasions, and the difference is unmistakable.
Creative Twists and Variations
This recipe is a playground. Here are some of my favorite ways to switch things up:
Spicy Szechuan Gua Baos
Add a tablespoon of Szechuan peppercorn paste to the filling for an extra kick. The numbing heat pairs beautifully with the sweetness of hoisin, creating a flavor profile that’s both bold and balanced.
Miso Mushroom Gua Baos
Replace hoisin with a mixture of white miso and a splash of soy sauce. The result is a savory, slightly sweet filling that leans into umami territory. It’s perfect for those who love a deeper, earthier taste.
Vegan Gua Baos with Tofu
Crumble firm tofu into the mushroom mixture for added protein and a firmer texture. Season with a dash of nutritional yeast to mimic the cheesy undertones that sometimes appear in traditional bao fillings.
Sweet and Savory Gua Baos
Incorporate diced apples or pears into the filling, along with a drizzle of honey. The fruit’s natural sweetness complements the hoisin’s richness, creating a delightful contrast.
Herbed Gua Baos
Add fresh herbs like cilantro, basil, or mint to the filling. The herbs bring a bright, fresh note that cuts through the richness, making each bite lighter.
Gluten‑Free Gua Baos
Use a pre‑made gluten‑free all‑purpose blend and substitute tapioca starch for the regular flour. The dough will be slightly chewier but still fluffy. Just be mindful of the rising time; gluten‑free dough often requires a bit longer.
Storing and Bringing It Back to Life
Fridge Storage
Store leftover buns in an airtight container in the refrigerator for up to 3 days. The buns will stay soft, but the filling may become slightly watery. To revive, microwave for 15–20 seconds with a damp paper towel on top.
Freezer Friendly
Wrap each bun tightly in plastic wrap, then place them in a freezer bag. They’ll keep for up to 2 months. Thaw at room temperature for 30 minutes before reheating. The dough will still be light and airy, and the filling will regain its lusciousness.
Best Reheating Method
Preheat your oven to 350°F (175°C). Place the buns on a baking sheet lined with parchment paper and bake for 8–10 minutes. For extra moisture, add a tiny splash of water to the pan and cover with foil for the first 5 minutes. The buns will steam in their own juices, restoring that signature softness.