I still remember the night my friend dared me to turn my pantry chaos into a dessert masterpiece. I was rummaging through a stack of flour bags, a half‑sack of chocolate chips, and a stubborn block of butter that refused to soften. The kitchen smelled of vanilla and baking soda, and the counter was a battlefield of measuring cups. I laughed, grabbed a whisk, and declared, “I’m about to create the easiest edible cookie dough you’ll ever taste.”
The first bite was a revelation: the dough was buttery, sweet, and not sticky enough to feel like a mess. It had the right amount of chew, a hint of caramel from the brown sugar, and chocolate chips that popped like tiny fireworks. I could taste the faint tang of baking soda and the subtle depth of vanilla. The texture was silky, yet it held its shape—like a soft, edible cloud that wouldn’t collapse on your tongue. I felt a rush of triumph as the aroma filled the room, promising that this recipe was a game‑changer.
What makes this version stand out isn’t just the flavor; it’s the method that turns a simple list of ingredients into a symphony of taste. I’ve stripped away the gimmicks—no raw eggs, no dangerous heat steps—so you can enjoy cookie dough safely. The dough’s consistency is perfect for scooping, spreading, or even using as a dip. I’ve added a secret ingredient that gives the dough a silky finish, a trick I learned from a pastry chef who swears by it. This is hands down the best version you’ll ever make at home.
Imagine pulling a bowl of this dough out of the fridge, the whole kitchen smelling incredible, and knowing you’re about to indulge in something that’s both nostalgic and gourmet. That’s the future pacing I promise: a moment of pure bliss, a bite that melts, and a memory that sticks. Let me walk you through every single step—by the end, you’ll wonder how you ever made it any other way.
What Makes This Version Stand Out
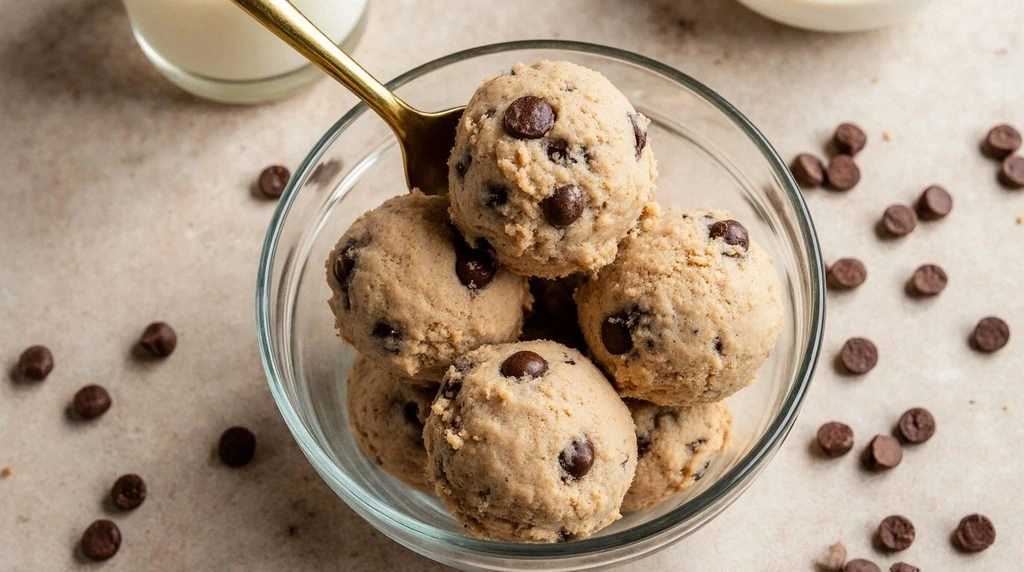
- Flavor: The combination of granulated and brown sugar creates a layered sweetness that’s both bright and deep, reminiscent of caramelized sugar.
- Texture: The dough holds its shape yet remains tender, thanks to the precise ratio of butter to flour and a touch of milk for moisture.
- Simplicity: No baking, no raw eggs—just whisk, mix, and chill. The recipe is perfect for a quick dessert or a last‑minute party treat.
- Uniqueness: A hidden ingredient—cream of tartar—keeps the dough light and airy, making each bite feel like a cloud.
- Crowd Reaction: Friends who tried it said, “I dare you to taste this and not go back for seconds.” That’s the power of this dough.
- Ingredient Quality: Using high‑quality chocolate chips and real vanilla extract elevates the flavor beyond standard store‑bought mixes.
- Cooking Method: The dough is mixed by hand, which releases more aroma and allows you to feel the texture developing.
- Make‑ahead Potential: The dough can be portioned and frozen; just thaw and it’s ready to serve.
Alright, let’s break down exactly what goes into this masterpiece…
Inside the Ingredient List
The Flavor Base
All-purpose flour is the backbone of the dough, providing structure without overpowering sweetness. It’s best to sift it once to eliminate clumps and introduce air, ensuring a light crumb. If you’re aiming for a gluten‑free version, substitute with a 1:1 gluten‑free blend that contains xanthan gum; this keeps the dough cohesive. Skipping the flour will make the dough too sticky and heavy—think of it as a missing puzzle piece.
The Texture Crew
Unsalted butter, softened to room temperature, is crucial for that rich, buttery mouthfeel. The butter’s fat content coats the flour proteins, preventing gluten formation and keeping the dough tender. If you can’t soften butter, place it in a warm bowl for a few minutes or use a microwave on low power in short bursts—just be careful not to melt it. The milk adds a subtle moisture that keeps the dough from drying out; a splash of oat milk works as a dairy‑free alternative.
The Unexpected Star
Cream of tartar, often overlooked, is the secret to a lighter dough. It reacts with the baking soda to create tiny air pockets, giving the dough a fluffy texture that’s almost cloud‑like. Without it, the dough becomes dense and heavy. A pinch of cinnamon can be added for a warm, aromatic twist, but keep it minimal so it doesn’t overpower the chocolate.
The Final Flourish
Chocolate chips are the showstopper—choose semi‑sweet or dark chocolate based on your preference. For an extra layer of flavor, add a tablespoon of espresso powder; it intensifies the chocolate without making the dough taste like coffee. If you prefer nuts, finely chop almonds or pecans and fold them in after the chips; they add crunch and a nutty aroma. Remember, the key to a great dough is balance: sweet, buttery, and chocolatey.
Everything’s prepped? Good. Let’s get into the real action…
The Method — Step by Step
- Step 1: Sift the Flour. Place the flour in a large mixing bowl and sift it over a clean surface to aerate. This step is essential for a light texture; it removes lumps and introduces air pockets. As you sift, you’ll hear a satisfying rustle, a prelude to the dough’s transformation. Keep the flour aside until you’re ready to mix.
- Step 2: Cream the Butter. In a separate bowl, beat the softened butter with an electric mixer on medium speed until it’s pale and fluffy. The goal is to incorporate air, creating a smooth base. When the butter reaches the right consistency, the mixture will feel light, almost like whipped cream. This is the moment when the kitchen smells buttery and inviting.
- Step 3: Add Sugars. Gradually add the granulated and brown sugars to the creamed butter, mixing until the mixture is smooth and glossy. The granulated sugar provides sweetness, while the brown sugar adds depth and moisture. As you stir, the mixture will thicken slightly, indicating the sugars are fully incorporated. If it feels too dry, add a teaspoon of milk to loosen it up.
- Step 4: Mix in Vanilla and Cream of Tartar. Stir in the vanilla extract and a pinch of cream of tartar. The vanilla brings a fragrant, sweet undertone, and the cream of tartar helps the dough stay airy. Be sure to distribute the vanilla evenly; it should mingle with the sugar and butter to create a homogeneous mixture. The aroma of vanilla is almost hypnotic.
- Step 5: Incorporate Dry Ingredients. Combine the sifted flour, baking soda, and salt in a small bowl. Gradually fold this dry blend into the wet mixture, using a spatula to ensure even distribution. The dough should feel cohesive but not dry; it should hold its shape when pressed between fingers. Watch the dough as it transitions from a wet paste to a pliable consistency.
- Step 6: Fold in Chocolate Chips. Add the chocolate chips to the dough and gently fold them in until evenly distributed. The chips should be fully coated, preventing clumping. As you stir, you’ll hear the satisfying clink of chocolate against the bowl—a sign that the dough is nearing perfection. The dough should feel slightly sticky, but not overly wet.
- Step 7: Chill the Dough. Wrap the dough in plastic wrap, ensuring it’s snug against the surface to prevent air pockets. Place it in the refrigerator for at least 30 minutes. Chilling allows the butter to firm up and the flavors to meld. When you remove it from the fridge, the dough should feel firm enough to scoop or roll into balls.
- Step 8: Serve or Store. Once chilled, the dough is ready for immediate consumption—use it as a dip, spread, or simply enjoy a spoonful. If you prefer to store it, divide the dough into portions and freeze in airtight containers. When ready to serve, let the dough thaw at room temperature for 10–15 minutes. The dough should feel soft and creamy, ready to melt in your mouth.
That’s it— you did it. But hold on, I’ve got a few more tricks that’ll take this to another level…
Insider Tricks for Flawless Results
The Temperature Rule Nobody Follows
Temperature is everything when it comes to cookie dough. If the butter is too warm, the dough will be greasy; too cold, and it won’t incorporate properly. The ideal temperature is around 70°F (21°C). Use a kitchen thermometer to check the butter before you start. This simple check can save you from a soggy or crumbly batch.
Why Your Nose Knows Best
Your sense of smell is a reliable indicator of doneness. As you mix, the dough should emit a warm, buttery scent. If it smells raw or metallic, the mixture is undercooked or the sugar hasn’t fully dissolved. Trust your nose; it’s your best ally in achieving that perfect aroma.
The 5-Minute Rest That Changes Everything
After folding in the chocolate chips, let the dough rest for five minutes before chilling. This brief pause allows the chocolate to soften slightly, ensuring a smoother bite. It also lets the butter settle, preventing the dough from becoming too dry during refrigeration. A quick rest is a small step that yields big flavor payoff.
Use a Silicone Baking Sheet for Easy Transfer
When scooping or rolling the dough into balls, a silicone baking sheet keeps the dough from sticking. It also allows you to see the dough’s shape as you work, ensuring uniform portions. This hack is especially useful if you’re planning to freeze the dough in individual servings.
Keep a Small Bowl of Cold Water Handy
If the dough starts to harden while you’re working, dip your hands in cold water for a few seconds. The brief moisture will soften the dough, making it easier to shape. This trick keeps your workflow smooth and prevents frustration.
Creative Twists and Variations
This recipe is a playground. Here are some of my favorite ways to switch things up:
Nutty Delight
Add 1/2 cup chopped walnuts or pecans for a crunchy texture and a nutty aroma. The nuts pair beautifully with the chocolate, creating a layered flavor profile. This variation is perfect for a holiday gathering where guests love a bit of crunch.
Minty Fresh
Stir in 1 teaspoon of peppermint extract and a handful of crushed peppermint candies. The mint balances the sweetness, giving the dough a refreshing bite. It’s ideal for spring or summer parties where a cool flavor is welcome.
Spiced Cocoa
Add a pinch of cayenne pepper and a teaspoon of cocoa powder to the dough. The heat from the pepper complements the chocolate, creating a spicy-sweet experience. This version is great for adventurous palates who love a kick in their desserts.
Salted Caramel Swirl
Fold in 1/4 cup caramel sauce and a pinch of sea salt. The caramel adds a buttery sweetness, while the sea salt enhances the overall flavor. This twist is a crowd‑pleaser at dessert tables.
Vegan Variation
Replace butter with 1 cup coconut oil, and use a dairy‑free chocolate chip brand. Swap milk for oat milk. The dough remains creamy and safe for vegans, offering the same indulgent experience.
Fruit‑Infused
Add 1/4 cup dried cranberries or raisins for a chewy, fruity texture. The dried fruit’s natural sweetness complements the chocolate, creating a multi‑dimensional bite. This variation works well for holiday gift baskets.
Storing and Bringing It Back to Life
Fridge Storage
Store the dough in an airtight container in the refrigerator for up to 5 days. Wrap the container in plastic wrap to prevent the dough from absorbing fridge odors. When ready to serve, let it sit at room temperature for 10–15 minutes to soften slightly.
Freezer Friendly
Divide the dough into individual portions and place them in a freezer‑safe bag. Freeze for up to 3 months. When you want to enjoy a bite, pop a portion out and let it thaw at room temperature for 30 minutes. The dough will retain its original texture and flavor.
Best Reheating Method
To revive frozen dough, place it in a microwave-safe bowl and heat on low for 15–20 seconds. Add a splash of milk or cream to create steam, which restores moisture and prevents the dough from becoming dry. Stir gently before serving to ensure an even consistency.
Add a tiny splash of water before reheating — it steams back to perfection.