I was halfway through a weeknight dinner when the oven alarm went off, and my entire kitchen smelled like burnt toast and regret. I stared at the salmon on the tray, realizing I’d over‑baked it to a dry, leathery texture that could only be described as a culinary crime. That night, I vowed to reinvent that salmon into something that would make my taste buds do a happy dance. I’m not going to lie—my friends begged me to show them how to salvage that disaster, so I pulled out my notebook, grabbed my trusty baking sheet, and got to work. The result? A dish that feels like a sushi roll, a casserole, and a midnight snack all rolled into one.
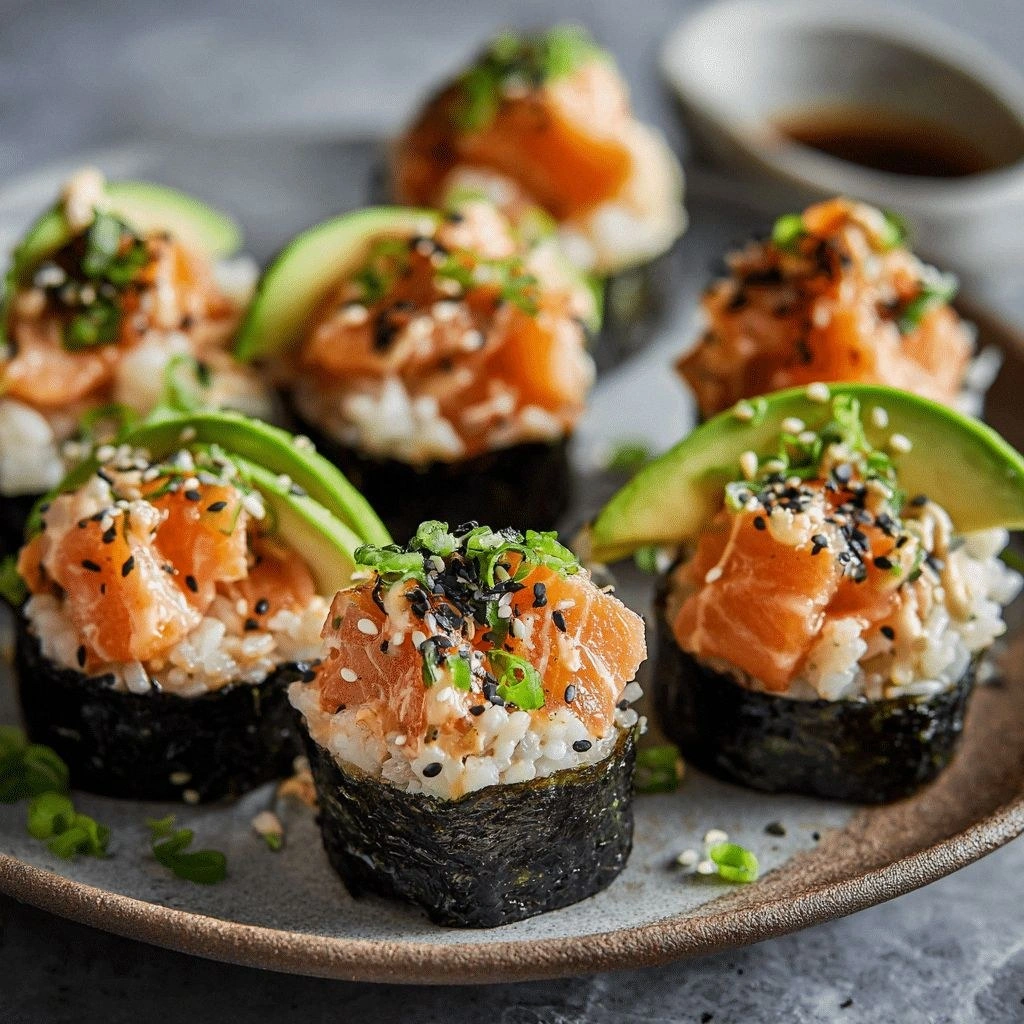
Picture this: the oven hums, the timer ticks, and a golden crust forms on the salmon, crackling like a tiny, edible firework. The air fills with a sweet, buttery aroma that makes your mouth water before you even see the first bite. When you lift a cup, the rice inside is perfectly crisp at the edges yet soft and slightly sticky at the center, offering a delightful contrast that sings against the rich, flaky salmon. The first bite delivers a burst of umami, followed by a subtle citrus tang from the rice vinegar, and the final whisper of toasted sesame seeds that leave a nutty aftertaste lingering on your tongue. It’s a sensory symphony that feels like a vacation in your kitchen.
What sets this version apart from the countless “salmon sushi” recipes that flood the internet is the way I’ve blended baking, sushi technique, and a dash of bold flavor. I’ve taken the classic sushi rice base, tempered it with a sweet‑sour glaze, and baked the salmon until it’s caramelized but still moist. I then assemble everything into a cup format that’s easy to eat, perfect for parties, and surprisingly low in carbs. The result is a dish that feels indulgent but stays surprisingly balanced, and it’s so simple that even a novice can pull it off with minimal fuss. Trust me—once you taste this, you’ll be tempted to hide it from everyone else.
Now, I’m about to walk you through every single step, from pre‑picking the salmon to the final garnish. By the end, you’ll wonder how you ever made it any other way. I dare you to taste this and not go back for seconds. And if you’ve ever struggled to assemble sushi at home, you’re not alone—this is the fix you’ve been waiting for. Let’s dive in.
What Makes This Version Stand Out
- Texture: The salmon is baked to a caramelized perfection, while the rice stays crisp on the edges and tender inside, creating a mouth‑watering contrast that feels like a well‑balanced symphony.
- Flavor: A sweet‑sour glaze infused into the rice, a subtle hint of ginger, and a dash of wasabi mayo give this dish depth without overwhelming the delicate fish.
- Simplicity: No need for a sushi mat or rolling skills—just bake, assemble, and serve. The process is straightforward, making it a stress‑free option for busy nights.
- Visual Appeal: The golden salmon atop a glossy rice base, topped with bright cucumber and avocado, creates a dish that looks as good as it tastes.
- Make‑Ahead Friendly: You can assemble the cups ahead of time and reheat them in the oven, preserving the crispness of the rice and the buttery finish of the salmon.
- Party‑Ready: These bite‑sized cups are perfect for finger food, making them ideal for potlucks, dinner parties, or a quick snack that impresses.
- Nutrition: Packed with omega‑3 fatty acids from salmon, complex carbs from sushi rice, and healthy fats from avocado and sesame oil, it’s a balanced meal that satisfies.
Alright, let’s break down exactly what goes into this masterpiece…
Inside the Ingredient List
The Flavor Base
Sushi rice is the backbone of this dish, providing a chewy yet slightly sticky foundation that holds everything together. The rice is seasoned with a mixture of rice vinegar, sugar, and a pinch of salt, creating a sweet‑sour balance that complements the salmon’s richness. If you skip the vinegar, the rice will taste flat and the dish will lose its signature tang. A good rule of thumb is to use about 1/4 cup vinegar per 2 cups of uncooked rice. For an extra layer of umami, toss in a splash of soy sauce after cooking.
The Texture Crew
Salmon is the star here, but its texture is what makes this dish unforgettable. I recommend using wild‑caught salmon fillets for the best flavor and sustainability. The fillets should be skin‑removed and cut into bite‑size pieces before baking. A small amount of sesame oil brushed over the salmon before baking adds a subtle nutty aroma and helps keep the flesh moist. If you’re short on time, pre‑season the salmon with salt, pepper, and a drizzle of olive oil for a quick flavor boost.
The Unexpected Star
Wasabi mayo is a game‑changer, providing a creamy, spicy kick that balances the mildness of the salmon and the sweetness of the rice. It’s made by blending mayonnaise with a small amount of wasabi paste and a squeeze of lime juice. If you’re not a fan of wasabi’s heat, you can substitute with a mild sriracha mayo for a milder kick. The mayo also helps keep the cup moist, preventing the rice from drying out during baking. A touch of fresh dill or cilantro can add an herbal brightness that lifts the dish.
The Final Flourish
Cucumber and avocado are the crisp, fresh elements that provide contrast and a burst of color. Dice the cucumber into small cubes so it blends seamlessly with the rice, while sliced avocado adds a buttery smoothness that balances the dish’s textures. Sprinkle toasted sesame seeds on top for a nutty crunch that echoes the sesame oil in the salmon. Finally, a drizzle of soy sauce or a splash of pickled ginger adds a finishing touch of savory depth.
Everything's prepped? Good. Let's get into the real action...
The Method — Step by Step
- Preheat and Prep: Set your oven to 375°F (190°C) and line a baking sheet with parchment paper or a silicone mat. While the oven warms, rinse the sushi rice under cold water until the water runs clear, then drain well. This removes excess starch and ensures the rice stays fluffy.
- Cook the Rice: In a medium saucepan, combine the rinsed rice with 2 cups of water and a pinch of salt. Bring to a boil, then reduce heat to low, cover, and simmer for 18 minutes. After the water is absorbed, let the rice steam for an additional 10 minutes off the heat, then fluff with a fork.
- Season the Rice: In a small bowl, whisk together 1/4 cup rice vinegar, 2 tbsp sugar, and 1 tsp salt until dissolved. Gently fold this mixture into the warm rice, using a wooden spoon to preserve the grains’ structure. Allow the rice to cool to room temperature; it should feel slightly tacky.
- Prepare the Salmon: Pat the salmon fillets dry, then brush each piece with 1 tbsp sesame oil and season with salt and pepper. Place the salmon on the prepared baking sheet and bake for 12–15 minutes, or until it flakes easily with a fork and has a caramelized crust.
- Make the Wasabi Mayo: In a bowl, combine 1/2 cup mayonnaise, 1 tsp wasabi paste, and a squeeze of lime juice. Mix until smooth. If the mixture is too thick, thin it with a splash of soy sauce or water until it reaches a drizzle consistency.
- Assemble the Cups: Cut a sheet of nori into 4 equal squares and place each square on a small, heat‑proof cup or ramekin. Spoon a generous amount of seasoned rice onto each nori square, leaving a small border. Gently press the rice to compact it, creating a sturdy base for the salmon.
- Add Salmon and Toppings: Break the baked salmon into bite‑sized pieces and distribute them evenly over the rice. Scatter diced cucumber, avocado slices, and a sprinkle of toasted sesame seeds. Finish with a drizzle of wasabi mayo over the top.
- Final Bake (Optional): For a caramelized finish, return the assembled cups to the oven for an additional 5 minutes. This step ensures the edges of the rice crisp up slightly and the mayo sets into a silky glaze.
- Serve Immediately: Let the cups cool for a minute or two before serving. Pair with a chilled glass of sake or a light cucumber salad for a complete Japanese-inspired meal.
That’s it — you did it. But hold on, I’ve got a few more tricks that will take this to another level. These small adjustments can elevate the dish from good to unforgettable.
Insider Tricks for Flawless Results
The Temperature Rule Nobody Follows
Many cooks bake salmon at 400°F, but I’ve found that 375°F gives a more even, moist finish. Lower heat allows the salmon to cook through without the surface becoming overly browned or burnt. The result is a tender, buttery interior with a caramelized crust that’s easy to flake.
Why Your Nose Knows Best
Before you lift the first cup, let the aroma guide you. The sweet scent of caramelized salmon, the sharp tang of rice vinegar, and the subtle fragrance of sesame oil all signal that the dish is ready. If the smell feels too “oven-y,” give it a few more minutes.
The 5‑Minute Rest That Changes Everything
After baking, let the cups rest on a wire rack for 5 minutes. This brief pause allows the steam to redistribute, preventing the rice from becoming soggy and the salmon from drying out. It also gives the wasabi mayo a chance to set into a silky glaze.
Freshness is Key
Use the freshest salmon you can find; the quality of fish dramatically impacts flavor. If you’re buying pre‑cooked salmon, look for a firm texture and a clean, mild scent. A slight pink hue indicates freshness, while a grayish tint signals age.
Avoid Over‑Filling
It’s tempting to pack as many toppings as possible, but over‑filling can cause the cups to collapse. Aim for a balanced ratio of rice, salmon, and toppings, allowing each component to shine without overwhelming the others. A well‑balanced cup is easier to eat and looks more appetizing.
Creative Twists and Variations
This recipe is a playground. Here are some of my favorite ways to switch things up:
Spicy Korean BBQ Cups
Swap the wasabi mayo for a Korean BBQ sauce made with gochujang, soy sauce, and sesame oil. Top with a sprinkle of Korean chili flakes and a few drops of sesame oil for an extra kick. The smoky, sweet, and spicy flavors create a bold, addictive bite.
Mediterranean Twist
Replace the salmon with grilled shrimp and toss the rice with a squeeze of lemon, chopped parsley, and a drizzle of olive oil. Add a sprinkle of feta cheese on top. The bright citrus and salty feta give this version a Mediterranean flair.
Vegetarian Delight
Use marinated tofu or tempeh instead of salmon. Coat the protein with a mixture of soy sauce, mirin, and a touch of maple syrup, then bake until caramelized. The tofu will mimic the texture of salmon while keeping the dish plant‑based.
Truffle‑Infused Cups
Add a drizzle of truffle oil to the rice before baking, and sprinkle truffle salt on top of the finished cups. The earthy aroma and rich flavor elevate the dish to a gourmet level, perfect for special occasions.
Tropical Paradise
Replace avocado with diced mango and add a splash of coconut milk to the rice for a creamy, tropical base. Finish with a sprinkle of toasted coconut flakes and a drizzle of lime‑y soy sauce. This version feels like a beach vacation in every bite.
Herb‑Infused Salmon
Marinate the salmon in a mixture of fresh dill, lemon zest, and a splash of white wine before baking. The herbs infuse the fish with bright, fresh flavors that pair wonderfully with the subtle sweetness of the rice.
Storing and Bringing It Back to Life
Fridge Storage
Store assembled cups in an airtight container in the refrigerator for up to 2 days. Keep the nori on a separate plate to prevent it from becoming soggy. When ready to serve, let the cups sit at room temperature for 10 minutes before reheating.
Freezer Friendly
For longer storage, wrap each cup individually in parchment paper and place them in a freezer bag. Freeze for up to 3 months. When you’re ready to enjoy, thaw overnight in the refrigerator and reheat in a 350°F oven for 10 minutes.
Best Reheating Method
To revive the crispness of the rice, reheat the cups in a pre‑heated oven at 350°F for 5–7 minutes. Add a splash of water to the bottom of the baking sheet to create steam, which keeps the rice from drying out. Once heated, garnish with fresh herbs or a drizzle of soy sauce for a fresh finish.