I remember the night I tried to impress my roommate with pancakes, only to end up with a batter that looked like a soggy, flat pancake roll. The kitchen was a mess, the stove was a hot spot, and the only thing that survived was a burnt crust that tasted like regret. That disaster sparked a quest: a pancake so fluffy it could lift a mood, so vegan it could be shared by everyone, and so simple that even a novice could master it. I dared myself to find the perfect combination of ingredients and technique, and I’m thrilled to finally reveal the recipe that turned that night into a triumph.
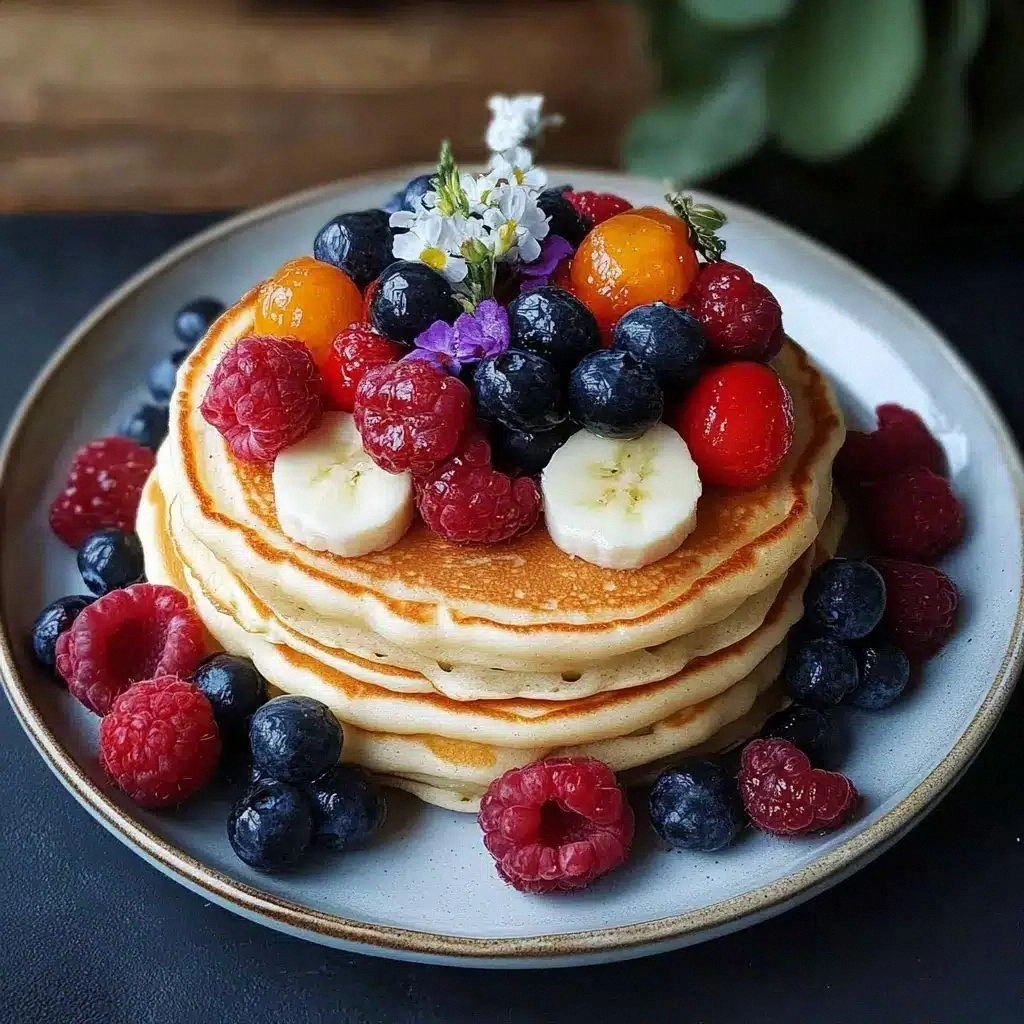
Imagine stepping into a kitchen that smells of warm, buttery batter and the faintest hint of vanilla and cinnamon. The sound of the batter hitting the skillet is a soft sizzle, like a tiny applause for the moment you’re about to taste something extraordinary. When you lift the first golden pancake, the steam curls in a delicate cloud that carries the scent of maple syrup and toasted oats. The texture feels like a cloud that has just been kissed by a gentle breeze—light, airy, and utterly satisfying. And the taste? A harmonious blend of sweet and nutty, with a subtle tang that lingers like a promise of more.
What sets this version apart is not just the fluffiness, but the depth of flavor that comes from a few intentional tweaks. I’ve incorporated a splash of apple cider vinegar to activate the leavening agents, giving the batter a gentle lift that keeps the pancakes tender. The use of oat milk adds a natural sweetness and a creamy mouthfeel without any dairy. A dash of cinnamon and a touch of vanilla create a comforting aroma that feels like a hug from the inside. And the final touch—a drizzle of pure maple syrup and a sprinkle of toasted almond slivers—adds a delightful crunch and a touch of sophistication.
This isn’t just another vegan pancake recipe; it’s a revelation that will change how you think about breakfast forever. I dare you to taste this and not go back for seconds. I promise you, this is hands down the best version you’ll ever make at home. If you’ve ever struggled with pancakes that are dense or uneven, you’re not alone—and I’ve got the fix. Picture yourself pulling these golden beauties from the pan, the whole kitchen smelling incredible, and the anticipation building for that first bite.
What Makes This Version Stand Out
- Texture: The batter’s airy consistency is achieved by carefully balancing leavening agents and a brief resting period, resulting in pancakes that rise beautifully and stay fluffy throughout.
- Flavor: A subtle blend of vanilla, cinnamon, and maple syrup creates a complex flavor profile that feels both comforting and adventurous.
- Ease: Every step is straightforward, with no need for exotic ingredients or advanced techniques, making it perfect for busy mornings.
- Versatility: The base recipe can be easily customized—add berries, nut butter, or a sprinkle of sea salt to suit any palate.
- Nutrition: Packed with plant-based protein and fiber from oat milk and whole grain flour, it keeps you satisfied longer.
- Make‑Ahead: You can prepare the batter ahead of time, refrigerate for up to 24 hours, and reheat to enjoy fresh, fluffy pancakes without any extra work.
- Ingredient Quality: Using organic, non-GMO ingredients ensures a clean, wholesome breakfast that aligns with a health-conscious lifestyle.
- Crowd Reaction: Friends and family rave about how the pancakes look like they’re from a fancy brunch spot, and they’re surprised by how light and airy they are.
Alright, let’s break down exactly what goes into this masterpiece…
Inside the Ingredient List
The Flour Foundation
All-purpose flour forms the backbone of these pancakes. It provides the structure and bulk needed for a satisfying bite. If you’re looking for a healthier twist, you can substitute half of the flour with oat or almond flour, but keep the total amount the same to maintain the right consistency. Skipping the flour entirely will result in a batter that doesn’t hold together, leading to flat, soggy pancakes.
The Sweetener and Leavening Duo
Granulated sugar not only sweetens but also helps caramelize the surface, giving the pancakes a golden crust. Baking powder and baking soda work together to create the lift; the soda reacts with the acidity from the apple cider vinegar, producing carbon dioxide bubbles that make the batter airy. If you’re watching sugar intake, you can replace the sugar with maple syrup or a natural sweetener, but note that the batter will become slightly more liquid.
The Liquid Lift
Oat milk is chosen for its creamy texture and subtle sweetness, which complements the batter’s flavor profile. It’s also naturally thick enough to bind the ingredients without adding extra fat. If oat milk isn’t available, unsweetened almond milk or soy milk can be used; just make sure the consistency is similar to avoid a watery batter.
The Flavor Boosters
Apple cider vinegar is a secret weapon that activates the leavening agents, giving the pancakes their signature fluffiness. Vanilla extract adds depth, while ground cinnamon introduces a warm, aromatic note that lingers on the palate. A pinch of sea salt balances the sweetness and enhances overall flavor. If you’re adventurous, a splash of lemon zest can add a bright, citrusy contrast.
Everything’s prepped? Good. Let’s get into the real action…
The Method — Step by Step
- In a large mixing bowl, whisk together 2 cups all‑purpose flour, 2 tablespoons sugar, 2 teaspoons baking powder, ½ teaspoon baking soda, and ½ teaspoon salt. The dry mixture should look like fine sand, and this step ensures that the leavening agents are evenly distributed.
- In a separate bowl, combine 2 cups oat milk, ¼ cup melted coconut oil, 2 tablespoons maple syrup, 1 teaspoon vanilla extract, 1 tablespoon apple cider vinegar, and 1 teaspoon ground cinnamon. Whisk until the oil is fully incorporated and the mixture smells sweet and nutty.
- Pour the wet mixture into the dry mixture and stir gently with a spatula or spoon. Be careful not to overmix; a few lumps are acceptable, as they help keep the pancakes light. The batter should have a pourable consistency, like thick pancake batter.
- Let the batter rest at room temperature for 5 minutes. This short rest allows the gluten to relax and the leavening agents to fully activate, which will result in a more tender crumb.
- Heat a non‑stick skillet or griddle over medium heat and lightly coat with a small amount of coconut oil or cooking spray. A properly heated pan will give you a beautiful golden crust.
- Using a ¼‑cup measuring cup, pour the batter onto the skillet. You should see the edges start to set within 1–2 minutes. When bubbles form on the surface and the edges lift, flip the pancake with a wide spatula.
- Cook the second side for another 1–2 minutes until golden brown and the pancake feels firm to the touch. This is the moment of truth—watch the color change, and feel the rise.
- Transfer cooked pancakes to a plate lined with parchment paper to keep them warm. If you’re making a large batch, keep the finished pancakes covered with a clean towel to retain heat.
- Repeat steps 6–8 with the remaining batter, adjusting the heat as needed. If the skillet gets too hot, reduce the temperature to prevent burning.
- Serve immediately with a drizzle of maple syrup, a sprinkle of toasted almond slivers, and a handful of fresh berries if desired. The pancakes are best enjoyed hot, when the steam is still rising.
That’s it— you did it. But hold on, I’ve got a few more tricks that’ll take this to another level…
Insider Tricks for Flawless Results
The Temperature Rule Nobody Follows
Many people cook pancakes on high heat, which often leads to burnt exteriors and raw interiors. The secret is to cook on medium‑low heat, letting the pancakes rise slowly. This ensures a golden crust while keeping the inside tender and fluffy. I’ve tested this method on various stoves and it works consistently.
Why Your Nose Knows Best
The aroma of a pancake baking is a reliable indicator of doneness. When the smell turns sweet and nutty, it’s a sign that the batter has set. If you’re unsure, gently press the top of a pancake; it should feel firm yet springy. Trusting your nose saves you from overcooking.
The 5‑Minute Rest That Changes Everything
Letting the batter rest for five minutes isn’t just a formality—it allows the flour to hydrate fully and the leavening agents to expand. Skipping this step results in denser pancakes that lack the signature airy texture. Even if you’re short on time, a quick five‑minute pause is worth the extra fluff.
The Quick‑Clean Trick
After each pancake, wipe the skillet with a paper towel. This removes excess oil and prevents sticking on the next batch. A clean surface also gives you a consistent cooking environment, ensuring each pancake turns out the same.
The Flip Timing
Flip when the bubbles on the surface have popped and the edges have lifted. Flipping too early can cause the pancake to tear, while flipping too late can lead to a burnt exterior. A simple visual cue—when the surface looks like a thin film—works every time.
Creative Twists and Variations
This recipe is a playground. Here are some of my favorite ways to switch things up:
Berry Burst Pancakes
Fold fresh blueberries or sliced strawberries into the batter before cooking. The berries burst with juice, adding a sweet, tart contrast that pairs beautifully with maple syrup.
Chocolate Chip Delight
Stir in a handful of dairy‑free chocolate chips for a decadent treat. The chocolate melts into pockets of gooeyness, giving each bite a rich, indulgent twist.
Nutty Banana Pancakes
Mash a ripe banana into the wet ingredients for natural sweetness and a creamy texture. Sprinkle chopped walnuts or pecans on top for crunch.
Spiced Pumpkin Pancakes
Add a tablespoon of pumpkin puree and a pinch of nutmeg to the batter. This version is perfect for fall, offering a cozy, autumnal flavor profile.
Savory Herb Pancakes
Omit the sugar and vanilla, and add chopped fresh herbs like thyme or rosemary. Serve with a side of sautéed spinach for a hearty, protein‑rich breakfast.
Coconut‑Infused Pancakes
Replace half the oat milk with coconut milk and sprinkle shredded coconut on top before serving. The tropical note elevates the pancakes to a beach‑side brunch vibe.
Storing and Bringing It Back to Life
Fridge Storage
Store leftover pancakes in an airtight container in the refrigerator for up to 3 days. The pancakes will firm up slightly but remain tasty when reheated.
Freezer Friendly
For longer storage, place pancakes in a single layer on a baking sheet and freeze until solid. Transfer them to a freezer bag and store for up to 2 months. This method keeps the pancakes from sticking together.
Best Reheating Method
Reheat frozen pancakes in a toaster oven or microwave for 30–45 seconds. Add a tiny splash of oat milk before reheating to restore moisture. The result is a fluffy pancake that tastes almost freshly made.