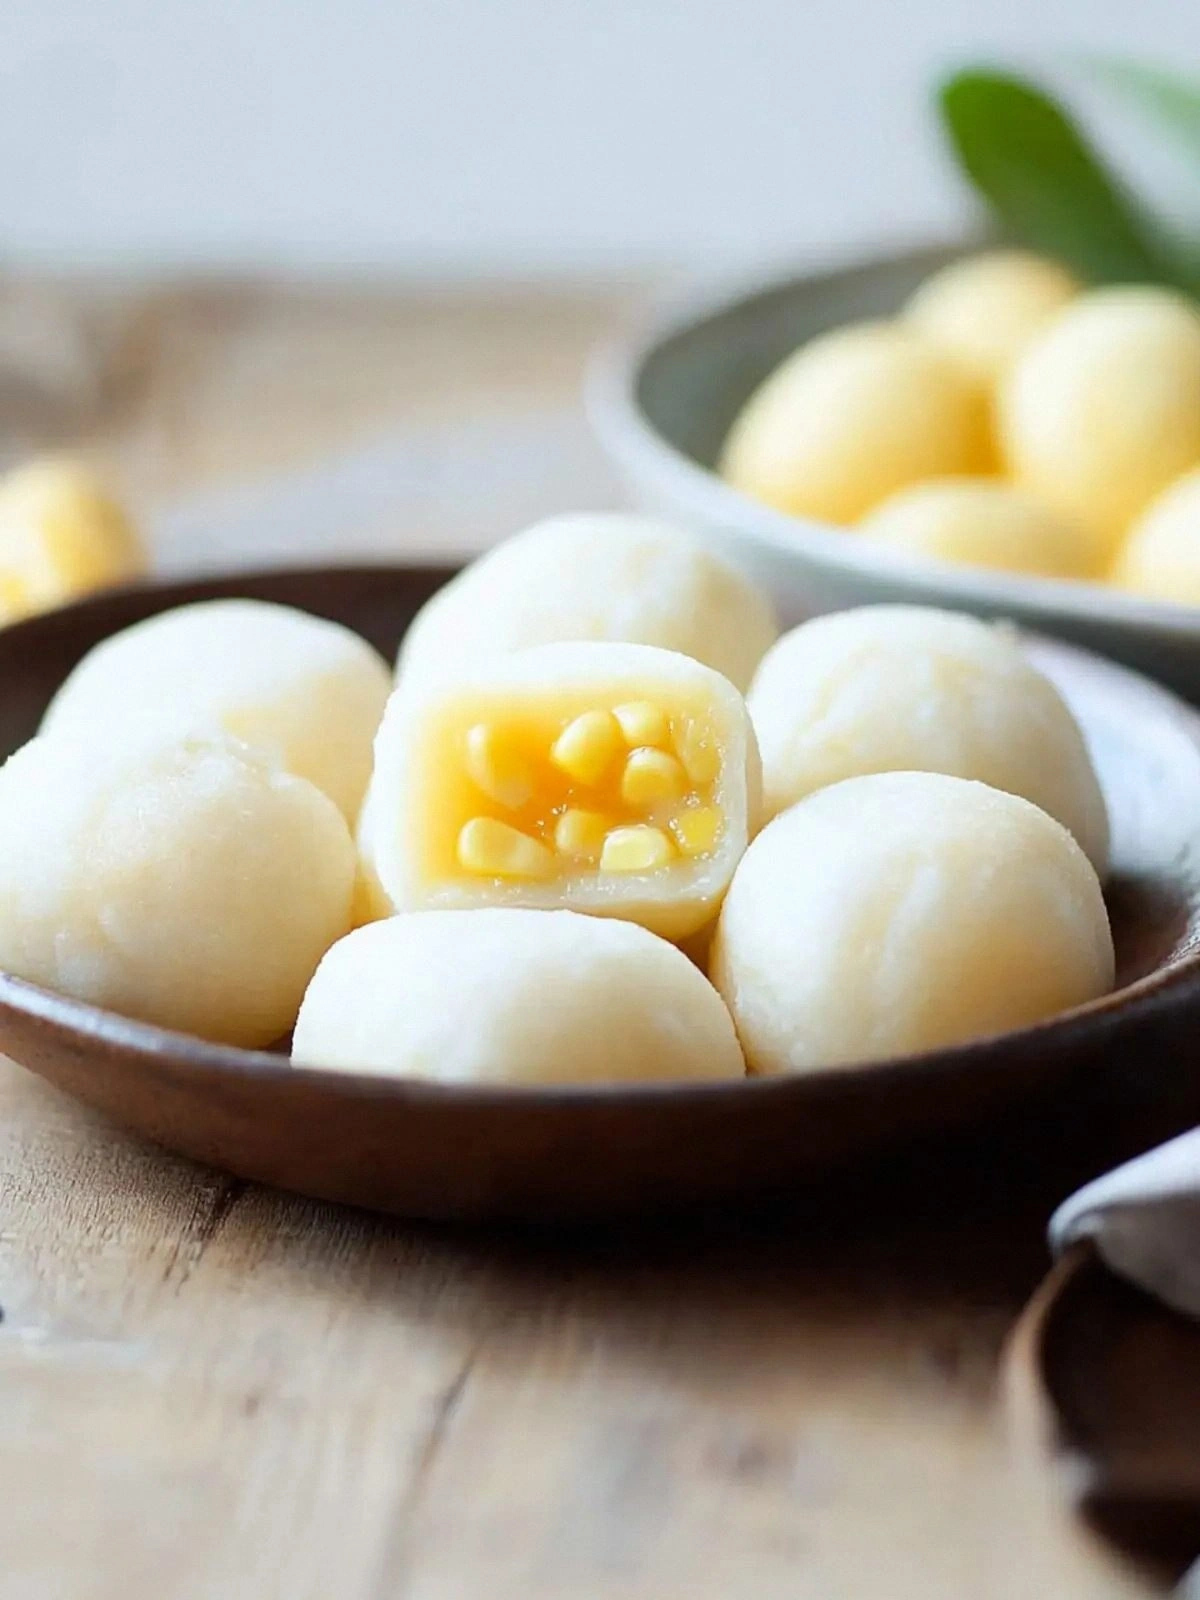
I still remember that night like it was yesterday—my kitchen was a battlefield, the stove was a volcano, and the timer was ticking like a drumbeat. I had been craving something sweet, chewy, and utterly comforting, but the only thing on my mind was the last batch of pancakes that had turned out as flat as a pancake itself. I was ready to abandon the kitchen, but then I remembered a forgotten can of sweet corn in the pantry, a jar of cream cheese, and a little box of Mochiko flour that had been gathering dust. I dared myself to try something wild: Sweet Corn Mochi. The idea sounded ridiculous, but I was hungry for an adventure, and I was about to discover a recipe that would change my culinary life forever. This is hands down the best version you'll ever make at home, and I can't wait to share every single detail.
Picture the aroma: the buttery scent of corn mingling with the sharp tang of cream cheese, all wrapped in a subtle sweetness that makes your mouth water before you even taste it. The texture is a delightful paradox—soft, pillowy inside, with a slight snap when you bite into the outer layer, almost like biting into a piece of cloud that’s been kissed by a gentle drizzle of sugar. The sound of the first bite is a satisfying crack, followed by a melt that feels like a warm hug. You can almost hear the faint hiss of steam as the mochi cooks, and the visual is a golden crust that glistens like a tiny sun. Every sense is engaged, turning a simple snack into an unforgettable experience.
What makes this recipe stand out is not just the ingredients but the way they dance together. The sweet corn provides a natural sweetness and a subtle crunch that contrasts beautifully with the creamy, silky interior. Mochiko flour, with its high starch content, creates that signature chewy texture that you’re supposed to get from mochi. Cream cheese adds richness and a slight tang that cuts through the sweetness, preventing it from becoming cloying. The result is a harmonious balance that feels indulgent yet not overbearing. I dare you to taste this and not go back for seconds; the first bite will have you craving more.
I’m not going to lie—this recipe is a game-changer. Most people think mochi is a Japanese specialty that requires a rice cooker and a lot of patience, but I’ve stripped it down to a quick, 5-minute treat that anyone can whip up in a pinch. The secret? A simple combination of sweet corn and cream cheese that adds depth and flavor, turning an ordinary snack into something that feels like a celebration. And the best part? It’s so fast that you can make it while you’re waiting for dinner to finish or even during a quick break at work. Stay with me here — this is worth it.
What Makes This Version Stand Out
- Flavor: The natural sweetness of corn is elevated by the creamy tang of cream cheese, creating a taste profile that is both familiar and adventurous.
- Texture: Mochiko flour gives that signature chew, while the corn kernels provide a satisfying bite, making each mouthful a delightful contrast.
- Speed: In just 15 minutes from prep to plate, you have a warm, comforting treat that feels like a gourmet dessert.
- Ingredient Simplicity: No exotic spices or hard-to-find ingredients—just pantry staples that everyone has.
- Visual Appeal: A golden, slightly crisp crust that glistens, inviting you to dig in.
- Make-Ahead Potential: These mochi can be stored in the fridge for up to 3 days, making them perfect for busy weeknights.
- Kid-Friendly: The mild flavor and soft texture make it a hit with younger diners.
- Versatility: Use them as a dessert, snack, or even a sweet side dish with savory meals.
Alright, let’s break down exactly what goes into this masterpiece…
Inside the Ingredient List
The Flavor Base
At the heart of this recipe is the sweet corn, the star that brings both sweetness and texture. Sweet corn is not just a filler; it’s a natural sweetener that pairs wonderfully with the creamy richness of cheese. When you cook the corn in the mixture, it releases its juices, creating a moist interior that feels like a burst of summer in every bite. If you skip the corn, the mochi will taste flat and lack the subtle crunch that makes it memorable. For those who love a bit more sweetness, you can add a teaspoon of honey, but be careful not to overpower the delicate balance.
The Texture Crew
Mochiko flour is the secret weapon that gives mochi its signature chew. Unlike regular wheat flour, Mochiko is high in starch and low in protein, which means it doesn't develop gluten. That’s why the dough stays soft and stretchy rather than becoming tough. If you don’t have Mochiko, you can substitute with cornstarch, but the texture will be slightly different—more brittle than chewy. A good rule of thumb: keep the ratio of flour to liquid consistent; if you add more water, add a bit more flour to maintain the right consistency.
The Unexpected Star
Cream cheese might seem like an odd choice for a mochi, but it’s the linchpin that brings richness and a slight tang to the dish. The fat content of cream cheese adds a silky mouthfeel, while the acidity balances the sweetness of the corn and sugar. If you’re lactose intolerant or vegan, a good substitute is coconut cream or a dairy-free cheese alternative. Keep in mind that the texture will shift slightly, becoming less dense but still creamy. The key is to keep the cream cheese at room temperature before mixing so it blends smoothly.
The Final Flourish
Sugar is the final touch that rounds out the flavor profile, giving the mochi that sweet finish you crave. Three tablespoons are enough to lift the natural sweetness of the corn without making it overly sugary. If you prefer a less sweet version, reduce the sugar by one tablespoon, or if you like it sweeter, add an extra tablespoon. Remember, the sugar also helps the mochi set, giving it that firm yet tender bite that’s essential to the mochi experience.
Everything’s prepped? Good. Let’s get into the real action…
The Method — Step by Step
- Step 1: Prepare the Corn. Drain the can of sweet corn and place it in a small saucepan. Add 2 tablespoons of water and heat over medium heat until the corn is steaming hot and the liquid has evaporated. This step helps release the corn’s natural sugars, giving the mochi a richer flavor. Keep an eye on the pot; the corn should be hot but not boiling. When the steam stops, remove from heat.
- Step 2: Blend the Cream Cheese. While the corn is heating, place 12 tablespoons of cream cheese in a bowl. Use a handheld mixer or a whisk to beat until the mixture is smooth and creamy. The goal is a lump-free base that will blend seamlessly with the other ingredients. If the cheese is too cold, it will clump; let it sit at room temperature for a few minutes.
- Step 3: Mix Sugar and Corn. Add 3 tablespoons of granulated sugar to the bowl of cream cheese and mix until fully incorporated. The sugar should dissolve, creating a glossy mixture. Then stir in the hot corn. The heat from the corn helps the sugar dissolve completely and infuses the mixture with a warm, caramelized flavor.
- Step 4: Add Mochiko Flour. Slowly sift 1 cup of Mochiko flour into the bowl, stirring continuously to avoid lumps. The flour should be evenly distributed, creating a thick, elastic dough. If the mixture seems too runny, add a splash more flour; if it’s too thick, add a tablespoon of water to loosen it. The dough should be smooth and pliable.
- Step 5: Shape the Mochi. Turn the dough onto a clean surface dusted with a little more Mochiko flour. Using a rolling pin or your hands, roll the dough into a flat sheet about 1/4 inch thick. Cut the sheet into small squares or circles, about 2 inches across. If the dough sticks, lightly dust it with flour.
- Step 6: Cook the Mochi. Heat a non-stick skillet over medium-low heat. Place a few pieces of dough onto the skillet, leaving space between them. Cook for 2-3 minutes on each side, or until the edges start to lift and a golden crust forms. The center should feel slightly springy. This is the moment of truth—don’t rush it; the slow heat ensures a tender interior.
- Step 7: Cool Slightly. Transfer the cooked mochi to a wire rack and let them cool for a minute or two. They will firm up as they cool, but still remain soft. This cooling step is crucial for achieving that perfect chew.
- Step 8: Serve. Serve the mochi warm or at room temperature. They can be enjoyed plain or dusted with a little powdered sugar for an extra touch of sweetness. Pair them with a cup of tea or a glass of milk for a comforting treat.
That’s it — you did it. But hold on, I’ve got a few more tricks that’ll take this to another level…
Insider Tricks for Flawless Results
The Temperature Rule Nobody Follows
Cooking mochi at the wrong temperature is the most common mistake people make. Low heat is the key; too high and the outside will burn before the inside cooks. I’ve found that setting the skillet to medium-low and using a lid for the first minute helps trap steam, ensuring the mochi cooks evenly. If you’re using a non-stick pan, a little oil is fine, but avoid too much; it can create a greasy surface that clings to the dough.
Why Your Nose Knows Best
The aroma of your cooking is a powerful indicator of progress. When the mochi is ready, the scent should be warm, slightly sweet, and reminiscent of toasted corn. If you notice a sharp, sour smell, the cream cheese may have started to curdle or the dough has been left too long. Trust your nose; it’s a seasoned chef’s secret weapon.
The 5-Minute Rest That Changes Everything
After cooking, let the mochi rest for exactly five minutes. This short pause allows the steam inside to redistribute, giving the mochi a softer, more cohesive texture. I’ve seen people skip this step, resulting in mochi that feels too dense. Give it that brief rest, and you’ll notice an immediate difference in mouthfeel.
Don’t Forget the Flour Dust
Dusting the work surface with a small amount of Mochiko flour before rolling helps prevent sticking and keeps the dough from drying out. It also adds a subtle extra layer of flavor to the final product. If you don’t have Mochiko on hand, a light dusting of cornstarch works, though the flavor profile will shift slightly.
The Perfect Pairing
Serve your mochi with a side of warm tea or a chilled glass of milk. The contrast between the warm, sweet mochi and the cool beverage creates a balanced experience. If you’re feeling adventurous, drizzle a little honey over the mochi for an extra touch of indulgence.
Creative Twists and Variations
This recipe is a playground. Here are some of my favorite ways to switch things up:
Spiced Sweet Corn Mochi
Add a dash of cayenne pepper or smoked paprika to the dough for a spicy kick. The heat balances the sweetness and gives the mochi a bold flavor that’s perfect for adventurous palates.
Herb-Infused Cream Cheese
Mix in finely chopped fresh herbs like chives or parsley into the cream cheese before blending. The herbs add a fresh, green note that cuts through the richness, making the mochi feel lighter.
Chocolate-Dipped Delight
After cooling, dip half of the mochi pieces in melted dark chocolate. This adds a rich, bittersweet layer that pairs wonderfully with the sweet corn base.
Nutty Crunch Variation
Fold in toasted almond slivers or chopped pecans into the dough before cooking. The crunch adds texture and a nutty aroma that elevates the overall experience.
Vegan Version
Replace the cream cheese with a dairy-free alternative like coconut cream and use a vegan-friendly sweetener. The texture may be slightly different, but the flavor remains delightful.
Mini Mochi Bites
Cut the dough into smaller 1-inch squares and cook them for a shorter time. These bite-sized treats are perfect for parties or as a sweet snack for kids.
Storing and Bringing It Back to Life
Fridge Storage
Store the cooked mochi in an airtight container in the refrigerator for up to three days. The mochi will keep its chewy texture and flavor, making it a convenient grab-and-go snack. Before eating, let them sit at room temperature for a few minutes to soften.
Freezer Friendly
For longer storage, place the mochi in a freezer-safe bag, removing as much air as possible. Freeze for up to one month. When ready to eat, thaw in the refrigerator overnight, then reheat briefly in a microwave or on a skillet to restore warmth.
Best Reheating Method
Reheat the mochi on a low-heat skillet for 30 seconds on each side, or microwave on low power for 10-15 seconds. To keep them moist, add a tiny splash of water before reheating; this steams them back to perfection. Avoid over-heating, or they’ll become tough.