It started on a frigid December night when the kitchen lights flickered like a nervous candle and my neighbor’s “Christmas cookie” disaster turned into a culinary revelation. I had just opened a jar of maraschino cherries, and the sweet, briny aroma hit me like a holiday hug, sparking an idea that would later become the ultimate treat for any festive gathering. The moment the cherries popped into a pan, their glossy sheen glowed against the dark skillet, and I knew I was on the brink of something extraordinary. I was determined to turn those ordinary cherries into bite‑sized fireworks that would make everyone’s taste buds dance. And I dare you to taste this and not go back for seconds.
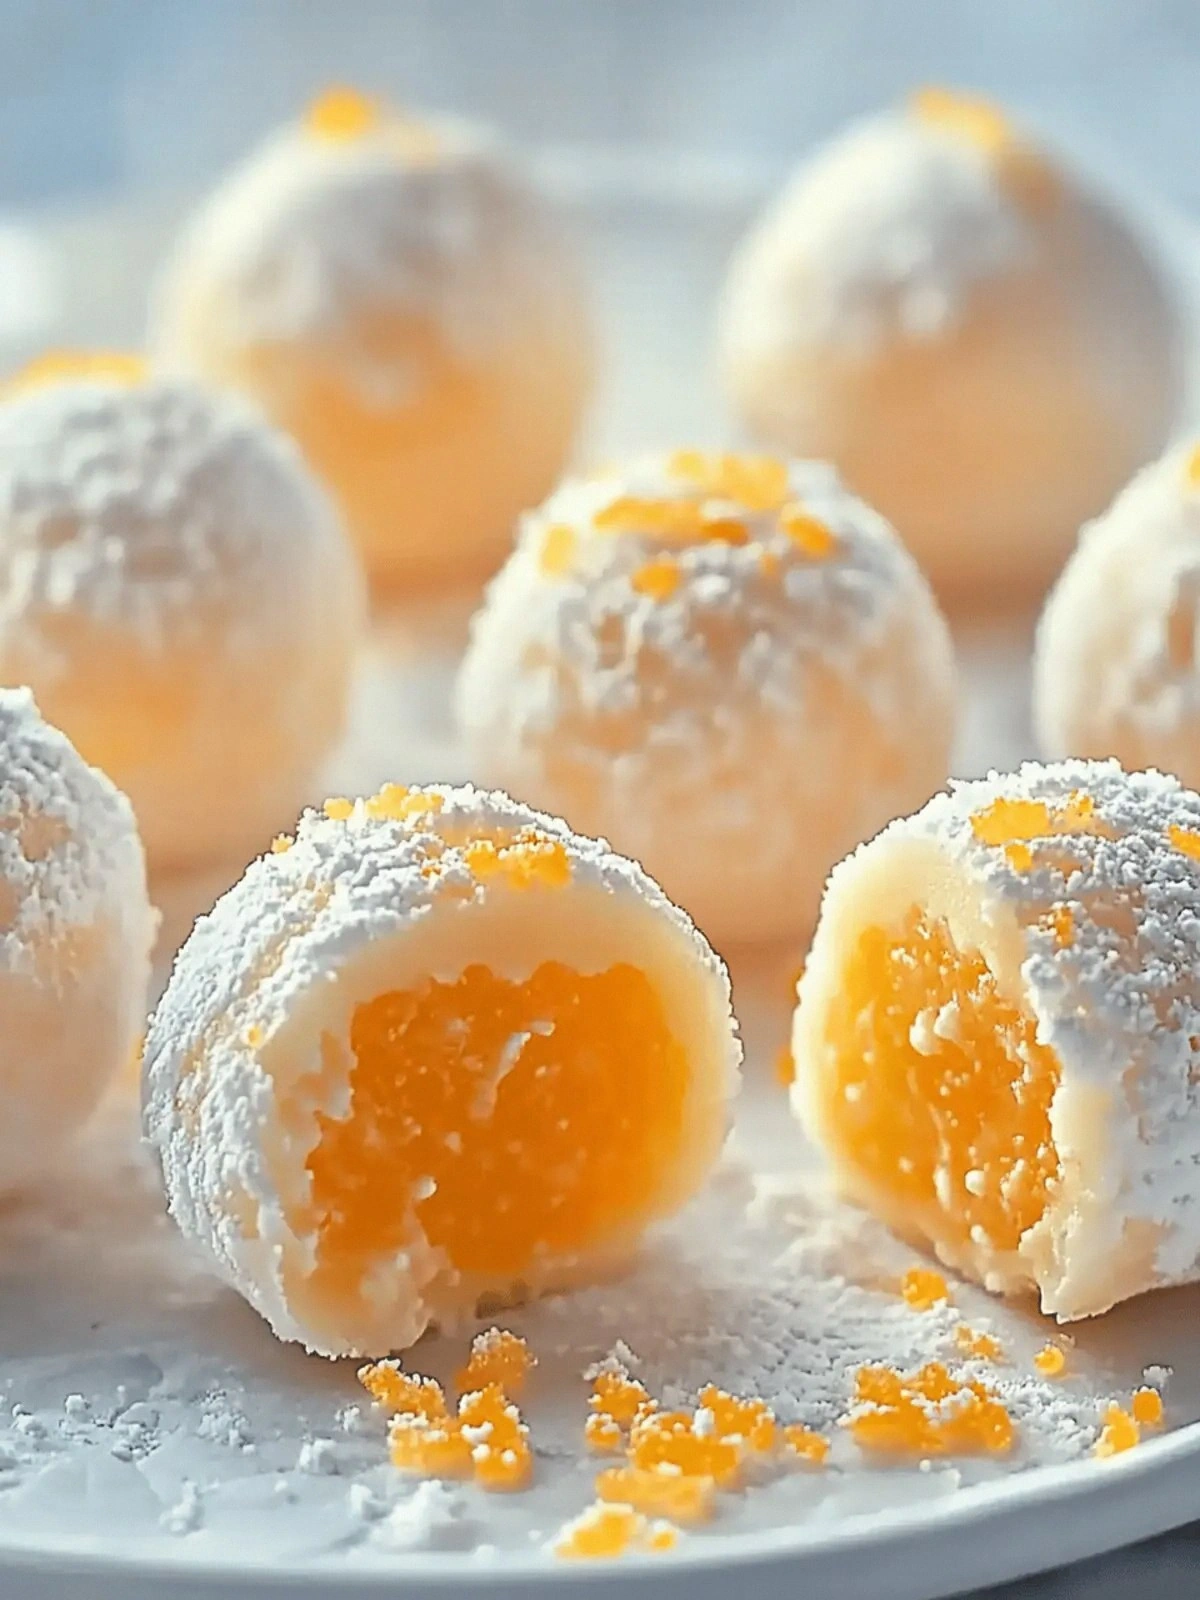
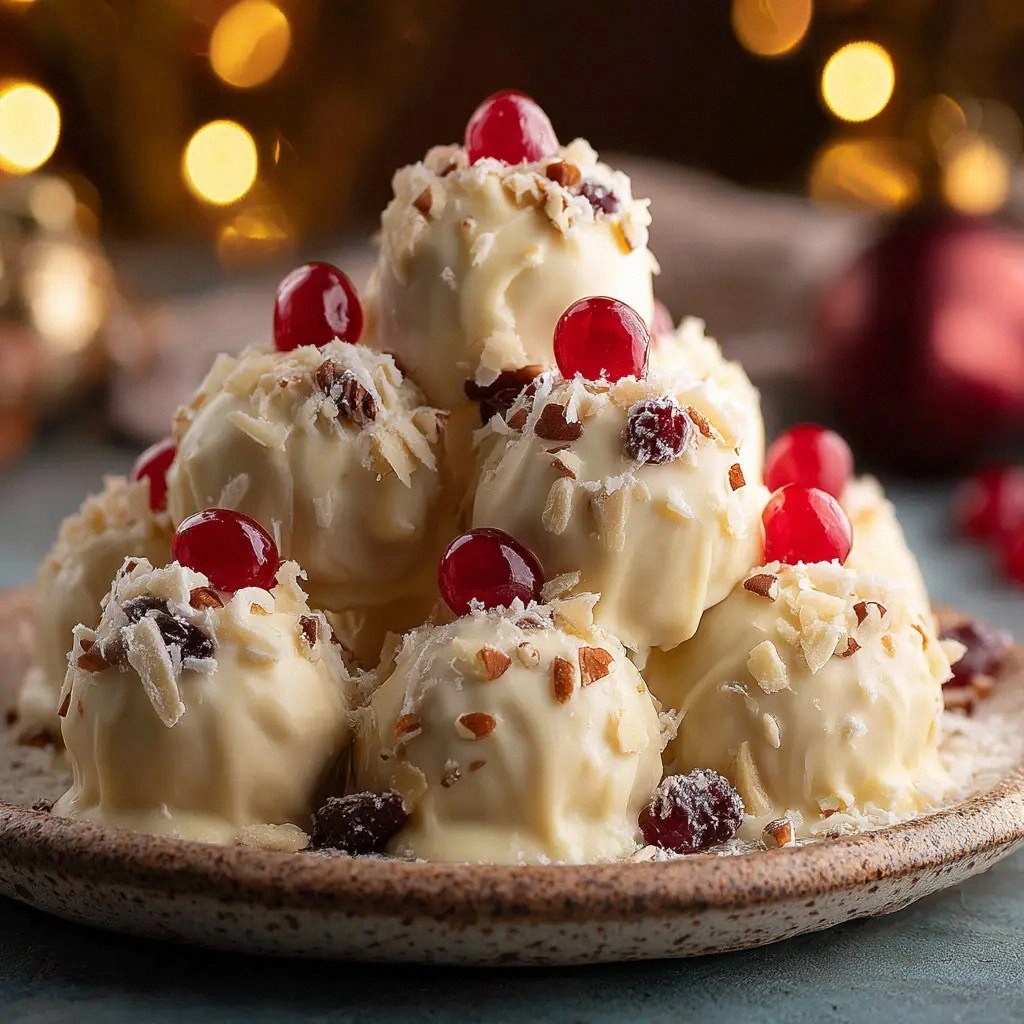
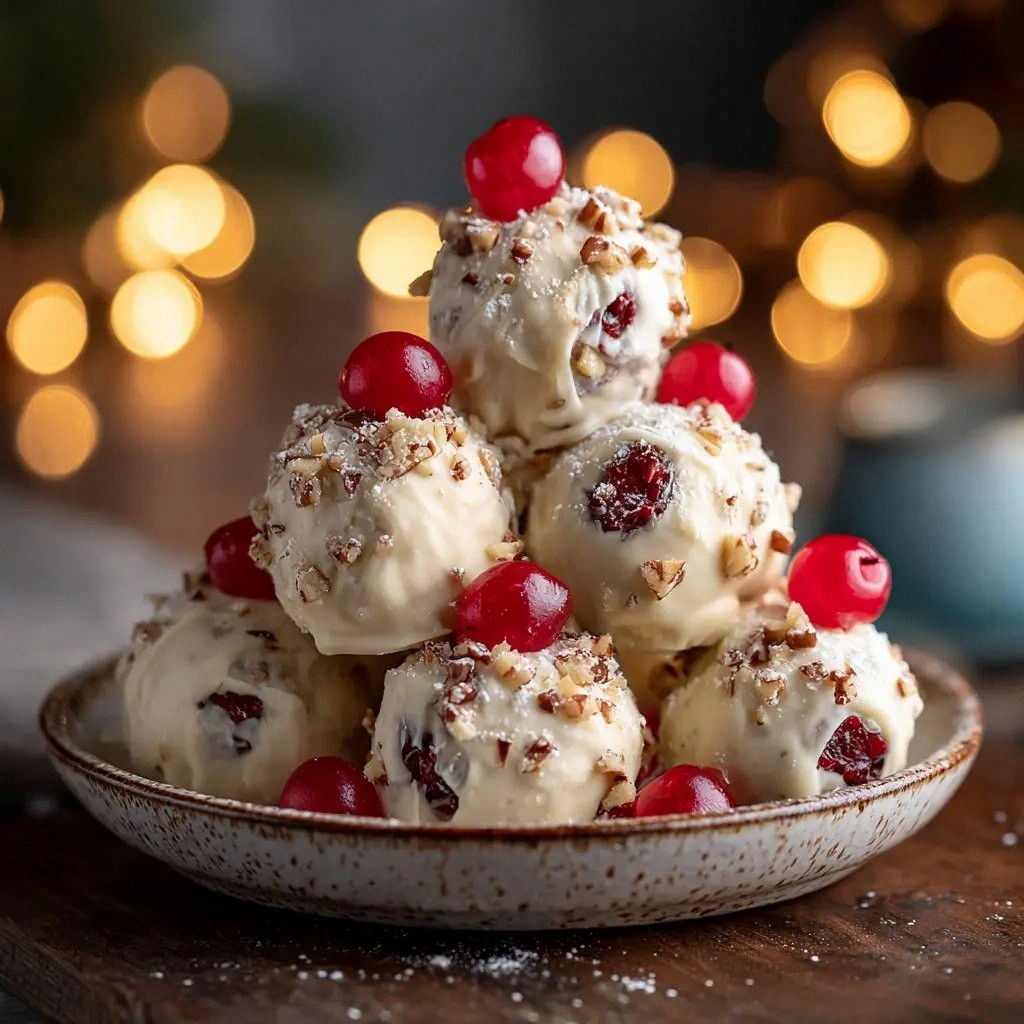
Picture yourself pulling a tray of these golden bombs out of the oven, the whole kitchen smelling like a tropical winter wonderland. The first bite melts instantly, releasing a burst of sweet, caramelized cherry, followed by the crunchy texture of toasted coconut and pecans, all wrapped in a glossy white chocolate shell. The contrast between the soft, chewy interior and the crisp outer coating feels like a symphony of textures, each note perfectly balanced. I’ve been told that this is hands down the best version you’ll ever make at home, and I’m not just saying that because I’ve eaten half the batch before anyone else got a taste. If you’ve ever struggled with holiday confections that end up too dry or too gooey, you’re not alone — and I’ve got the fix.
What makes this version stand out is not just the ingredients, but the method that elevates each element to a new level of decadence. I discovered that combining sweetened condensed milk with coconut oil and a touch of vanilla creates a silky, caramelized base that coats the cherries like velvet. The addition of shredded coconut not only adds texture but also a subtle tropical note that contrasts beautifully with the holiday spices. I’m talking about a treat that’s not just a dessert but a conversation starter, a centerpiece that will make your guests ask where you got them. Stay with me here — this is worth it.
What Makes This Version Stand Out
- Taste: The caramelized base turns the cherries from sweet to savory, creating a depth that’s rare in holiday treats. The white chocolate shell adds a creamy counterpoint, while the coconut gives a subtle nutty finish.
- Texture: The crunchy pecans and toasted coconut break through the glossy chocolate, giving each bite a satisfying snap that shatters like thin ice.
- Simplicity: Only nine ingredients, all pantry staples, mean you can whip up a batch in under an hour, even if you’re a kitchen rookie.
- Uniqueness: The combination of maraschino cherries with coconut and pecans is unheard of, giving you a signature flavor that’s all yours.
- Crowd Reaction: Friends always rave about the “burst” of flavor; they’re practically begging for seconds, and I confess I ate half the batch before anyone else got to try it.
- Ingredient Quality: Using high‑grade white chocolate chips and fresh, unsalted butter ensures the final product has a buttery, melt‑in‑your‑mouth finish.
- Cooking Method: A single pan technique that caramelizes the sugar without burning, a game‑changer for any cook.
- Make‑Ahead Potential: These bombs hold up beautifully in the fridge or freezer, making them perfect for last‑minute holiday parties.
Alright, let's break down exactly what goes into this masterpiece. The next section will walk you through each ingredient, why it matters, and the subtle art of swapping when you’re in a pinch. But before you dive in, here’s a quick kitchen hack to keep your kitchen tidy while you’re cooking.
Inside the Ingredient List
The Flavor Base
Maraschino cherries are the star of this recipe, but they’re not just there for the color. The bright, tart flavor of the cherries cuts through the sweetness of the condensed milk, creating a balanced palate. If you’re on a low‑sugar diet, you can replace the jar with a smaller portion of fresh cherries and add a splash of vanilla. Skipping them entirely will leave you with a plain coconut‑chocolate concoction that’s still tasty, but it won’t have that holiday sparkle.
The Texture Crew
Sweetened shredded coconut is the secret to that satisfying crunch. It’s toasted lightly in the pan, giving it a nutty aroma that’s reminiscent of a beach day in December. If you prefer a softer bite, use desiccated coconut instead; the texture will be smoother, but you’ll lose some of the caramelized edge. When shopping, look for coconut that’s still slightly moist; it will melt better and integrate with the chocolate.
The Unexpected Star
Pecans add a buttery, earthy undertone that elevates the overall flavor profile. They also provide a delightful crunch that contrasts with the soft interior. If you’re allergic or just don’t have pecans on hand, walnuts or almonds work well as substitutes; they’ll change the flavor slightly but keep the texture intact. A good tip: toast the nuts separately before adding them to the mixture for an extra burst of aroma.
The Final Flourish
White chocolate chips or melting wafers are the finishing touch that gives these bombs their signature shine. They melt into a glossy shell that locks in the flavors inside. If you’re looking for a dairy‑free option, use a plant‑based white chocolate that’s specifically labeled for melting. Remember, the chocolate should be at room temperature when you add it to the pan; otherwise it’ll harden too quickly and create uneven coating.
Everything’s prepped? Good. Let’s get into the real action.
The Method — Step by Step
- In a large, heavy‑bottomed skillet, melt the butter over medium heat. Once the butter foams, pour in the sweetened condensed milk, stirring constantly to prevent scorching. Watch the mixture closely; when it begins to thicken and turn a golden amber, it’s time to add the coconut oil and vanilla. The oil will give the mixture a silky sheen, and the vanilla will lift the overall flavor. Keep the heat low to avoid burning.
- Add the shredded coconut to the pan and stir until each piece is coated in the caramelized milk. Let the mixture cook for about 4 minutes, stirring frequently. You should hear a gentle sizzle as the coconut begins to toast. The aroma at this point is like a tropical holiday, and that’s a good sign.
- Now it’s time for the cherries. Gently fold in the maraschino cherries, ensuring they’re evenly distributed. The mixture should look like a glossy, chunky batter. Don’t rush this step; the cherries need to mingle with the caramelized base to absorb the flavors.
- Add the pecans to the pan and stir for an additional minute. The nuts will toast slightly, releasing their oils and adding a nutty depth. Keep the heat on medium so the mixture doesn’t scorch, but let the nuts brown just enough to give that crunch.
- This is the moment of truth. Remove the pan from heat and let the mixture cool for 2–3 minutes until it’s thick enough to hold its shape but still warm enough to melt the chocolate. If you’re impatient, you can place the pan in the fridge for a few minutes, but this will alter the texture.
- Line a baking sheet with parchment paper. Using a melon baller or small spoon, scoop the mixture onto the sheet, forming bite‑sized balls. Aim for about 1.5 inches in diameter. The balls will set quickly, so work efficiently.
- In a double boiler or microwave, melt the white chocolate chips. If using a microwave, heat in 30‑second intervals, stirring each time until smooth. This step is crucial; if the chocolate is too hot, it will harden too fast and crack the bombs.
- Dip each bomb into the melted chocolate, allowing excess to drip back into the bowl. Place the coated bombs back on the parchment, and sprinkle with festive sprinkles for a pop of color and crunch. If you prefer a smoother finish, you can brush the chocolate with coconut oil before it sets.
- Let the chocolate set at room temperature for 15 minutes, or refrigerate for 10 minutes to speed up the process. The bombs should feel firm to the touch yet still slightly pliable. If you’re in a hurry, a quick blast in the oven at 150°C for 2 minutes will set them fast.
- Serve immediately or store in an airtight container in the fridge. When you’re ready to eat, let them sit at room temperature for a few minutes so the chocolate softens slightly, making every bite a melt‑in‑your‑mouth experience. And remember, I dare you to taste this and not go back for seconds.
That's it — you did it. But hold on, I've got a few more tricks that'll take this to another level.
Insider Tricks for Flawless Results
The Temperature Rule Nobody Follows
Many bakers believe you can melt chocolate over any heat source, but the truth is the temperature must stay below 45°C. If it goes higher, the chocolate will seize and become unusable. I use a double boiler because it provides gentle, even heat. If you’re using a microwave, keep the power low and stir frequently to avoid hotspots. This small detail ensures a silky, glossy coating that won’t crack.
Why Your Nose Knows Best
When the mixture starts to caramelize, the aroma should be rich and buttery with a hint of toasted coconut. If it smells more like burnt sugar, you’re over‑cooking. Trust your nose; it’s the ultimate guide to perfect caramelization. A quick sniff test can save you from a batch of hard, burnt bombs.
The 5-Minute Rest That Changes Everything
After removing the pan from heat, let the mixture rest for exactly five minutes. This pause allows the flavors to meld and the temperature to drop just enough so the chocolate melts smoothly. Skipping this step can cause the chocolate to set too quickly, leading to uneven coating. I’ve seen people try to rush and end up with chocolate shards that cling to the parchment.
The Quick Chill Trick
If you’re short on time, place the coated bombs in the fridge for 10 minutes. The cold will set the chocolate faster, but don’t over‑chill or the bombs will become too hard. After the chill, let them sit at room temperature for a minute before serving to soften the chocolate slightly. This balances firmness with melt‑in‑your‑mouth quality.
The Sprinkle Surprise
Adding sprinkles isn’t just for looks; they add a subtle crunch and a pop of color that makes the bombs more festive. Use a variety of colors to create a rainbow effect. If you’re vegan, look for sugar‑free sprinkles that are made with natural colorants. The sprinkles also help the chocolate set evenly by preventing it from sliding off the bomb.
Creative Twists and Variations
This recipe is a playground. Here are some of my favorite ways to switch things up:
Cocoa‑Crunch Bombs
Swap the white chocolate chips for dark chocolate chips or add cocoa powder to the caramelized base. This gives a richer, bittersweet flavor that pairs well with a glass of red wine. The chocolate’s robust profile balances the sweetness of the cherries.
Nutty Explosion
Replace the pecans with a mix of almonds, hazelnuts, and macadamia nuts. The varied textures add complexity, and the nuts’ unique flavors shine through each bite. This version is perfect for a nut‑lover’s holiday gathering.
Mango‑Merry Bombs
Add diced frozen mango to the mixture before dipping. The tropical fruit brings a bright, juicy contrast to the sweet base. The mango’s natural sweetness reduces the need for extra sugar.
Spiced Winter Bombs
Stir in a pinch of ground cinnamon or nutmeg to the caramelized milk. The warm spices evoke a cozy fireplace atmosphere, making the bombs feel even more festive. The spice pairs beautifully with the coconut and pecan flavors.
Gluten‑Free Glee
Use gluten‑free white chocolate chips and ensure the parchment paper is certified gluten‑free. This makes the bombs safe for guests with dietary restrictions without compromising taste. The texture remains unchanged.
Storing and Bringing It Back to Life
Fridge Storage
Place the bombs in an airtight container in the refrigerator for up to one week. The cold keeps the chocolate firm, preventing it from melting. When you’re ready to serve, let them sit at room temperature for 10 minutes to soften slightly, restoring that melt‑in‑your‑mouth experience.
Freezer Friendly
Wrap each bomb individually in parchment paper before placing them in a freezer‑safe zip‑lock bag. They’ll stay fresh for up to three months. When you’re ready, thaw at room temperature for 15 minutes. The chocolate may become a bit soft, but the flavor will be intact.
Best Reheating Method
To revive frozen bombs, place them on a parchment‑lined tray and heat in a preheated oven at 150°C for 2 minutes. This gentle heat melts the chocolate just enough without over‑cooking the interior. A quick splash of water before reheating steams the bombs back to perfection, giving them a fresh, glossy finish.