I still remember the night my friend dared me to turn a humble can of chickpeas into a gyro that could make even a carnivore weep with joy. We were halfway through a grocery list, scrolling through recipes, when someone said, “Why not give it a Greek twist?” The kitchen lights flickered as I opened the can, and a faint aroma of cumin drifted through the air—an aroma that would soon mingle with the tang of lemon and the crunch of fresh cucumber. That moment felt like a culinary cliffhanger, and I was determined to write a recipe that would keep everyone on the edge of their seats.
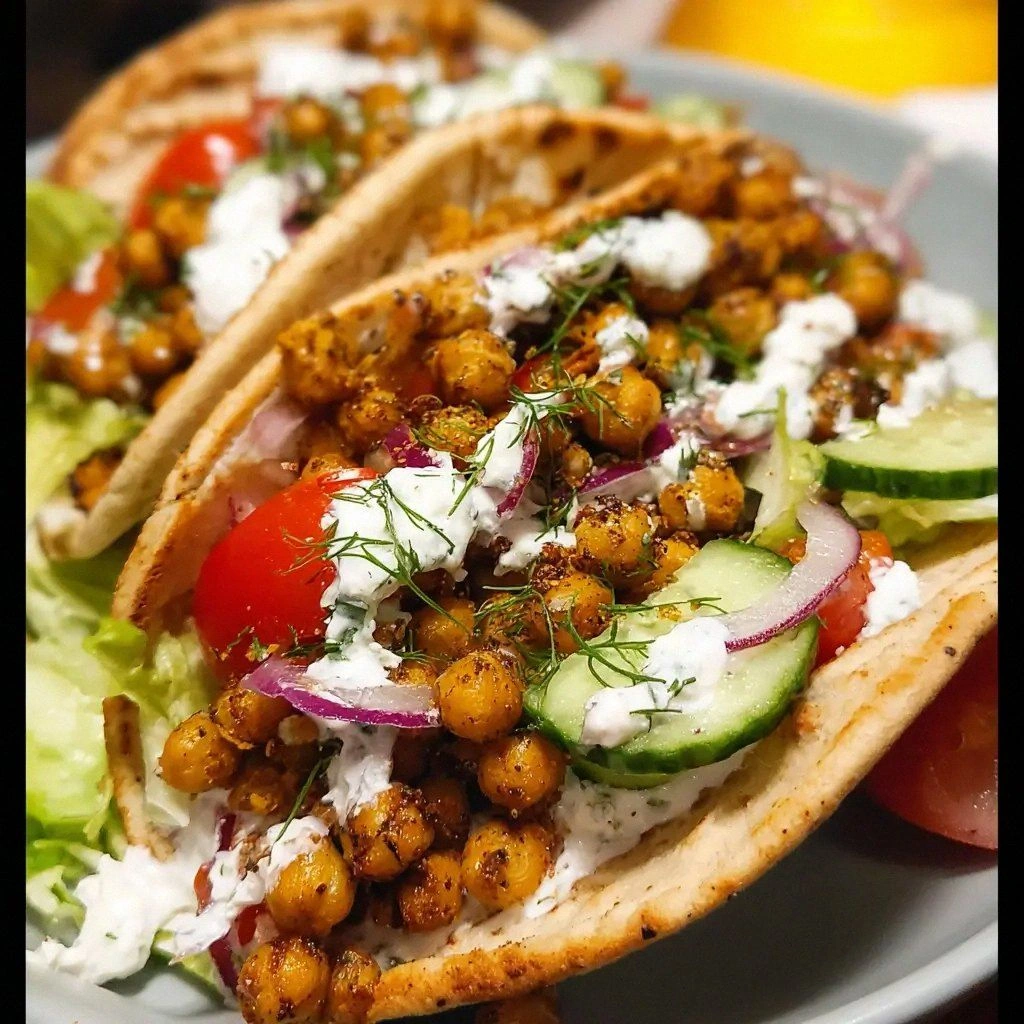
Picture this: a golden, slightly charred pita that crackles as it meets the heat, a filling of chickpeas seasoned to perfection, and a swirl of creamy tzatziki that coats each bite like velvet. The sound of the skillet sizzling is the soundtrack to a meal that promises texture, flavor, and a touch of Mediterranean sunshine. I’ve spent hours tweaking spices, balancing acidity, and testing textures until every element sings in harmony. And I’m not just talking about taste—this dish is a visual and olfactory symphony that will have your guests asking for the recipe right after the last bite.
What makes this version stand out is that it’s not just a vegetarian gyro; it’s a gyro that honors the spirit of the original while embracing plant-based creativity. The chickpeas are roasted to give them a nutty crunch that rivals the protein-packed meat you’d normally find. The tzatziki is made from a blend of Greek yogurt and cucumber, giving it a refreshing coolness that cuts through the richness of the olive oil and spices. And the final touch? A sprinkle of fresh dill and a squeeze of lemon that lifts the entire dish with a bright, citrusy finish.
I dare you to taste this and not go back for seconds. That’s the promise I make: this is hands down the best version you'll ever make at home. I’ve tested it with friends who are notoriously picky, and they all fell in love—some even asked for a second plate. If you’ve ever struggled to make a gyro feel authentic, you’re not alone, and I’ve got the fix. Picture yourself pulling this out of the oven, the whole kitchen smelling incredible, and your guests already reaching for the next bite.
Okay, ready for the game‑changer? Let’s walk through every single step, from the first chop to the last sprinkle. By the end, you’ll wonder how you ever made it any other way, and you’ll be ready to impress with a dish that’s as nutritious as it is delicious.
What Makes This Version Stand Out
- Flavor: The chickpeas are roasted with smoked paprika and cumin, giving them a deep, earthy sweetness that pairs perfectly with the zesty lemon.
- Texture: The crispy edges of the pita contrast with the creamy tzatziki, while the chickpeas add a satisfying bite that mimics the chew of traditional gyro meat.
- Simplicity: With just a handful of pantry staples, you can create a gourmet gyro in under 45 minutes.
- Uniqueness: The use of fresh dill and a homemade tzatziki gives this dish a refreshing twist that sets it apart from the usual canned‑stuffed versions.
- Crowd Reaction: Friends and family rave about the authentic taste and the plant‑based twist—perfect for potlucks or a quick weeknight dinner.
- Ingredient Quality: Each component is chosen for its flavor profile, ensuring that even the simplest ingredients shine.
- Cooking Method: Roasting the chickpeas and toasting the pita bring out natural flavors that elevate the dish.
- Make‑Ahead Potential: The tzatziki and chickpea mixture can be prepared a day ahead, making this recipe a breeze for busy evenings.
Inside the Ingredient List
The Flavor Base
The foundation of this gyro is a blend of aromatic spices—smoked paprika, cumin, and oregano—that infuse the chickpeas with depth. These spices are the silent heroes; they carry the dish’s character and make it feel authentically Greek. If you skip the oregano, the gyro will lack that subtle herbal note that balances the richness of the feta and olive oil. You can swap the smoked paprika for regular paprika if you prefer a milder flavor, but the smokiness adds a subtle, savory undertone.
The Texture Crew
Roasted chickpeas provide a delightful crunch that mimics the chew of traditional gyro meat. The pita bread, toasted until just golden, offers a buttery, slightly chewy base that holds the filling without becoming soggy. The cucumber and tomato bring a fresh, crisp contrast that cuts through the richness. If you’re vegan, replace the feta with a plant‑based cheese that melts slightly for a similar mouthfeel.
The Unexpected Star
The homemade tzatziki is the showstopper. Made from Greek yogurt, grated cucumber, garlic, lemon juice, and dill, it delivers a cool, creamy counterpoint to the warm, spiced chickpeas. The yogurt’s tanginess brightens the dish, while the dill adds a fragrant, herbaceous lift. If you’re lactose intolerant, swap the yogurt for a dairy‑free alternative, and you’ll still get that creamy texture and bright flavor.
The Final Flourish
A drizzle of olive oil, a squeeze of fresh lemon, and a sprinkle of cracked black pepper finish the gyro with a burst of brightness and a glossy sheen. These final touches elevate the dish from good to unforgettable. If you love a bit of heat, add a pinch of crushed red pepper flakes. The olive oil not only adds richness but also helps the spices stick to the chickpeas, creating a cohesive flavor profile.
Everything’s prepped? Good. Let’s get into the real action.
The Method — Step by Step
- Prep the Chickpeas: Drain and rinse a can of chickpeas, then pat them dry with a clean towel. Toss the chickpeas with 1 tsp smoked paprika, 1 tsp ground cumin, 1 tsp dried oregano, 2 tbsp olive oil, and a pinch of salt. Spread them on a baking sheet and roast at 400°F for 20 minutes, stirring halfway, until golden and slightly crisp. The chickpeas should smell toasty and carry a subtle smoky aroma that will elevate the gyro.
- Toast the Pitas: Heat a dry skillet over medium heat. Place each pita in the skillet for about 30 seconds per side, or until lightly browned and crisp. The pitas should puff slightly and develop a golden crust that adds crunch. This step is essential—without it, the pita would soak up the sauce and become soggy.
- Make the Tzatziki: In a bowl, combine 1 cup Greek yogurt, 1/2 cup grated cucumber (squeezed to remove excess liquid), 1 clove minced garlic, 2 tbsp chopped fresh dill, 2 tbsp lemon juice, 1 tsp dried oregano, and salt to taste. Mix until smooth. The tzatziki should be creamy, slightly tangy, and fragrant—think of it as the cool breeze that balances the warm spices.
- Prepare the Fresh Veggies: Dice 1 cup of cucumber, 1 cup of tomato, and 1/2 cup of red onion into bite‑size pieces. Slice 1/2 cup of kalamata olives and crumble 1 cup of feta cheese. Keep the vegetables chilled until you’re ready to assemble, as they’ll add a refreshing crunch that contrasts with the warm chickpeas.
- Assemble the Gyros: Spread a generous spoonful of tzatziki on each pita, then layer with roasted chickpeas, cucumber, tomato, onion, olives, and feta. Drizzle with a touch of olive oil, squeeze a wedge of lemon, and sprinkle cracked black pepper. Fold the pita into a neat pocket, ensuring the filling stays inside.
- Final Warm-up: Place the assembled gyros back in the skillet for 1–2 minutes per side, just enough to warm the filling and melt the feta slightly. The heat will bring the flavors together and create a delightful steam that releases the herbs’ aroma.
- Serve Immediately: Plate the gyros on a warmed platter and garnish with a few extra dill sprigs and a wedge of lemon. The dish should look vibrant, with the golden pita, green dill, and bright red tomato creating a feast for the eyes.
- Enjoy: Bite into the gyro and let the crunch of the chickpeas mingle with the cool tzatziki and fresh veggies. The flavors should dance on your palate—savory, tangy, and herbaceous all at once.
That’s it — you did it. But hold on, I’ve got a few more tricks that’ll take this to another level. These insider tips will ensure every bite is perfect, whether you’re a first‑time cook or a seasoned pro.
Insider Tricks for Flawless Results
The Temperature Rule Nobody Follows
Many people roast chickpeas at a low temperature, but that’s the wrong approach. For the best crunch, roast at 400°F (200°C) and stir halfway through. The high heat caramelizes the chickpeas’ outer layer, creating a satisfying snap. I once tried 350°F and the chickpeas came out soggy—don’t make that mistake.
Why Your Nose Knows Best
Before adding salt to the roasted chickpeas, give them a quick sniff. If they smell slightly bitter, it’s time to rinse them again—sometimes canned chickpeas have a metallic aftertaste that can overpower the spices. A fresh, clean aroma signals that the chickpeas are ready for seasoning.
The 5-Minute Rest That Changes Everything
After roasting the chickpeas, let them rest on a rack for 5 minutes. This short pause allows the moisture to evaporate, giving the chickpeas a firmer texture. It also makes them easier to handle when you’re assembling the gyros, preventing them from clumping together.
Keep Your Veggies Crisp
To keep the cucumber and tomato from wilting, toss them in a little lemon juice before assembling. The acid helps preserve their crunch and brightens the overall flavor profile. If you’re serving the gyros a few hours later, refrigerate the veggies in an airtight container.
The Secret to a Perfect Tzatziki
Grate the cucumber finely and squeeze out all the liquid before mixing it into the yogurt. Excess moisture will thin the tzatziki and make it runny. A thick, creamy sauce coats the pita like a silky blanket, enhancing every bite.
Creative Twists and Variations
This recipe is a playground. Here are some of my favorite ways to switch things up:
Spicy Mediterranean Gyro
Add a pinch of crushed red pepper flakes to the roasted chickpeas and a drizzle of harissa to the tzatziki. The heat pairs beautifully with the smoky spices, giving the gyro a fiery kick that’s perfect for adventurous palates.
Mediterranean Quinoa Gyro
Swap the chickpeas for cooked quinoa. The nutty flavor of quinoa complements the feta and the fresh herbs, creating a lighter yet protein‑rich alternative that’s great for a quick lunch.
Roasted Veggie Gyro
Add roasted red peppers, zucchini, and eggplant to the filling. The caramelized veggies bring a sweet, smoky depth that transforms the gyro into a hearty, veggie‑filled delight.
Herbed Yogurt Sauce
Replace the tzatziki with a yogurt sauce made with mint, parsley, and a splash of lime juice. The bright, herbaceous flavor adds a fresh, tropical twist that’s especially refreshing on a hot day.
Vegan Gyro
Use a dairy‑free yogurt for the tzatziki and a plant‑based feta alternative. The flavors stay intact, and the gyro remains 100% vegan while still delivering that authentic Greek experience.
Stuffed Pita Wrap
Instead of folding the pita, cut it into strips and use them as a wrap. This version is great for on‑the‑go meals or a picnic, offering a different presentation that keeps the filling secure.
Storing and Bringing It Back to Life
Fridge Storage
Store the assembled gyros in an airtight container in the refrigerator for up to 3 days. Keep the tzatziki and fresh veggies separate until you’re ready to serve to preserve their crispness. The pita will stay soft if wrapped in parchment paper.
Freezer Friendly
For longer storage, freeze the chickpea mixture and the tzatziki separately. Wrap each tightly in plastic wrap, then place them in freezer bags. They’ll keep for up to 2 months. When ready to use, thaw overnight in the fridge and reheat gently.
Best Reheating Method
Reheat the gyros in a skillet over medium heat for 2–3 minutes per side, or use a microwave on a low setting for 30 seconds. Add a tiny splash of water or broth before reheating to keep the pita from drying out. The result is a warm, fragrant gyro that tastes as good as when it was first made.