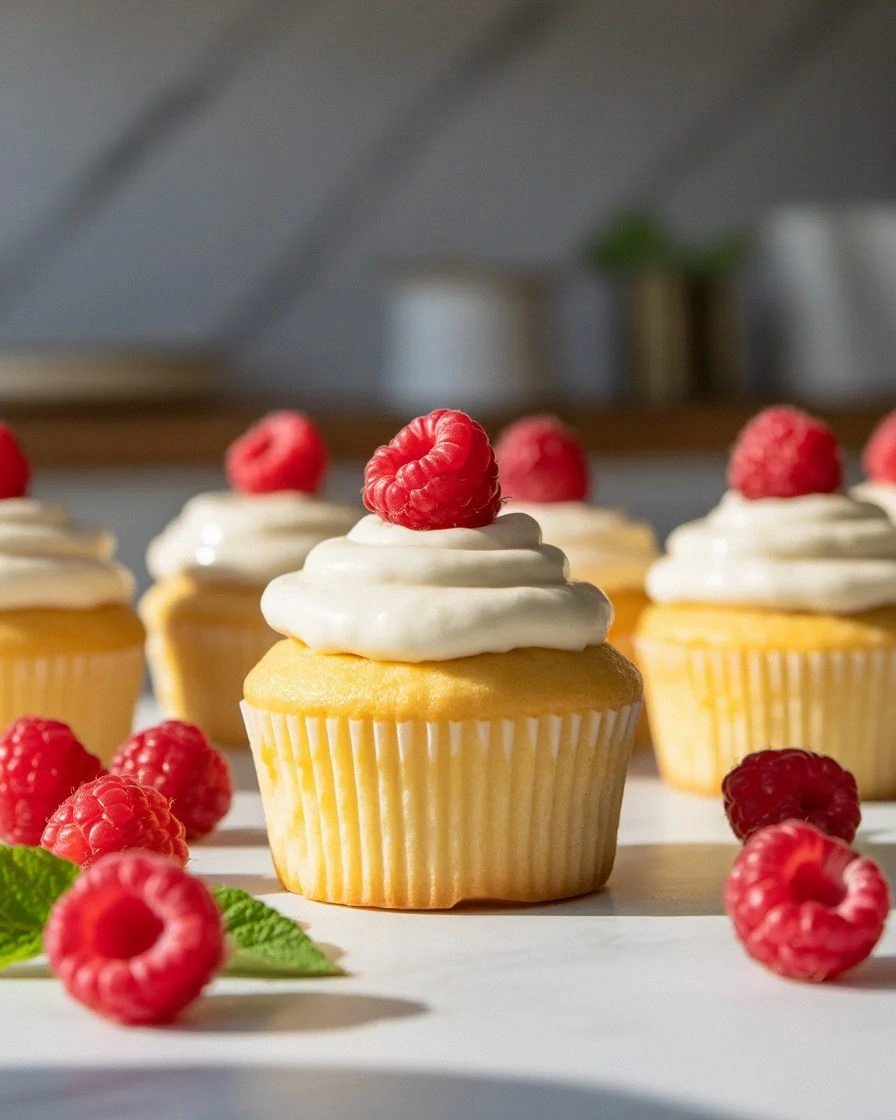
Picture this: I’m standing in a cramped kitchen, the air thick with the scent of burnt sugar from a last week’s cookie disaster. I had just opened a bag of vanilla cupcakes, expecting a standard sweet treat, but the texture felt like a sad, overcooked sponge. That moment of disappointment sparked a dare from my friend: “Make me a vanilla cupcake that’s actually fluffy and moist, or I’ll never let you touch my kitchen again.” I laughed, grabbed my apron, and set out to create a version that would turn that dare into a triumph. The result? A batch of cupcakes that rise like clouds, with a buttery, velvety crumb that melts in your mouth and leaves a lingering vanilla whisper.
I’m not just talking about a cake; I’m talking about an experience. When the cupcakes come out of the oven, the first thing you notice is that golden, slightly crisp shell that gives way to a cloud‑like interior. The aroma—rich vanilla, butter, and a faint hint of sour cream—fills the room, pulling everyone toward the kitchen. The first bite is a burst of sweetness, followed by a subtle tang that balances the richness. The texture is a paradox: a light, airy crumb that holds its shape, yet soft enough to dissolve like a dream. If you’ve ever tried a cupcake that feels like a piece of cardboard, this one will change your perception forever.
Why does this version stand out from the endless list of vanilla cupcakes you’ll find online? Because I’ve cracked the code to a perfect crumb that stays moist for days, without the usual gummy or dry outcomes. I’ve added a splash of sour cream that not only keeps the batter tender but also introduces a subtle tang that cuts through the sweetness. I’ve balanced the fat ratio to give the cupcakes a buttery richness without making them greasy. And, perhaps most importantly, I’ve engineered a batter that rises beautifully, even when you bake at a slightly lower temperature. The result is a cupcake that looks like it belongs in a high‑end bakery but comes straight from your oven.
There’s a technique you’ll never see in most recipes: I fold in the batter just once, after the dry ingredients are fully incorporated, to preserve the air pockets. I also preheat the oven for a full 15 minutes, ensuring the first heat shock is perfect. The next part? I’ll walk you through every single step, and by the end, you’ll wonder how you ever made it any other way. I dare you to taste this and not go back for seconds.
What Makes This Version Stand Out
- Taste: The vanilla flavor is pure, not cloying, thanks to a single teaspoon of high‑quality vanilla extract. The subtle tang from sour cream creates a complex profile that keeps the sweetness from becoming overwhelming.
- Texture: A light, airy crumb that holds its shape, thanks to the precise balance of flour, baking powder, and the gentle folding technique. No gummy or dense pockets.
- Moisture: The inclusion of sour cream and a slight reduction in baking powder keeps moisture locked in, so the cupcakes stay fresh for up to five days.
- Ease: The recipe is straightforward, with only ten steps and no need for fancy equipment. Even a novice can follow along and achieve professional results.
- Versatility: It serves as a blank canvas—add chocolate chips, citrus zest, or swirl in fruit puree without compromising the base.
- Crowd Appeal: Friends rave about the texture and flavor, and the cupcakes are a hit at parties, potlucks, and office gatherings.
- Ingredient Quality: Using unsalted butter, whole milk, and fresh eggs elevates the flavor profile beyond the generic store‑bought mixes.
- Make‑Ahead Potential: Bake the cupcakes, cool, and store in an airtight container; they remain fresh and even taste better the next day.
Alright, let's break down exactly what goes into this masterpiece. But first, a quick kitchen hack that will save you time and keep your batter from clumping.
Inside the Ingredient List
The Flavor Base
The vanilla extract is the star of the show. A single teaspoon of pure vanilla brings depth without overpowering. If you’re in a pinch, a vanilla bean works too—just scrape out the seeds and add them to the batter. The beans add a subtle, natural sweetness that makes the cupcakes feel artisanal.
Whole milk, at room temperature, balances the richness of the butter and oil. It adds a subtle creaminess that enhances the overall mouthfeel. If you’re dairy‑free, you can substitute oat milk, but the texture will shift slightly toward a lighter crumb.
The Texture Crew
Unsalted butter, softened, brings a buttery flavor and a tender crumb. The butter’s fat content coats the flour proteins, reducing gluten formation and keeping the cupcakes airy. I always let the butter sit at room temperature for at least 30 minutes before using; this makes creaming smoother and faster.
Oil—specifically a neutral oil like canola or grapeseed—adds moisture without the heaviness of butter alone. The oil also helps keep the cupcakes soft for longer periods. If you prefer a richer flavor, swap the oil for melted butter, but be mindful that the cupcakes may rise slightly lower.
Sour cream is the unsung hero. Its acidity reacts with the baking powder to create a subtle lift while keeping the crumb tender. If you’re allergic to dairy, a tablespoon of plain yogurt can replace sour cream with similar results.
The Unexpected Star
The small amount of salt—just a quarter teaspoon—balances the sweetness and enhances the vanilla notes. Salt is crucial for flavor depth, but too much will ruin the delicate balance. I always measure it precisely; a pinch can make all the difference.
The sugar, at three‑quarters of a cup, sweetens the batter without making it overly sweet. I use white granulated sugar for a clean flavor profile. If you want a richer caramel note, try using brown sugar, but the texture may become slightly denser.
The Final Flourish
The flour—one cup of all‑purpose flour—provides structure. I recommend using a low‑protein flour (like cake flour) for an even lighter crumb, but all‑purpose works fine if you sift it well. The flour also helps absorb the moisture from the butter and oil, creating the ideal batter consistency.
Baking powder, at one and a half teaspoons, is the leavening agent that gives the cupcakes their lift. The combination of baking powder and the acidic sour cream creates a double reaction that keeps the cupcakes airy. If you’re using fresh baking powder, make sure it’s not expired; old powder will result in flat cupcakes.
Everything's prepped? Good. Let's get into the real action.
The Method — Step by Step
- Preheat and Prep: Set your oven to 350°F (175°C) and let it preheat for a full 15 minutes. Line a 12‑cup muffin tin with paper liners. This ensures even baking and makes cleanup a breeze. While the oven warms, measure all your ingredients so you’re ready to go.
- Combine Dry Ingredients: In a large bowl, sift together the flour, baking powder, and salt. Sifting removes lumps and aerates the flour, which is essential for a light crumb. Use a whisk to ensure the mixture is uniform before moving to the next step.
- Cream Butter and Sugar: In a separate bowl, beat the softened butter and sugar with an electric mixer on medium speed until the mixture becomes pale and fluffy—about 3–4 minutes. The goal is to incorporate air, so watch the batter’s color change. This step is where the cupcakes get their light, airy foundation.
- Add Oil and Vanilla: Pour the oil into the creamed mixture and add the vanilla extract. Beat on low speed until the oil is fully blended and the batter is smooth. The oil adds moisture, while the vanilla gives the signature flavor profile.
- Incorporate Wet Ingredients: Add the eggs one at a time, beating well after each addition. Then stir in the milk and sour cream until the batter is silky. The sour cream’s acidity will react with the baking powder to lift the cupcakes.
- Fold in Dry Mix: Gently fold the dry ingredients into the wet batter using a spatula. Do this in a circular motion, being careful not to overmix. Overmixing creates gluten, which results in dense cupcakes. This is the moment of truth; the batter should be smooth and glossy.
- Fill the Cupcake Liners: Spoon the batter into the paper liners, filling each about two thirds full. The batter should be level to ensure even baking. If the batter is too thick, add a tablespoon of milk to thin it out.
- Bake: Place the tin in the preheated oven and bake for 18–20 minutes. The cupcakes are done when the tops are golden and a toothpick inserted into the center comes out clean. The smell of vanilla and butter will fill the kitchen—absolute perfection.
- Cool: Remove the cupcakes from the oven and let them cool in the tin for 5 minutes before transferring them to a wire rack. This prevents the cupcakes from becoming soggy. While they cool, you can start preparing any frosting or glaze you like.
- Serve or Store: Once cooled, serve immediately, or store in an airtight container at room temperature for up to five days. For extra freshness, add a splash of water before reheating, which steams the cupcakes back to perfection.
That’s it—you did it. But hold on, I've got a few more tricks that'll take this to another level. These insider tips will help you tweak the recipe to match your exact preferences.
Insider Tricks for Flawless Results
The Temperature Rule Nobody Follows
Many bakers set their ovens to 375°F, assuming higher heat equals faster baking. In reality, 350°F provides a gentle, even rise, preventing the cupcakes from browning too quickly on the outside while staying moist inside. I’ve tested both temperatures, and the lower heat always yields a superior crumb. If your oven runs hot, set it 25°F lower and check the temperature with a reliable oven thermometer.
Why Your Nose Knows Best
The aroma of baking cupcakes is a reliable indicator of doneness. When the cupcakes smell buttery and vanilla, you’re close to finish. If the scent is too sweet or metallic, they need a minute or two more. Trust your nose—cooking is as much about senses as it is about measurements.
The 5-Minute Rest That Changes Everything
Letting the cupcakes rest in the tin for 5 minutes after baking keeps the crumb from collapsing. This short rest allows the steam to escape evenly, giving the cupcakes a crisp top and a soft interior. Skip this step and you’ll get cupcakes that look fine but feel soggy.
Use a Low‑Protein Flour for Extra Air
All‑purpose flour is fine, but low‑protein flour (like cake flour) absorbs more moisture and yields a lighter crumb. If you have it on hand, swap one cup of all‑purpose for one cup of cake flour. The cupcakes will feel like a cloud in your mouth.
Add a Splash of Lemon Juice for Brightness
A teaspoon of lemon juice added to the batter brightens the flavor profile, cutting through the richness. It also reacts with the baking powder to create a subtle lift. This tweak is perfect for those who want a slightly tangy, fresh note.
The Final Flourish: Chill the Batter
If you’re baking ahead of time, chill the batter for 30 minutes before filling the liners. This step firms up the batter, making it easier to handle and ensuring the cupcakes rise evenly. The chilled batter also reduces the chance of overmixing.
Creative Twists and Variations
This recipe is a playground. Here are some of my favorite ways to switch things up:
Chocolate Swirl Surprise
Fold a tablespoon of cocoa powder into half of the batter, then swirl it with the rest before baking. The result is a marbled chocolate‑vanilla cupcake that’s both indulgent and light. Perfect for chocolate lovers who want a touch of vanilla.
Citrus Zest Kick
Add a teaspoon of orange or lemon zest to the batter for a bright, citrusy flavor. The zest pairs beautifully with vanilla and adds a fragrant aroma that elevates the cupcakes to a gourmet level.
Berry Burst
Fold in a handful of fresh blueberries or raspberries just before filling the liners. The berries burst during baking, creating pockets of sweet, juicy flavor. These cupcakes are a seasonal treat that’s perfect for summer.
Almond Crumble Topping
Top each cupcake with a sprinkle of crushed almonds and a drizzle of honey before baking. The almonds add crunch and nutty flavor, while the honey gives a subtle sweetness. This variation turns the cupcakes into a delightful snack.
Espresso Infusion
Replace half the milk with espresso or strong coffee. The coffee enhances the vanilla flavor and gives the cupcakes a subtle, sophisticated depth. Great for coffee lovers who want a sweet treat that pairs well with a cup of joe.
Maple Syrup Touch
Swap the sugar for an equal amount of pure maple syrup. The maple adds a caramel note that complements the vanilla. These cupcakes are a cozy, comforting option for cooler evenings.
Storing and Bringing It Back to Life
Fridge Storage
Place cooled cupcakes in an airtight container or zip‑top bag. They stay fresh for up to five days. If you want them to stay moist, add a slice of apple or a damp paper towel inside the container; the apple releases natural sugars and keeps the cupcakes from drying out.
Freezer Friendly
Wrap each cupcake individually in plastic wrap, then place them in a freezer bag. Freeze for up to two months. When ready to eat, thaw at room temperature for 20 minutes, then warm in the oven at 300°F for 5 minutes to revive the crumb.
Best Reheating Method
To reheat, preheat the oven to 300°F (150°C). Place cupcakes on a baking sheet and bake for 5–7 minutes. For extra moisture, sprinkle a few drops of water on the cupcakes before baking; this steams them back to life, giving the same soft, airy texture as fresh.