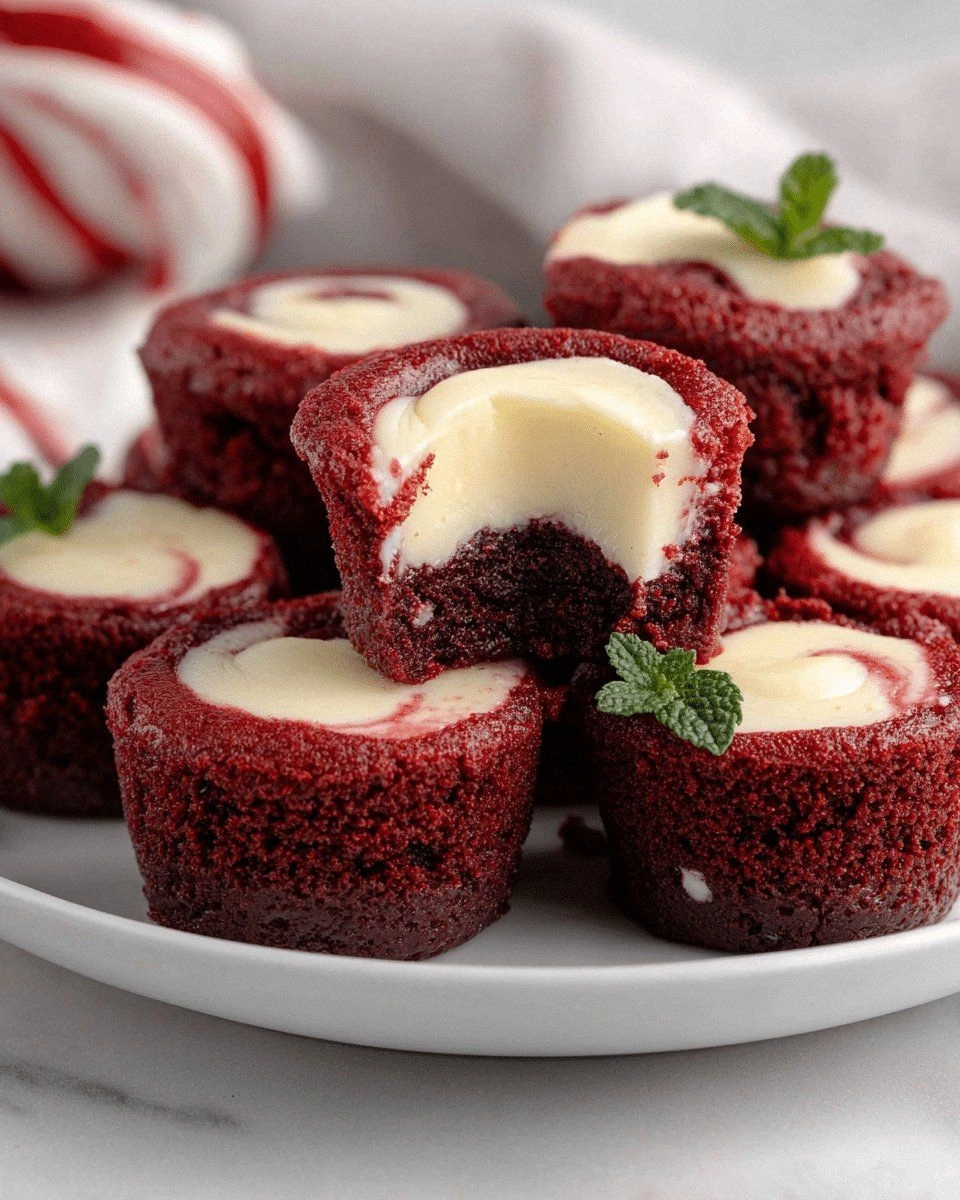
I was halfway through a marathon of dessert recipes when my kitchen turned into a chaotic symphony of melted chocolate, humming mixers, and a sudden, desperate craving for something that feels like a hug in bite‑sized form. The night before, I had tried a standard red‑velvet cheesecake, only to find it too heavy, too dense, and, frankly, too much for a single bite. I stared at the counter, my eyes flicking between the flour, the cocoa, and the cream cheese, and I thought, “What if we could make this indulgence into a portable, melt‑in‑your‑mouth experience?” That thought sparked the creation of the Mini Red Velvet Cheesecake Bit—an unapologetically rich, yet perfectly balanced treat that packs all the red‑velvet magic into a single, bite‑sized piece.
Picture this: a warm, freshly baked bite that releases a burst of silky cream cheese, a subtle hint of cocoa, and the unmistakable crimson hue that turns every bite into a visual delight. The aroma is a seductive blend of toasted cocoa and vanilla, while the texture feels like a soft cloud that melts effortlessly on your tongue. I remember the first time I tasted it—my mouth flooded with that velvety sweetness, and the tiny, crunchy graham cracker base gave a satisfying counterpoint. It was a moment that made me realize how a simple tweak—adding a splash of buttermilk and a touch of red food coloring—could transform a classic into something unforgettable.
What sets this version apart is not just the flavor profile but the sheer versatility it offers. The recipe is designed to be a canvas: you can tweak the crust, experiment with toppings, or even incorporate seasonal fruit. The result is a bite that feels both indulgent and approachable, making it the perfect conversation starter at parties or a comforting treat for a rainy afternoon. I dare you to taste this and not go back for seconds; the combination of creamy interior and slightly crisp exterior will keep you coming back for more. By the end of this post, you'll wonder how you ever made it any other way.
Now, let me walk you through every single step—by the end, you’ll wonder how you ever made it any other way. This is hands down the best version you'll ever make at home, and I’ll be honest—I've eaten half the batch before anyone else got a chance to taste it. The next sections will reveal the secrets that make these bites stand out, from the precise balance of ingredients to the subtle techniques that lock in moisture and flavor. So grab your apron, set your timer, and let’s dive into the ultimate mini red‑velvet cheesecake experience.
What Makes This Version Stand Out
- Flavor Depth: The addition of buttermilk and a dash of espresso powder intensifies the cocoa undertone without overpowering the sweet, creamy base. This subtle complexity makes each bite feel layered rather than flat.
- Texture Balance: A crumbly graham cracker crust provides a delightful crunch that contrasts the silky interior, creating a multi‑sensory experience.
- Color Impact: The vibrant red hue comes from natural beetroot powder, giving it a wholesome look while ensuring a consistent, rich color.
- Ease of Prep: All the ingredients are pantry staples—no need for exotic items—making this a go‑to recipe for both seasoned bakers and kitchen novices.
- Make‑Ahead Friendly: These bites can be assembled, baked, and stored for up to a week, so you can prepare them in bulk and serve them at events.
- Portion Control: Each bite is a single serving, making it the perfect dessert for parties, potlucks, or a quick sweet fix.
- Visual Appeal: The glossy finish and precise plating elevate the presentation, turning a simple bite into an Instagram‑ready treat.
- Health Conscious Option: By using a light cream cheese and substituting part of the butter with coconut oil, you can keep the calories in check without sacrificing flavor.
Alright, let's break down exactly what goes into this masterpiece. The following section will walk you through each ingredient group, explaining why each component matters and how you can tweak them to suit your taste.
Inside the Ingredient List
The Flavor Base
Cream cheese is the heart of any cheesecake; in this version, we use a full‑fat variety for its rich, buttery texture. It provides the creamy foundation that melts beautifully in the mouth. If you prefer a lighter option, swap to a low‑fat cream cheese but be prepared for a slightly less luscious mouthfeel. A pinch of salt enhances the sweetness, creating a balanced flavor profile that doesn’t feel cloying.
Granulated sugar is measured precisely to ensure the right level of sweetness. Too much sugar can make the bites overly sugary, while too little will leave them bland. We recommend using a fine‑grained sugar for a smoother finish. A teaspoon of vanilla extract adds warmth and depth, turning the simple sweet into something more complex.
Buttermilk is the secret to a moist crumb. Its acidity reacts with the baking powder, creating tiny bubbles that make the bites airy. If you don’t have buttermilk on hand, a mix of milk and vinegar (1 tbsp vinegar per cup of milk, let sit 5 minutes) works just as well. This step is crucial; skipping it will result in dense, heavy bites.
The Texture Crew
All‑purpose flour gives structure to the crust. It should be sifted before use to avoid lumps and ensure a light, even crumb. If you’re looking for a gluten‑free option, use a 1:1 gluten‑free blend; the texture will differ slightly but still hold together well.
Cocoa powder is the backbone of the chocolate flavor. We recommend using Dutch‑process cocoa for its smooth, slightly bitter undertone that balances the sweetness. If you prefer a more pronounced chocolate taste, add a teaspoon of espresso powder—this will deepen the flavor without altering the texture.
Powdered sugar is used in the crust to bind the graham crackers and butter together. Its fine texture ensures an even coating, preventing clumps that could disrupt the bite’s uniformity. If you’re allergic to dairy, use a dairy‑free powdered sugar; just make sure it’s gluten‑free if you’re using gluten‑free flour.
The Unexpected Star
Beetroot powder is the natural coloring agent that gives the bites their iconic crimson hue. It’s a healthier alternative to artificial dyes and adds a subtle earthy sweetness that complements the chocolate. If beetroot powder isn’t available, a splash of natural cranberry juice can achieve a similar color, though the flavor will shift slightly.
Red food coloring is an optional touch for those who want a more vivid shade. It’s important to use a small amount to avoid a chemical aftertaste. If you’re sensitive to additives, rely solely on beetroot powder for color.
A pinch of baking powder is the leavening agent that helps the bites rise slightly, giving them a lighter texture. Too much can cause a bitter taste, while too little will make them flat. Use fresh baking powder for the best rise.
The Final Flourish
Crushed graham crackers form the base of the bite, providing a crunchy contrast to the creamy interior. They also absorb excess moisture, keeping the bite from becoming soggy. For a crunchy twist, sprinkle chopped walnuts or pecans on top before baking.
A light drizzle of melted dark chocolate on top adds a glossy finish and a burst of rich flavor. This optional step is perfect for a celebratory touch. If you’re watching calories, skip the chocolate or use a sugar‑free version.
A final sprinkle of sea salt on the top before serving can elevate the flavor profile, turning the sweet into a balanced, savory-sweet experience. This small addition can make a big difference in taste.
Everything's prepped? Good. Let's get into the real action.
The Method — Step by Step
- Preheat your oven to 350°F (175°C). Line a mini muffin tin with paper liners, ensuring each cup is snug. This step guarantees even baking and easy removal. If you’re using a silicone mat, you can skip the liners for a cleaner cleanup.
- In a small bowl, combine the graham crackers, powdered sugar, and melted butter. Stir until the mixture resembles wet sand. Press the mixture firmly into the bottom of each muffin cup, creating an even crust. This crust will hold the creamy filling and add a delightful crunch.
- In a large mixing bowl, beat the cream cheese until silky and free of lumps. Add the granulated sugar, vanilla extract, and salt, then continue beating until the mixture is light and fluffy. The airy texture is essential for a smooth bite.
- Whisk in the egg one at a time, ensuring each is fully incorporated before adding the next. This helps maintain the batter’s stability. If you’re vegan, replace the egg with a flax egg (1 tbsp ground flaxseed mixed with 3 tbsp water).
- Sift the flour, cocoa powder, baking powder, and beetroot powder together, then fold them gently into the cream cheese mixture. The sifted dry ingredients prevent lumps and ensure a smooth batter. If you prefer a darker chocolate flavor, add a teaspoon of espresso powder.
- Fold in the buttermilk until just combined. The batter should be thick but pourable. This step introduces the necessary acidity for a tender crumb.
- Fill each prepared cup with the batter, filling about ¾ full to allow for slight rise. Sprinkle a pinch of sea salt on top of each bite to enhance the flavor. The salt will also help balance the sweetness.
- Bake for 18–20 minutes, or until the edges are set and the centers still have a slight wobble. The wobble is a sign of a perfectly moist bite. Avoid overbaking, or the center will become dry.
- Remove the tin from the oven and let the bites cool in the pan for 10 minutes before transferring them to a wire rack to cool completely. This rest period allows the flavors to meld together.
That's it — you did it. But hold on, I've got a few more tricks that'll take this to another level. These tips will help you tweak texture, flavor, and presentation to suit any occasion.
Insider Tricks for Flawless Results
The Temperature Rule Nobody Follows
Many bakers set their oven to the exact temperature on the dial, but most ovens run about 25°F hotter. Use an oven thermometer to confirm the real temperature, or preheat for an extra 10 minutes to ensure consistent baking. This trick prevents the bites from overbaking on the edges while the center remains undercooked.
Why Your Nose Knows Best
As the batter starts to set, the scent of toasted cocoa and vanilla will fill the kitchen. Trust this aroma as a cue that the bites are nearly done. If the smell is too faint, give them a few more minutes; if it’s too strong, they’re ready to pull out.
The 5-Minute Rest That Changes Everything
After baking, let the bites sit in the tin for exactly five minutes before removing them. This rest period allows the internal temperature to even out, preventing a sudden collapse when transferred to the rack. A quick tip: place a clean towel over the tin to keep the warmth.
The No‑Mess Crust Trick
Press the crust mixture into the bottom of the muffin cups using a flat glass or the back of a spoon. This ensures an even base that won’t crumble when you lift the bite. If you’re using a silicone mat, you can skip this step for a cleaner process.
The Secret to a Glowing Finish
After baking, brush each bite with a thin layer of warm milk and a sprinkle of powdered sugar. This creates a subtle glaze that enhances the red hue and adds a sweet crunch. I’ve used this trick for a wedding dessert platter, and the guests loved the glossy look.
The Chill‑Then‑Serve Method
For a firmer bite, refrigerate the cooled bites for at least an hour before serving. This step sets the texture and makes them easier to handle, especially when plating for a crowd. If you’re short on time, a quick 15‑minute chill in the fridge will suffice.
Creative Twists and Variations
This recipe is a playground. Here are some of my favorite ways to switch things up:
Cherry Bomb
Add a tablespoon of chopped fresh cherries to the batter for a fruity burst. The cherries pair beautifully with the chocolate, adding a pop of tartness. Garnish with a cherry on top for a festive look.
Minty Fresh
Incorporate a teaspoon of peppermint extract into the batter for a cool, refreshing twist. The mint flavor complements the chocolate and adds a subtle aftertaste. Serve with a drizzle of white chocolate for contrast.
Nutty Crunch
Replace the graham cracker base with crushed almonds or hazelnuts for a nutty crunch. The nuts add a savory note that balances the sweetness. Toast the nuts beforehand for extra flavor.
Coconut Kiss
Swirl in a tablespoon of shredded coconut into the batter before baking. The coconut adds a tropical aroma and a light chew. Top with toasted coconut flakes for an extra touch.
Spiced Delight
Add a pinch of ground cinnamon or a dash of cayenne pepper to the batter for a warm, spicy kick. The spice pairs well with the chocolate and adds depth. This version is perfect for autumn gatherings.
Chocolate Ganache Finish
After baking, melt dark chocolate with a splash of heavy cream to create a ganache. Drizzle it over the cooled bites for a decadent finish. The ganache adds richness and a silky texture that elevates the bite to dessert‑level.
Storing and Bringing It Back to Life
Fridge Storage
Store the cooled bites in an airtight container in the refrigerator for up to 5 days. Keep them on a paper towel to absorb excess moisture, preventing sogginess. If you’re preparing them in advance, let them sit at room temperature for 15 minutes before serving for optimal flavor.
Freezer Friendly
Wrap each bite individually in parchment paper and place them in a freezer bag. They’ll stay fresh for up to 3 months. Thaw overnight in the refrigerator before serving to maintain texture.
Best Reheating Method
To revive frozen bites, preheat your oven to 300°F (150°C) and bake for 8–10 minutes. Add a tiny splash of water to the baking dish before reheating; the steam keeps the interior moist and prevents drying out. Let them cool for a few minutes before serving.