Picture yourself standing in a kitchen that smells like freshly baked dreams, the oven timer ticking down, and a single thought echoing in your mind: “I dare you to taste this and not go back for seconds.” That was the moment when I realized that a humble box of red velvet cake mix, a handful of cookies and cream candy bars, and a splash of sour cream could conspire to create a dessert that feels like a secret handshake between chocolate, cream, and a hint of nostalgia. I was chasing the ultimate cookie‑and‑cream experience, and the universe handed me a recipe that was nothing short of a revelation.
I had once tried the standard cookie‑and‑cream cake, only to find it flat, overly sweet, or missing that coveted molten center. The disaster happened when I used a regular cake mix and forgot to fold in the melted candy bars until the batter was already in the oven. The result? A cake that looked like a sad, soggy cookie. That kitchen fiasco turned into a dare: create a version that would have people begging for seconds, and I answered with a recipe that feels like a velvet curtain opening to a world of gooey, buttery, chocolate‑laden bliss.
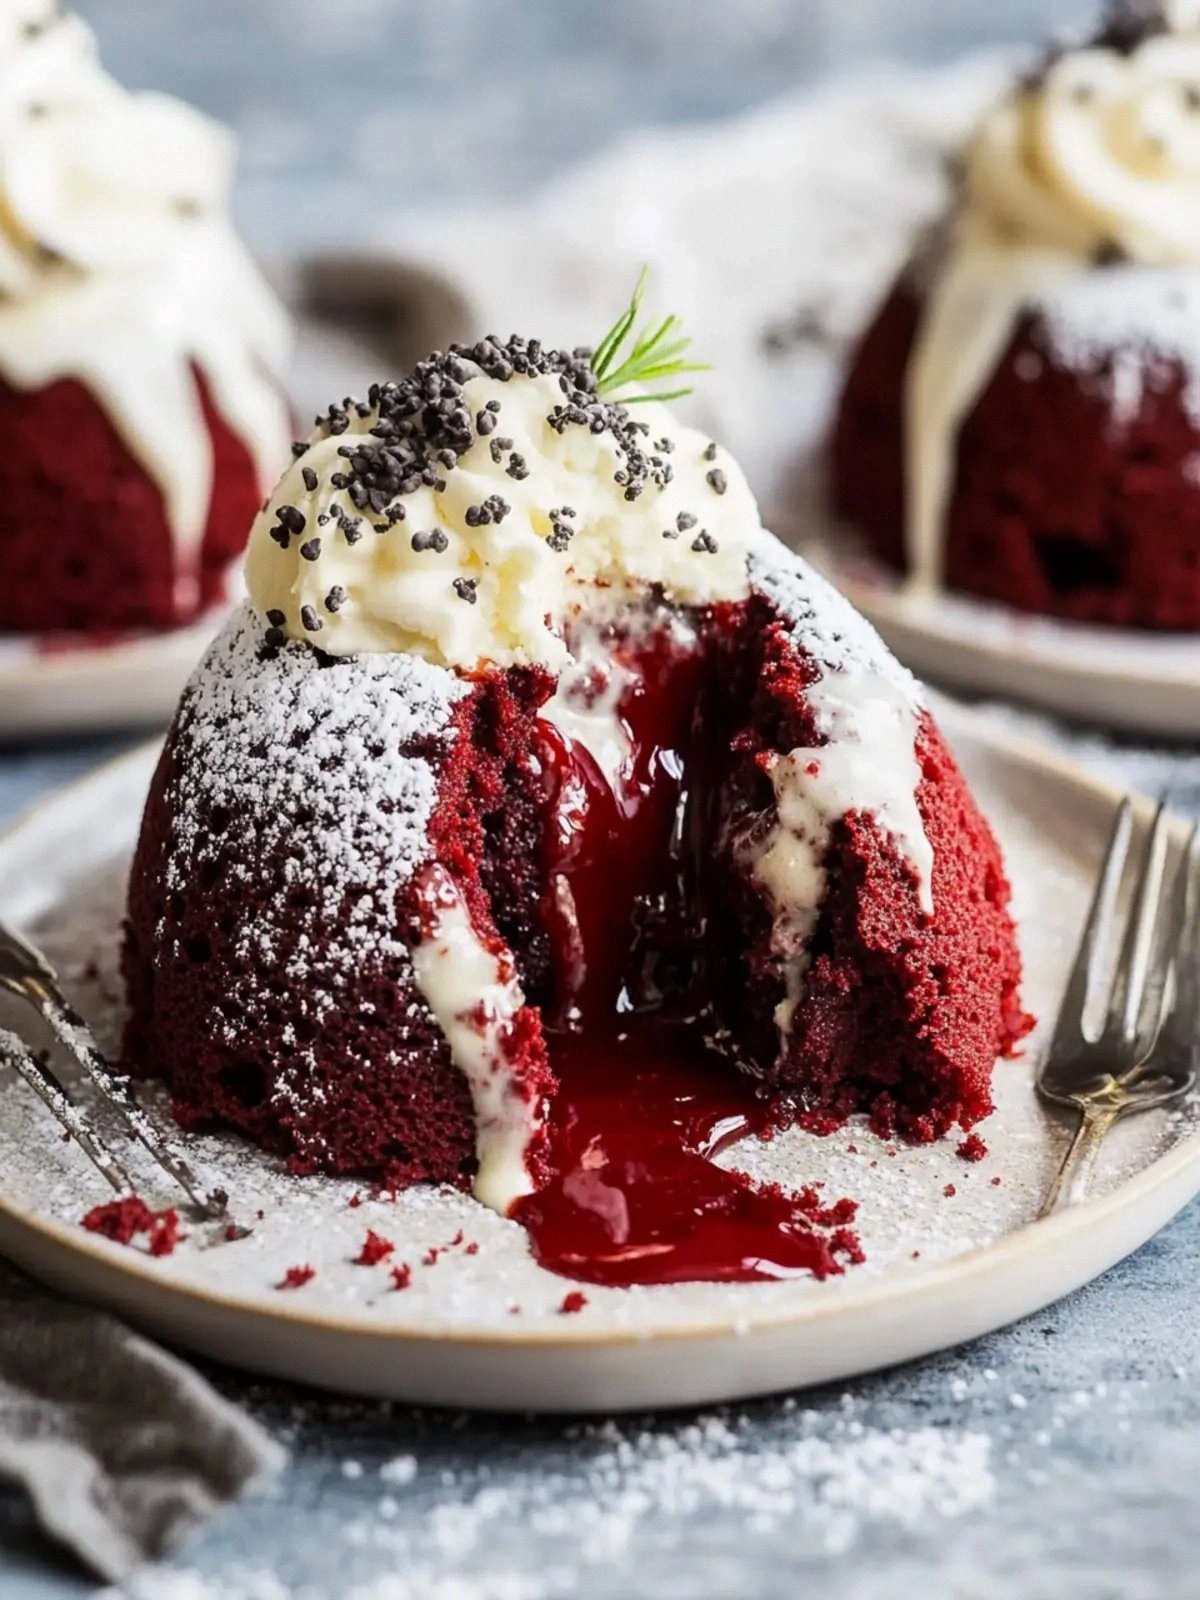
What makes this version stand out is not just the ingredients—it’s the meticulous layering of textures and flavors that play against each other. Think of the cake as a canvas: the buttery, slightly tangy batter paints a backdrop, the cookie bars embed pockets of crunchy, chocolatey surprise, and the molten chocolate and white chocolate sauces drape over the top like silk. The final bite is a symphony—airy on the outside, fudgy and molten inside, and the cold ice cream melting into the warm batter for a temperature contrast that sings.
And there’s a twist you won’t expect: the use of sour cream and oil not only enriches the batter but also creates a silky mouthfeel that lets the chocolate sauce glide over the cake like a satin ribbon. This is hands down the best version you’ll ever make at home, and if you’ve ever struggled with a cookie‑and‑cream dessert that falls flat, you’re not alone—this recipe is the fix you’ve been craving. Stay with me here—this is worth it.
What Makes This Version Stand Out
- Texture: The batter’s silky smoothness, combined with the crunchy cookie bars, creates a delightful contrast that keeps every bite interesting.
- Flavor: The tangy sour cream balances the sweetness, while the chocolate and white chocolate sauces add depth and richness.
- Visual Appeal: The molten chocolate center and glossy sauces make the cake a showstopper, perfect for impressing guests.
- Ease: Using a boxed cake mix saves prep time without sacrificing quality—no need to sift flour or measure dry ingredients.
- Make‑Ahead Friendly: The cake can be baked ahead of time, chilled, and topped with sauces just before serving, making it ideal for parties.
- Ingredient Quality: Choosing high‑quality cookies and cream candy bars ensures that each bite delivers a rich, authentic flavor.
- Audience Reaction: Guests often ask for the recipe after the first bite, proving the dessert’s irresistible appeal.
- Unique Twist: The addition of a scoop of ice cream on top adds a creamy layer that contrasts beautifully with the warm cake.
Alright, let's break down exactly what goes into this masterpiece...
Inside the Ingredient List
The Flavor Base
At the heart of this dessert is the red velvet cake mix, which brings a vibrant color and subtle cocoa flavor. The mix’s pre‑measured proportions ensure a consistent crumb, but the real magic happens when you add sour cream and oil. Sour cream introduces a slight tang that cuts through the sweetness, while oil keeps the cake moist and tender, preventing it from drying out during the molten bake. If you skip the sour cream, the cake will be denser and less airy.
The Texture Crew
The cookies and cream candy bars are the texture crew, breaking up the batter with pockets of crunchy chocolate and creamy filling. When melted and folded in, they create surprise bursts of flavor with every bite. If you prefer a smoother cake, you can crumble the bars instead of melting them, but you’ll lose the gooey center that defines this version.
The Unexpected Star
The ice cream scoop on top is the unexpected star that elevates the dessert from a simple cake to a layered experience. Vanilla ice cream is the classic choice, but a scoop of chocolate or salted caramel can add a new dimension. The cold ice cream melts into the warm cake, creating a creamy cascade that feels like a dessert on steroids.
The Final Flourish
The chocolate and white chocolate sauces are the final flourish, drizzling over the cake like a glossy coat. They add an extra layer of flavor and visual drama, making the dessert feel indulgent and decadent. If you’re a white chocolate fan, the white sauce will make the cake feel lighter, while the dark sauce keeps the richness intact. Skipping the sauces will result in a less complex flavor profile.
Everything's prepped? Good. Let's get into the real action...
The Method — Step by Step
- Preheat your oven to 350°F (175°C) and grease two 9‑inch round cake pans. The right temperature ensures a gentle rise, while the grease prevents sticking. As the oven warms, you’ll notice the faint scent of vanilla and cocoa—an early hint that something delicious is about to happen.
- In a large mixing bowl, combine the red velvet cake mix, sour cream, milk, oil, and eggs. Whisk until the batter is smooth and glossy; the texture should resemble thick pancake batter. If you prefer an extra airy cake, fold in a beaten egg white at this point. Remember, a smooth batter means a uniform rise and a better molten center.
- Melt the cookies and cream candy bars in a microwave or double boiler, stirring every 30 seconds until silky. The chocolate should coat the back of a spoon. Fold the melted chocolate into the batter, ensuring even distribution. The batter will now carry pockets of chocolatey crunch that will pop when you bite into it.
- Pour the batter into the prepared pans, filling them about three‑quarters full. Tap the pans gently to release any air bubbles. The batter should rise slightly as it bakes, creating a soft, slightly domed top. This step is crucial for the molten effect—overfilling can cause the batter to spill over and lose its gooey center.
- Bake for 25–30 minutes, or until the edges are set and the center still jiggles when you give the pan a gentle shake. The smell of toasted cocoa and vanilla will fill the kitchen, signaling that the cake is ready. Don’t rush this step; the molten center depends on a slightly underbaked interior.
- While the cakes bake, prepare the sauces. Warm the chocolate sauce over low heat, stirring until smooth. In a separate saucepan, gently melt the white chocolate sauce, whisking constantly to avoid lumps. The sauces should be pourable but not too thin; they’ll coat the cake like liquid silk.
- Once the cakes are done, remove them from the oven and let them cool on a rack for 5 minutes. Run a knife around the edges to loosen, then carefully invert onto serving plates. The molten center will begin to flow, creating a dramatic visual effect that’s almost too pretty to eat.
- Drizzle the warm chocolate sauce over each cake, then swirl in the white chocolate sauce for a striking color contrast. The sauces will pool at the edges, adding a glossy finish. If you prefer a sweeter finish, sprinkle a pinch of sea salt on top of the sauces to enhance the chocolate flavor.
- Place a generous scoop of vanilla ice cream on each cake. The cold ice cream will melt into the warm batter, creating a creamy cascade that feels like a dessert on steroids. The combination of temperatures adds a playful texture that keeps the dessert exciting from the first bite to the last.
- Serve immediately, preferably with a small fork or spoon. The first bite will feel airy on the outside, then suddenly hit a gooey, chocolate‑filled center, followed by the silky ice cream. The experience is unforgettable—this is why I’ve been bragging about it for weeks. And that’s it— you did it. But hold on, I've got a few more tricks that'll take this to another level...
Insider Tricks for Flawless Results
The Temperature Rule Nobody Follows
Many bakers bake at 375°F, thinking a higher temperature yields a better rise. In reality, a lower temperature of 350°F allows the cake to bake evenly and the molten center to stay gooey. If you’re tempted to increase the heat, keep a close eye on the edges; they can overcook while the center remains underdone.
Why Your Nose Knows Best
Before you open the oven door, pause and inhale. If you smell a faint hint of toasted cocoa and vanilla, the cake is almost ready. A strong, sweet aroma usually means the batter has cooked through and the center is just a touch underdone, which is exactly what you want for a molten effect.
The 5-Minute Rest That Changes Everything
Letting the cakes rest for 5 minutes after baking is not just for convenience; it allows the heat to distribute evenly, making the molten center more pronounced. During this rest, the batter continues to cook slightly, ensuring that the edges are set while the center remains liquid.
The Right Sauce Temperature
Warm your chocolate sauce just enough so it’s pourable, but avoid overheating, which can cause it to separate. Similarly, keep the white chocolate sauce at a low temperature; a hot sauce will melt the ice cream too quickly, ruining the temperature contrast that makes this dessert special.
The Scoop of Ice Cream
If you’re serving the cake during a warm afternoon, choose a firmer ice cream like gelato or a low-sugar option. The firmer texture will hold its shape longer, preventing the ice cream from dissolving into the cake before guests can enjoy it.
Creative Twists and Variations
This recipe is a playground. Here are some of my favorite ways to switch things up:
Chocolate‑Chili Explosion
Add a pinch of cayenne pepper to the batter and drizzle a chili‑infused chocolate sauce on top. The heat balances the sweetness, creating a spicy‑sweet sensation that’s perfect for adventurous eaters.
Minty Fresh
Swap the vanilla ice cream for mint‑infused gelato and sprinkle crushed peppermint candies on top. The mint complements the chocolate sauce, giving the cake a refreshing twist.
Nutty Delight
Crush a handful of hazelnuts and fold them into the batter. The nutty crunch pairs beautifully with the cookie bars, adding another layer of texture.
Berry Burst
Fold in fresh raspberries or blueberries before baking. The berries’ tartness contrasts with the rich chocolate, creating a balanced flavor profile.
Espresso Infusion
Stir a tablespoon of instant espresso powder into the batter. The coffee flavor deepens the chocolate notes, making the dessert feel like a decadent mocha cake.
Lemon Zest
Add a tablespoon of lemon zest to the batter and drizzle a lemon‑infused white chocolate sauce on top. The citrus brightens the dessert, giving it a lively finish.
Storing and Bringing It Back to Life
Fridge Storage
Store the baked cakes in an airtight container in the refrigerator for up to 3 days. Keep the sauces separate until you’re ready to serve, as the sauces can thicken when chilled.
Freezer Friendly
Wrap the cooled cakes tightly in plastic wrap and place them in a freezer bag. Freeze for up to 2 weeks. When ready, thaw in the refrigerator overnight, then top with warm sauces and ice cream.
Best Reheating Method
Reheat the cakes in a 350°F oven for 5 minutes, or microwave on low power for 20 seconds. Add a tiny splash of water before reheating; the steam keeps the cake moist and restores the molten center’s texture.