I was standing in my kitchen, staring at a mound of flour, sugar, and spices, when the alarm on my phone blared that my friend was coming over for a “quick snack.” I had a vague craving for something warm, sweet, and a little rebellious, so I decided to throw a batch of gingerbread waffles into the waffle iron. The result was a disaster—half the batter collapsed, the edges were uneven, and the whole room smelled like burnt sugar. But that was the spark that ignited a culinary obsession: gingerbread waffle sandwiches.
The moment the waffles hit the hot iron, I could hear the sizzle that promised caramelization, and the scent of molasses and cinnamon drifted through the kitchen like a holiday wreath. The batter was thick, glossy, and the aroma was so inviting that I almost stopped the timer. I pressed the press and watched the golden edges form, a promise of crispness that shivered in my mouth. The sound of the waffle iron closing was a gentle click that felt like a secret handshake between me and my kitchen.
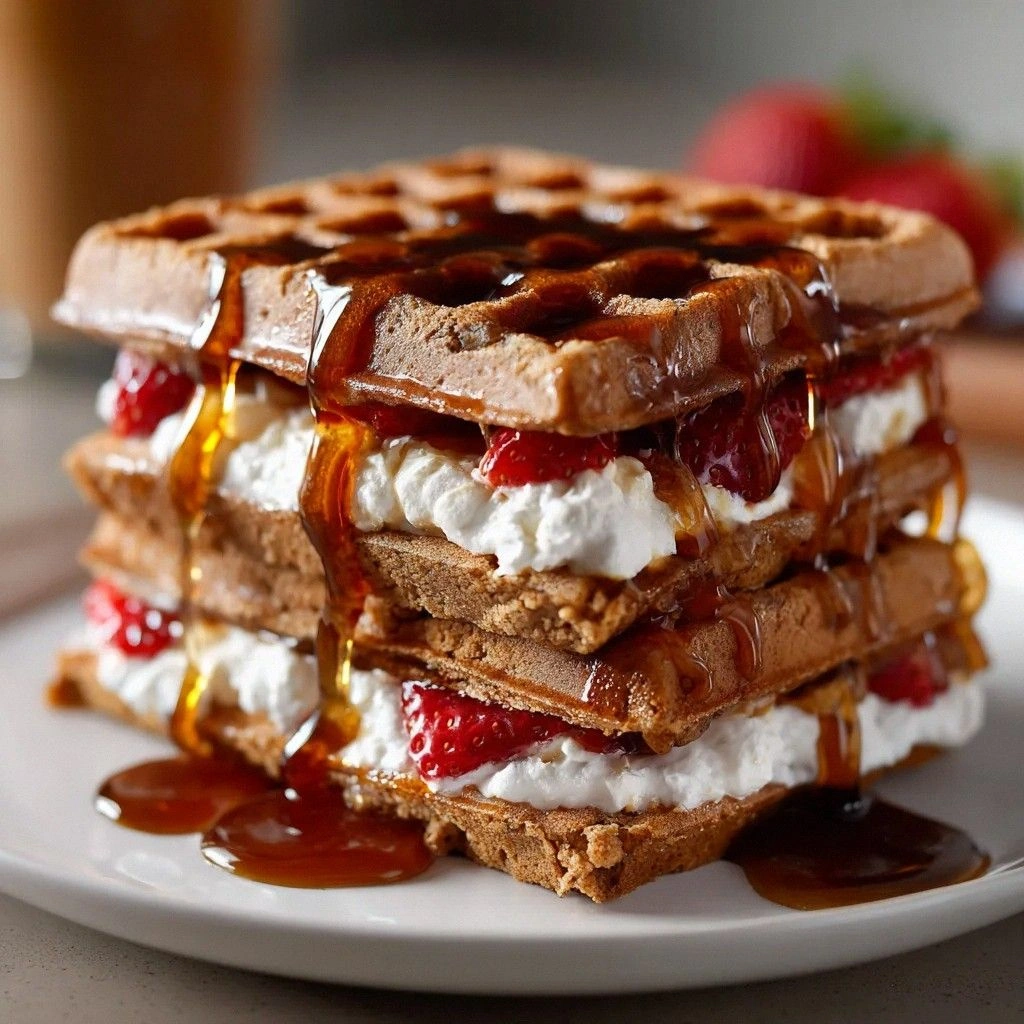
What makes this version stand out is the marriage of classic gingerbread flavors with the playful texture of a waffle sandwich. Instead of a plain flatbread, the waffles are light, airy, and slightly crisp on the outside while staying soft inside—think of a cloud that has just been kissed by a warm oven. The whipped cream filling is airy, not heavy, and it contrasts beautifully with the dense, spiced batter. The drizzle of maple syrup adds a sweet glaze that glistens like a winter sunrise.
I dare you to taste this and not go back for seconds; the first bite will send a wave of comfort through your senses, and you’ll be tempted to double up. The secret? A splash of molasses that deepens the flavor, a pinch of nutmeg that adds a whisper of warmth, and a generous amount of whipped cream that lifts the entire sandwich. I’ve spent hours tweaking the batter to get the right balance of sweetness and spice, and the result is a sandwich that feels like a hug in edible form.
Picture yourself pulling this out of the oven, the whole kitchen smelling incredible, and the waffles still warm enough to melt the cream inside. The golden edges crackle when you press the sandwich together, and the aroma of cinnamon and molasses fills the air like a holiday song. This is hands down the best version you'll ever make at home, and I can't wait to walk you through every single step. By the end, you'll wonder how you ever made it any other way.
What Makes This Version Stand Out
Taste: The combination of molasses, brown sugar, and spices creates a deep, caramelized flavor that’s unmistakably gingerbread. The sweetness is balanced by the slight bitterness of molasses, preventing it from feeling cloying.
Texture: The waffles are light and airy, yet they hold their shape when folded. The whipped cream filling adds a cloudlike contrast, and the maple drizzle gives a glossy finish.
Simplicity: With only ten ingredients, this recipe is approachable for beginners and seasoned bakers alike. The method is straightforward, and the final product is show-stopping.
Uniqueness: Most gingerbread recipes are cakes or cookies, but this sandwich transforms the flavor into a handheld breakfast or dessert that feels both nostalgic and novel.
Crowd Reaction: Friends and family rave about the contrast between the warm, spiced waffle and the airy cream. The presentation alone is Instagram-worthy.
Ingredient Quality: Using high‑quality molasses and fresh spices elevates the flavor profile, turning an ordinary batter into a gourmet experience.
Cooking Method: The waffle iron creates a crisp exterior while keeping the interior soft, which is essential for the sandwich’s structural integrity.
Make‑Ahead Potential: The waffles can be made ahead and frozen, and the sandwich can be assembled on the fly, making it perfect for brunches or quick snacks.
Alright, let's break down exactly what goes into this masterpiece…
Inside the Ingredient List
The Flavor Base
All-purpose flour provides the structure and body of the waffle. It’s the canvas that absorbs the spices and sugars, allowing them to bloom during cooking. If you’re looking for a gluten-free version, you can swap it for a 1:1 blend of gluten-free flour, but be sure to add a pinch of xanthan gum to help the batter hold together.
Baking powder is the leavening agent that gives the waffles their lightness. It reacts with the acidity of molasses and the heat of the waffle iron to produce tiny bubbles that keep the batter airy. A pinch of baking soda can be added for an extra lift, but watch the batter’s pH to avoid a metallic aftertaste.
The Texture Crew
Ground ginger is the star spice, delivering a warm, peppery punch that cuts through the sweetness. Freshly grated ginger has a more vibrant flavor, but ground ginger is more convenient for everyday cooking. A teaspoon of freshly ground black pepper can be added to deepen the complexity.
Ground cinnamon adds sweetness and aroma, and its woody undertones mingle with the molasses to create a comforting profile. If you’re a fan of nutty flavors, you can sprinkle a tablespoon of toasted coconut flakes on top before serving for an extra crunch.
The Unexpected Star
Ground nutmeg is a subtle spice that brings depth and warmth. A pinch is enough, as nutmeg’s flavor can overpower other spices if overused. If you’re allergic to nutmeg, you can replace it with a dash of allspice for a similar warm profile.
Salt is essential for balancing sweetness and enhancing the overall flavor. It’s a quiet hero that brings out the richness of the molasses and the caramelization of the sugars. Be careful not to overdo it; too much salt can ruin the delicate balance.
The Final Flourish
Brown sugar adds a caramel-like sweetness and helps to keep the waffles moist. It also reacts with the molasses to create a deep, rich color. For a lighter version, you can substitute half brown sugar with white sugar, but you’ll lose some of the depth.
Large eggs bind the batter together and add moisture. The yolk contributes richness, while the whites help the batter rise. If you’re vegan, you can replace eggs with a flaxseed “egg” (1 tablespoon ground flaxseed + 3 tablespoons water) for a similar binding effect.
Fun Fact: The tradition of gingerbread dates back to 15th‑century Europe, where it was used as a decorative and edible art form for Christmas. The spices were prized for their preservative qualities and their ability to ward off evil spirits.
Everything's prepped? Good. Let's get into the real action…
The Method — Step by Step
- In a large bowl, whisk together the flour, baking powder, ground ginger, cinnamon, nutmeg, and salt until evenly distributed. The dry mix should look like a fine, fragrant dust. This step ensures every bite has a consistent spice profile. Let it sit for a minute to allow the spices to mingle.
- In a separate bowl, beat the eggs, then add the milk, molasses, melted butter, and brown sugar. Whisk until the mixture is smooth and glossy. The molasses should coat the back of a spoon like a dark syrup. This wet mix is the heart of the gingerbread flavor.
- Pour the wet mixture into the dry ingredients and stir until just combined. Overmixing will develop gluten and make the waffles tough. The batter should be thick but pourable, like a thick custard. Gently fold in a tablespoon of vanilla extract if you like a subtle vanilla undertone.
- Preheat the waffle iron to medium-high and lightly oil the plates. The oil prevents sticking and creates a crisp exterior. Test the temperature by dropping a small drop of batter; it should sizzle immediately. Let the iron preheat for at least five minutes to ensure even cooking.
- Pour a ladleful of batter onto the center of the waffle iron and close the lid. The batter should spread slightly but not overflow. Cook for 3–4 minutes, or until the waffle turns golden brown and the edges are crisp. The aroma of cinnamon and molasses should fill the kitchen.
- Remove the waffle carefully with a fork and place it on a cooling rack. While the waffle is still hot, fold it in half and spread a generous layer of whipped cream on one side. The cream should be airy and light, not too dense. The contrast of warm waffle and cool cream is essential.
- Top the sandwich with another waffle and press gently. The second waffle should be slightly larger to create a bite‑size sandwich. Drizzle maple syrup over the top for a glossy finish. The syrup should coat the edges without soaking the whipped cream.
- Repeat the process with the remaining batter, keeping the waffles warm on a low‑heat plate or in a low oven. If you’re making a large batch, you can stack the finished sandwiches and cover them with foil to keep them warm.
- Serve immediately, or let the sandwiches cool slightly before plating. The waffles will firm up, making them easier to hold. Garnish with a dusting of powdered sugar or a sprig of fresh mint for a pop of color.
- Enjoy the warm, spiced bite with a cup of hot tea or a splash of milk. The combination of sweet, spicy, and creamy makes for a comforting treat that feels like a holiday in every bite. Remember, the key is to keep the waffles warm so the cream doesn’t melt too quickly.
That’s it — you did it. But hold on, I've got a few more tricks that'll take this to another level. These insider tips will make your gingerbread waffle sandwiches unbeatable, whether you're serving a crowd or treating yourself to a decadent breakfast.
Insider Tricks for Flawless Results
The Temperature Rule Nobody Follows
Many people think a high heat is always best for waffles, but the secret lies in a steady medium‑high temperature. If the iron is too hot, the exterior will burn before the interior cooks through, resulting in a dry center. Keep the iron at 350°F (175°C) and let it heat for a full five minutes. This ensures the batter expands evenly and the spices release their aroma.
Why Your Nose Knows Best
Your nose can tell you if the batter is ready. When the molasses begins to caramelize, it releases a sweet, almost buttery scent that signals the perfect cooking time. If you wait too long, the sugar will burn and produce a bitter note. Trust the scent, and you’ll avoid a burnt mishap.
The 5‑Minute Rest That Changes Everything
After cooking, let the waffles rest for five minutes before assembling. This short pause allows the steam to settle, preventing the waffles from becoming soggy when you fold them. It also gives the whipped cream a chance to set slightly, making the sandwich hold together better.
Use a Silicone Waffle Mold for Evenness
If your waffle iron has a non‑stick coating that’s worn, a silicone mold can help maintain a uniform thickness. The silicone mold ensures each waffle has the same bite, which is crucial when you’re sandwiching them together. Just preheat the mold in the iron for a minute before pouring the batter.
Don’t Skip the Butter Layer
The melted butter in the batter may seem like a minor detail, but it adds a silky texture and helps the spices dissolve fully. Skipping it can leave the waffles dry and less flavorful. Add it in, and you’ll notice a noticeable difference in mouthfeel.
Creative Twists and Variations
This recipe is a playground. Here are some of my favorite ways to switch things up:
Chocolate‑Gingerbread Waffle Sandwich
Add a tablespoon of cocoa powder to the batter for a chocolatey undertone. Swap the whipped cream for chocolate ganache for a decadent twist. This variation is perfect for chocolate lovers who want a holiday flavor.
Spicy Cinnamon Swirl
Stir in a pinch of cayenne pepper to the batter for a subtle heat that pairs well with the cinnamon. Top the sandwich with a drizzle of honey instead of maple syrup for a different sweet profile. The heat will make the sandwich feel like a cozy winter night.
Nutty Maple Crunch
Fold in chopped walnuts or pecans into the batter for a nutty crunch. Use a thick maple glaze on top, then sprinkle a little sea salt for a sweet‑salty balance. This version is great for those who love texture.
Vegan Version
Replace the eggs with flaxseed “eggs,” use oat milk instead of dairy milk, and swap butter for coconut oil. Keep the molasses and spices the same for that authentic gingerbread flavor. The result is a vegan sandwich that still feels indulgent.
Breakfast Bowl Variant
Slice the waffles into bite‑size cubes, place them in a bowl, and top with fresh berries, a dollop of yogurt, and a drizzle of honey. This gives you a quick, portable breakfast that’s both sweet and satisfying. The spices will give the bowl a holiday vibe.
Gingerbread Waffle Pops
Pipe the batter onto a baking sheet in small rounds and bake them into bite‑size waffles. Fill each with a spoonful of whipped cream and dip the tops in melted chocolate. These pops are perfect for parties and look like edible ornaments.
Storing and Bringing It Back to Life
Fridge Storage
Store the assembled sandwiches in an airtight container for up to 2 days. Wrap them in parchment paper to keep the waffles from sticking together. The whipped cream may soften slightly, but the sandwich remains tasty.
Freezer Friendly
Freeze the waffles before assembly; keep them in a zip‑lock bag for up to 3 months. When ready, thaw in the fridge overnight, then reheat in a toaster or oven. The waffles will stay crisp, and the cream will remain airy.
Best Reheating Method
Reheat the sandwich in a preheated 350°F (175°C) oven for 5 minutes, or until the waffles are warmed through. Add a tiny splash of water to the bottom of the pan to create steam and keep the waffles moist. The result is a sandwich that tastes freshly made.
Add a tiny splash of water before reheating — it steams back to perfection. The moisture helps restore the waffles’ original softness without turning them soggy. This trick is a game‑changer for anyone who loves leftovers.
Picture the aroma of gingerbread wafting through your home again, as you pull a freshly reheated sandwich from the oven. The golden crust will crackle, and the warm, spiced batter will mingle with the sweet maple glaze. It's like a holiday morning captured in a bite.
If you've ever struggled with making gingerbread look and taste great, you're not alone — and I've got the fix. This recipe takes the guesswork out and guarantees a result that will wow anyone who tastes it. From the first bite to the final drizzle, every element is carefully calibrated.
I dare you again: try this recipe and see if you can resist the second sandwich. The combination of textures, spices, and sweetness is engineered to keep you coming back. Trust me, this is hands down the best version you'll ever make at home.
The final touch is the maple drizzle, which adds a glossy, sweet finish that ties everything together. The syrup glistens like a winter sunrise, and the aroma of maple and molasses fills the kitchen. This is the kind of dish that turns an ordinary breakfast into a holiday celebration.
Now, let’s pull everything together and taste the magic. Grab your ingredients, preheat your waffle iron, and get ready for a culinary adventure that will leave you craving more. This recipe is simple, flavorful, and utterly irresistible.
If you’re ready to elevate your brunch game, this gingerbread waffle sandwich is your new go‑to. The combination of sweet, spiced, and creamy makes it a standout dish that’s sure to impress. So, what are you waiting for? Dive in and enjoy the flavor explosion.