I still remember the night my friend dared me to bake a gluten‑free chocolate cookie that would make her taste buds do a happy dance. The kitchen smelled like burnt sugar and melted butter, and my oven timer kept ringing like a broken metronome. I was half‑screaming, half‑laughing, when the first cookie emerged from the oven: thick, fudgy, and crackly like a fresh snowflake that has just melted on your tongue. That moment was the spark that turned a kitchen mishap into a culinary revelation. I am not going to lie – I ate half the batch before anyone else even got a bite, and the second half was a silent, sweet victory. If you’re ready for a cookie that will make your friends question their own baking skills, let me walk you through every single step — by the end, you’ll wonder how you ever made it any other way.
What makes this version stand out is not just the recipe, but the philosophy behind it. I’ve taken the time to understand how each ingredient behaves, how the texture is achieved, and how to keep the cookies gluten‑free without compromising on decadence. This isn’t a generic cookie recipe; it’s a carefully orchestrated dance of flavors and textures that will leave you craving the next bite. Below, you’ll find the exact ingredients, the secrets that make them work together, and the step‑by‑step method that guarantees a flawless outcome.
What Makes This Version Stand Out
- Flavor: The Dutch‑process cocoa powder gives a deep, slightly bitter undertone that balances the sweetness of the chocolate chips, creating a complex chocolate experience that feels like a chocolate bar in cookie form.
- Texture: The combination of dark brown sugar and granulated sugar, along with the butter, produces a cookie that is chewy in the center but crisp on the edges, a texture profile that most gluten‑free recipes miss.
- Gluten‑Free Integrity: Using a high‑quality 1‑to‑1 gluten‑free flour blend that mimics the protein structure of wheat flour, the cookies hold together without the crumbly bite that often plagues gluten‑free baked goods.
- Simplicity: Only ten ingredients, all pantry staples or easy to find at the grocery store. No need for specialty mixes or hard‑to‑obtain items.
- Crowd‑Pleaser: Whether you’re hosting a potluck, a movie night, or a quiet evening, these cookies are guaranteed to be the highlight of the snack table.
- Make‑Ahead Friendly: The dough can be frozen for up to three months, and the cookies reheat to a fresh‑baked state in minutes.
- Ingredient Quality: Each ingredient is chosen for its ability to deliver a professional taste; the dark chocolate chips, in particular, are a premium, bittersweet variety that melts beautifully.
- Cooking Method: The precise mixing technique ensures the butter is properly incorporated, preventing greasy or uneven cookies.
Alright, let's break down exactly what goes into this masterpiece…
Inside the Ingredient List
The Flavor Base
The Dutch‑process cocoa powder is the backbone of the cookie’s flavor profile. Its alkalized process removes acidity, giving a richer, more chocolatey taste that doesn’t compete with the sweetness of the sugars. If you skip this and use regular cocoa powder, the cookies will taste noticeably more acidic and the chocolate chips will dominate. For a sweeter version, you can add a teaspoon of espresso powder to deepen the chocolate notes.
The Texture Crew
Dark brown sugar and granulated white sugar work together to create that coveted chewy center and crisp outer shell. The brown sugar adds moisture and caramel flavor, while the white sugar provides structure and a slight crunch. If you omit the brown sugar, the cookies will be dry and crumbly. For a slightly lighter texture, replace half the brown sugar with coconut sugar, which also adds a subtle coconut undertone.
The Unexpected Star
Dark chocolate chips are the star that delivers that melt‑in‑your‑mouth experience. They soften during baking but remain slightly firm, offering pockets of gooey chocolate. If you prefer a smoother texture, substitute the chips with chopped dark chocolate bars; the melt will be more uniform. A pinch of sea salt flakes brightens the chocolate flavor and balances the sweetness.
Everything's prepped? Good. Let's get into the real action...
The Method — Step by Step
- Preheat the oven and prepare the pan: Heat your oven to 350°F (175°C) and line two baking sheets with silicone mats. The mats will prevent sticking and allow the cookies to cool evenly. While the oven warms, gather all your ingredients on a clean counter. The aroma of butter and sugar will already start to dance in the air. This is the moment where anticipation builds, and you’re already half‑way to cookie heaven.
- Mix the dry ingredients: In a medium bowl, whisk together the gluten‑free flour, Dutch‑process cocoa, and baking powder. The dry mix should be a uniform dark brown color. This step ensures even distribution of leavening, preventing pockets of under‑baked dough. Keep the mixture aside for now; you’ll need it to fold into the wet mixture later. Feel the flour’s texture; it should feel slightly gritty but not coarse.
- Cream the butter and sugars: In a stand mixer fitted with the paddle attachment, beat the unsalted butter, dark brown sugar, and granulated sugar together on medium speed until the mixture is light and fluffy. This will take about 3 minutes. The goal is to incorporate air into the butter, giving the cookies a lighter bite. As the mixture turns from pale to creamy, you’ll hear the familiar rhythmic clack of the mixer blades. The smell of caramelized sugar will fill the kitchen, signaling that you’re on the right track.
- Add the eggs and vanilla: Crack the eggs into the bowl, one at a time, allowing each to fully integrate before adding the next. Then pour in the pure vanilla extract. Beat on medium speed until the mixture is smooth and the eggs are fully incorporated. The batter should be silky, with no visible egg strands. This step ensures the cookies have a tender crumb and a subtle vanilla undertone that complements the chocolate.
- Combine wet and dry mixtures: Gradually add the dry ingredient mixture to the wet batter, folding gently with a spatula until just combined. Avoid overmixing, as this can lead to dense cookies. The batter should be thick but still pourable. The dough will feel a bit sticky, which is normal; you’ll see the texture change as it cools. This folding technique ensures the chocolate chips are evenly distributed throughout the dough.
- Fold in the chocolate chips: Gently stir in the dark chocolate chips, ensuring they’re evenly dispersed. The chips should be tucked into the dough, not sitting on top. This step guarantees that each bite has a chocolate burst. As the chips melt slightly in the batter, they’ll create pockets of molten chocolate that will ooze out as the cookie cools.
- Chill the dough: Cover the dough with plastic wrap and refrigerate for at least 30 minutes. If you’re in a hurry, you can skip this step, but the cookies will be less chewy. Chilling helps the dough firm up, making it easier to portion and preventing spreading during baking. The dough will become a firm, cool slab that’s perfect for scooping.
- Portion the dough: Using a cookie scoop or a tablespoon, portion the dough onto the prepared baking sheets, spacing each cookie about 2 inches apart. The size of each cookie will determine the baking time; medium-sized cookies are ideal for a chewy center. If you prefer thicker cookies, use a larger scoop, but be mindful that they’ll need a slightly longer bake time.
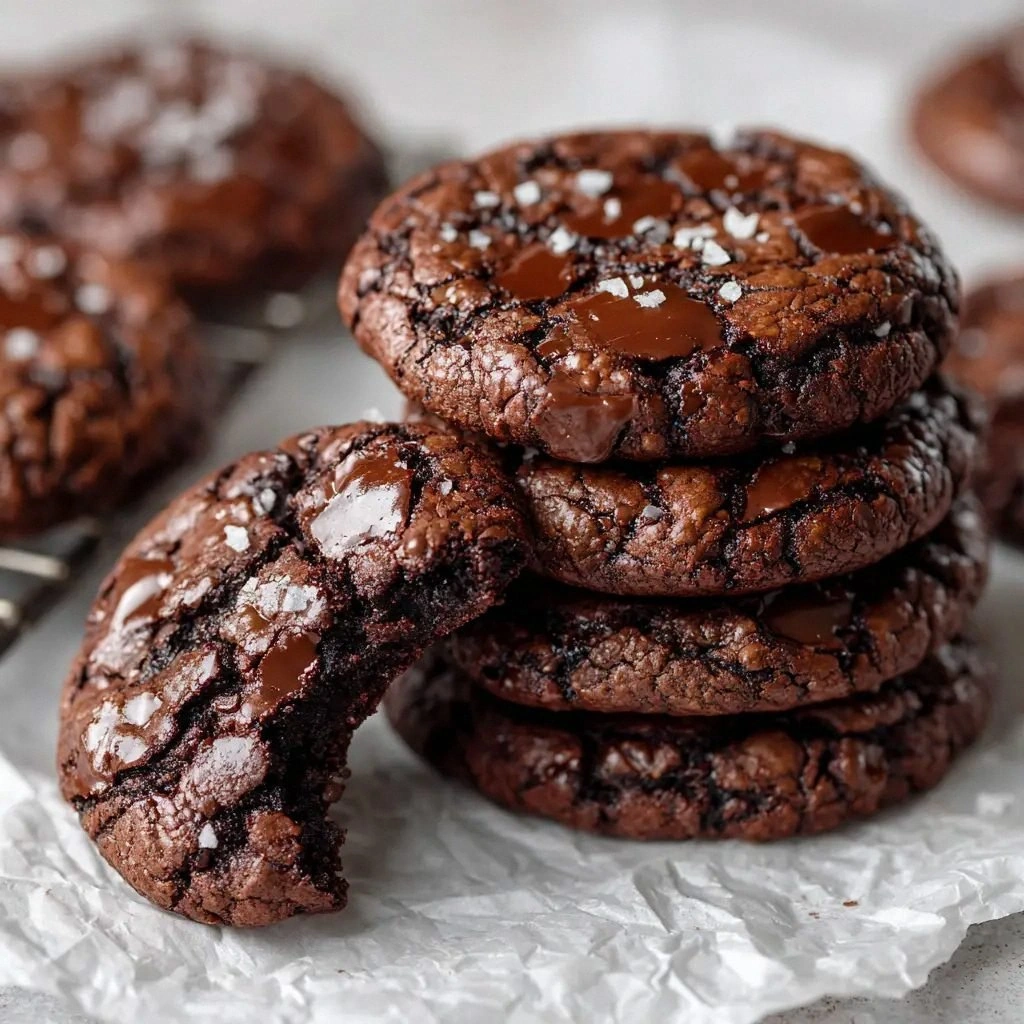
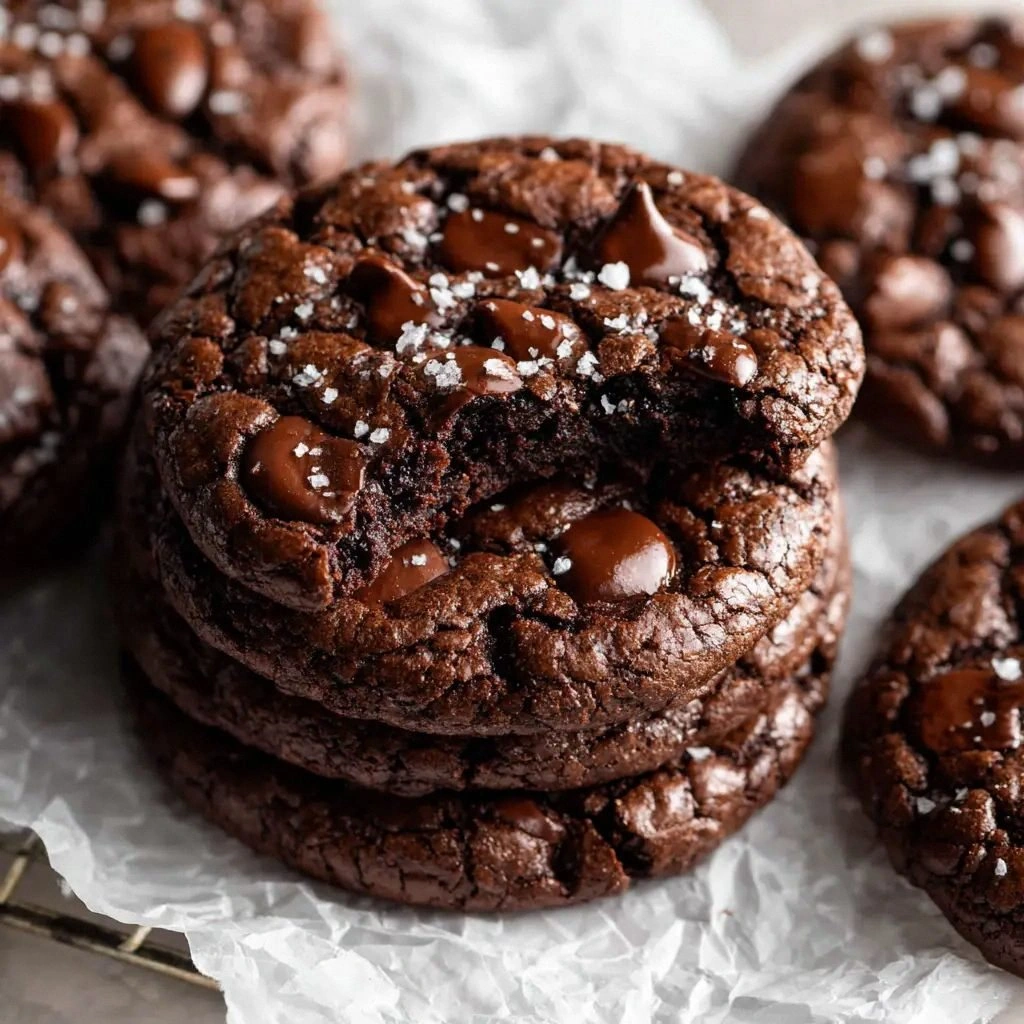
- Bake the cookies: Place the baking sheets in the preheated oven and bake for 12-14 minutes, or until the edges are set and the centers have firmed up. The cookies will look slightly undercooked in the middle; this is intentional, as they will continue to set as they cool. Remove them from the oven when the tops are lightly browned. Let them cool on the sheet for 5 minutes before transferring to a wire rack. The aroma of chocolate will fill the air, and you’ll hear that satisfying crackle as the cookies cool.
- Cool and serve: Once the cookies have cooled completely, transfer them to a storage container. These cookies are best enjoyed within 24 hours, but they can be frozen for up to three months. When you’re ready to eat them, let them sit at room temperature for 10 minutes to soften slightly. The result will be a cookie that feels like a chocolate bar in your mouth, with a chewy center and a crisp, crackly edge.
That's it — you did it. But hold on, I've got a few more tricks that'll take this to another level...
Insider Tricks for Flawless Results
The Temperature Rule Nobody Follows
Many bakers bake at 375°F, but that high temperature can cause the edges to burn before the center is set. Lowering the oven to 350°F allows the cookies to bake evenly, ensuring the center remains fudgy while the edges develop a golden crust. If you’re using a convection oven, reduce the temperature by 25°F to avoid over‑browning.
Why Your Nose Knows Best
Before you pull the cookies out of the oven, listen for that faint, sweet aroma of caramelized sugar and melted chocolate. If the scent feels underdeveloped, give them an extra minute or two. Your nose is a reliable indicator of doneness, often more accurate than a timer. Trust the scent, and you’ll avoid the dreaded “burnt on the outside, raw on the inside” cookie.
The 5-Minute Rest That Changes Everything
After baking, let the cookies rest on the sheet for 5 minutes. This brief pause allows the steam inside to redistribute, giving the cookies a more even texture. It also prevents them from breaking apart when you transfer them to the rack. Many bakers skip this step, resulting in fragile cookies that crumble on the first bite.
Don’t Walk Away from the Stove
The final minutes of baking are critical. If you leave the oven unattended, the cookies can overbake, turning them into brittle, hard discs. Keep a close eye on the edges; they should be set but still slightly pale. A quick glance every 2 minutes ensures you catch the perfect moment to pull them out.
Use a Baking Sheet with a Light Color
Dark pans absorb more heat and can cause the cookies to brown too quickly on the bottom. A light-colored sheet or a silicone mat provides a more even bake, preventing the cookies from turning too dark. If you don’t have a silicone mat, line the sheet with parchment paper and add an extra sheet of parchment on top of the dough.
Let the Dough Rest After Mixing
After folding the dry ingredients into the batter, cover the bowl and let it sit for 10 minutes. This resting period allows the flour to fully hydrate, which results in a softer, more cohesive cookie. The dough will feel less dry and easier to scoop.
Creative Twists and Variations
This recipe is a playground. Here are some of my favorite ways to switch things up:
Almond Crunch Edition
Add 1/2 cup of toasted almond slivers to the dough for a nutty crunch. The almonds complement the chocolate, adding a subtle earthy flavor. These cookies are perfect for those who love a bit of texture in every bite.
Minty Fresh Surprise
Stir in 1 teaspoon of peppermint extract and a handful of crushed peppermint candies. The mint provides a refreshing contrast to the deep chocolate, making the cookies a holiday favorite.
Sea Salt Caramel Swirl
Swirl in a tablespoon of caramel sauce and a pinch of sea salt before baking. The caramel melts into pockets of gooey sweetness, while the salt adds a savory finish that balances the chocolate.
Espresso Infusion
Add 1 teaspoon of instant espresso powder to the dry mix. The espresso deepens the chocolate flavor and gives the cookies a subtle caffeine kick. Great for a morning treat or a post‑dessert pick‑me‑up.
Nutella Swirl
Fold in a few spoonfuls of Nutella before baking. The hazelnut spread creates pockets of rich, creamy flavor that melt in your mouth. These cookies are an indulgent treat for Nutella lovers.
White Chocolate & Raspberry
Swap the dark chocolate chips for white chocolate chips and fold in 1/4 cup of fresh raspberries. The white chocolate adds a creamy sweetness, while the raspberries provide a tart contrast that brightens the cookie.
Storing and Bringing It Back to Life
Fridge Storage
Keep the cookies in an airtight container at room temperature for up to 5 days. The airtight seal preserves the chewy center and prevents the cookies from drying out. If you notice any moisture, let the cookies rest at room temperature for a few minutes before serving.
Freezer Friendly
Wrap the cookies individually in parchment paper and place them in a freezer bag. They will stay fresh for up to 3 months. When you’re ready to enjoy them, let them thaw at room temperature for 20 minutes before serving.
Best Reheating Method
Reheat the cookies in a preheated oven at 300°F (150°C) for 5 minutes, or until warm and soft. Adding a tiny splash of water to the bottom of the baking sheet will create steam, restoring moisture and making the cookies feel freshly baked. Let them cool slightly before eating to avoid burning your tongue.