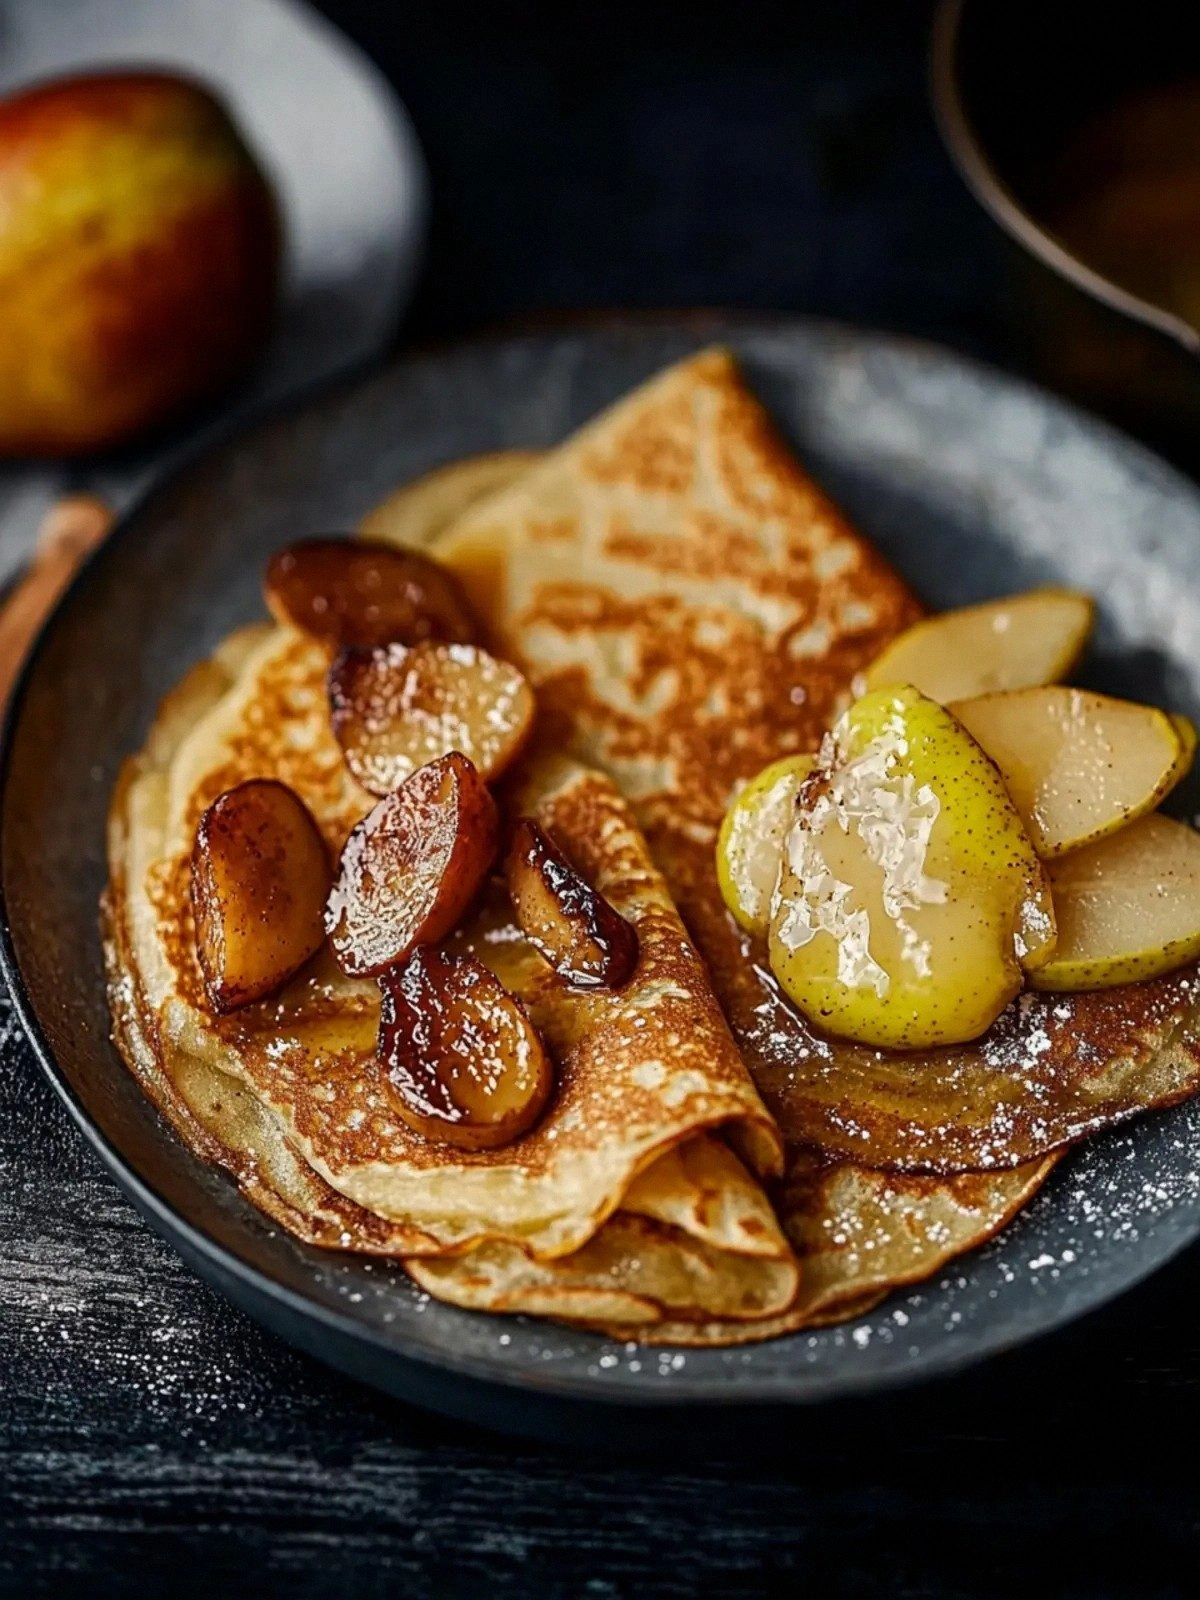
I was in a kitchen crisis one rainy Saturday when my friend dared me to turn a bland Sunday brunch into a headline‑worthy feast. The stove was already screaming from a burnt omelette, the fridge smelled like yesterday’s leftovers, and I had a mountain of conference pears that had been sitting too long. I swore I would create something that would make the whole house smell like a bakery and have everyone begging for seconds. That night I discovered a recipe that would become my new obsession: Cinnamon Crepes with Caramelis. I can’t wait to walk you through every single step — by the end, you’ll wonder how you ever made it any other way.
Picture the moment the first batter hits the heated pan: a faint hiss, a gentle sizzle that rises like a low‑key jazz solo. The air fills with the warm, nutty aroma of toasted cinnamon and the buttery scent of melted British butter. The texture is silky, almost like liquid silk that spreads in a thin, golden film across the skillet. When you flip the crepe, the edges lift with a satisfying crack that sounds like a soft pop. And the sound of pears caramelizing, their skins turning a deep amber, is the soundtrack to a culinary triumph.
What makes this version stand out is the meticulous balance between sweet and spice, the buttery richness that coats every bite, and the playful way the pears are caramelised to create a glossy, almost syrupy finish. It’s not just a recipe; it’s a performance where every ingredient has a role, every technique is a cue, and the final product is a showstopper that will make your taste buds applaud. I’ve tweaked the classic crepe batter with a pinch of extra cinnamon, added a second butter for that extra sheen, and used a touch of chocolate sauce to tie everything together. Most recipes get this completely wrong by either over‑cooking the pears or under‑seasoning the batter, but this one nails it every time. I dare you to taste this and not go back for seconds.
If you’ve ever struggled with making crepes that are neither too dry nor too soggy, you’re not alone — and I’ve got the fix. Picture yourself pulling this out of the pan, the whole kitchen smelling incredible, and the guests’ eyes widening as they see the glossy, caramelised pears nestled in buttery, cinnamon‑infused crepes. The moment the chocolate sauce drizzles over the stack, the aroma becomes a sweet, decadent invitation. This is hands down the best version you'll ever make at home, and I’m about to reveal the secrets that make it so irresistible.
What Makes This Version Stand Out
- Flavor: The dual cinnamon layers—one in the batter, one in the caramelised pears—create a warm, aromatic base that lingers on the palate. The chocolate sauce adds a subtle, velvety richness that balances the sweetness.
- Texture: The crepes are light and airy, with a crisp edge that shatters like thin ice when you bite into them. The pears melt into a silky glaze that coats the crepe without drowning it.
- Ingredient Quality: Using free‑range eggs and British butter gives the dish an unmistakably creamy, buttery flavor that elevates every bite.
- Visual Appeal: The golden crepes stacked with glossy pears and chocolate drizzle look like a piece of art, making it perfect for Instagram-worthy brunches.
- Make‑Ahead Potential: The batter can be prepared a day in advance, and the pears can be caramelised ahead of time, saving you precious minutes on the day you plan to serve.
- Versatility: Whether you serve it for a casual breakfast, a sophisticated brunch, or a dessert, the flavors adapt seamlessly to any occasion.
Inside the Ingredient List
The Flavor Base
Plain flour is the canvas that holds everything together. It gives the crepe structure while remaining neutral enough to let the cinnamon shine. If you skip it, the batter will be too runny and won’t set properly. For a gluten‑free version, try a 1:1 blend of oat and rice flour, but keep the ratio in mind to avoid a gritty texture.
The Cinnamon Duo
Ground cinnamon is the star of this dish, and we use it in two distinct stages. The first teaspoon is whisked into the batter, infusing each crepe with a warm, spicy aroma. The second half teaspoon is added to the pears during caramelisation, creating a deeper, more complex sweetness. Skipping either layer will leave the dish feeling flat and one‑dimensional.
The Texture Crew
Free‑range eggs bring moisture and richness, while whole milk adds a silky, custard‑like quality that keeps the crepes tender. The unsalted British butter—first 50 g for the batter and then 30 g for the pears—provides a glossy finish and a buttery depth that is simply irresistible. If you’re lactose intolerant, a non‑dairy milk will work, but the texture may be slightly lighter.
The Unexpected Star
Conference pears, known for their firm flesh and subtle sweetness, are the perfect partner for caramelisation. Their natural sugars transform into a glossy glaze when cooked with sugar and cinnamon, creating a glossy, almost syrupy finish that clings to each crepe. If pears are out of season, you can substitute ripe apples or stone fruit, but the caramelisation time will vary.
Everything's prepped? Good. Let's get into the real action...
The Method — Step by Step
- In a large bowl, sift together the plain flour and one teaspoon of ground cinnamon. Whisk until the mixture is smooth and free of lumps. The flour’s fine texture will help the batter glide effortlessly over the pan. I swear this step is the secret to a silky, even spread.
- Crack the two free‑range eggs into a separate bowl and beat them lightly with a fork. Add the whole milk and whisk until the mixture is uniform. The eggs act as the binder, while the milk adds moisture and a tender crumb. When you combine this with the dry mix, you’ll get a batter that’s thick enough to coat the pan but thin enough to spread like liquid silk.
- Pour the wet mixture into the dry ingredients and whisk vigorously until the batter is smooth. Use a whisk to avoid lumps; the goal is a silky consistency that pours easily. The batter should be thinner than pancake batter but thicker than a custard. If it’s too thick, add a splash of milk to reach the right consistency.
- Heat a non‑stick skillet over medium heat and add 25 g of unsalted butter. Swirl the pan until the butter melts and begins to foam. The butter should not brown; a light golden hue indicates the perfect temperature. This step ensures the crepe edges lift cleanly.
- Pour a ladleful of batter into the pan, swirling to coat the surface in a thin, even layer. The batter should spread immediately; if it’s too thick, add a splash of milk. Let it cook for about 30 seconds, until the edges lift and the surface looks set.
- Flip the crepe with a spatula and cook the second side for 20–25 seconds. The crepe should have a golden‑brown hue and a slightly crisp edge. When you lift it, the aroma of toasted cinnamon should fill the air. This is the moment of truth.
- Transfer the cooked crepe to a plate and cover loosely with foil to keep it warm. Repeat the process with the remaining batter, adding a small amount of butter to each new pan. The batter will stay silky and easy to pour.
- While the crepes bake, dice the pears into 1 cm cubes. Place them in a skillet with 1 tbsp of granulated sugar and 0.5 tsp of cinnamon. The sugar should dissolve, and the pears should start to brown slightly. This caramelisation step creates the glossy finish that’s the highlight of this dish.
- Add the remaining 30 g of butter to the skillet and stir until it melts into the pears. The butter should coat each piece, giving them a silky sheen. Cook for another 3–4 minutes, stirring occasionally, until the pears are soft and glazed.
- Drizzle the Belgian chocolate sauce over the caramelised pears. The chocolate should melt into a glossy, rich sauce that clings to the fruit. This final touch adds depth and a hint of bitterness that balances the sweetness.
That’s it — you did it. But hold on, I've got a few more tricks that'll take this to another level. The secret lies in the finishing touches and how you plate the dish for maximum wow factor.
Insider Tricks for Flawless Results
The Temperature Rule Nobody Follows
Most people cook crepes at high heat, which results in a burnt exterior and a soggy interior. I discovered that medium‑low heat allows the batter to spread evenly and cook through without scorching. Keep the pan at a steady 160 °C (320 °F), and test with a small drop of batter; it should sizzle but not smoke. This trick ensures every crepe has a crisp edge and a tender center.
Why Your Nose Knows Best
The aroma of caramelising pears is a reliable indicator of doneness. When the pears emit a sweet, nutty scent, they’re ready. If the scent is too sharp, they’re still raw; if it’s too strong, they’re over‑cooked. Trust your nose, and you’ll avoid the dreaded mushy fruit.
The 5‑Minute Rest That Changes Everything
After cooking the crepes, let them rest for five minutes under a foil blanket. This step allows the steam to redistribute, keeping the crepes soft and preventing them from drying out. The rest also lets the flavors meld, creating a cohesive taste profile. Skipping this step often leads to uneven textures.
Layering for Visual Impact
When assembling, stack the crepes with a thin layer of caramelised pears in between each layer. This not only adds flavor but also creates a pleasing visual gradient. Finish with a drizzle of chocolate sauce for a glossy finish that catches the light. The result looks like a work of art and tastes like pure indulgence.
Serve Immediately, or Chill for a New Twist
If you’re hosting a brunch, serve the crepes hot for the best experience. However, for a dessert twist, chill the assembled stack in the refrigerator for an hour. The pears will firm up, and the chocolate sauce will set, giving the dish a firmer bite that’s perfect for a sweet finale.
Creative Twists and Variations
This recipe is a playground. Here are some of my favorite ways to switch things up:
Maple‑Infused Pears
Swap the granulated sugar for maple syrup and add a splash of vanilla extract to the caramelisation step. The result is a richer, deeper sweetness that pairs beautifully with the cinnamon. This variation is perfect for a cozy winter brunch.
Nutty Crunch
Add toasted chopped walnuts or pecans to the caramelised pears before drizzling with chocolate. The crunch adds a delightful contrast to the silky pears and the soft crepes. It’s a great way to incorporate a protein boost.
Berry‑Boozy Delight
Replace the pears with fresh blueberries or strawberries, and finish with a splash of lemon‑infused balsamic reduction. The tartness of the berries balances the sweetness, and the balsamic adds a sophisticated depth. Serve this version for a spring or summer gathering.
Chocolate‑Only Indulgence
Omit the pears entirely and replace them with a layer of dark chocolate ganache. The ganache should be thick enough to hold the crepe stack but thin enough to pour. This version turns the dish into a decadent dessert that satisfies any chocolate craving.
Spiced Coconut Twist
Add shredded coconut to the batter and sprinkle extra cinnamon on top of the finished stack. The coconut adds a tropical flavor and a pleasant chew. This variation is ideal for a brunch that feels like a vacation.
Storing and Bringing It Back to Life
Fridge Storage
Store the assembled stack in an airtight container in the refrigerator for up to 48 hours. Wrap the stack in parchment paper before sealing to prevent the crepes from sticking together. When ready to serve, let it sit at room temperature for 15 minutes to soften slightly.
Freezer Friendly
Wrap the stack tightly in plastic wrap and place it in a freezer bag. It can be stored for up to two weeks. When you’re ready, thaw overnight in the refrigerator, then warm in a 150 °C (300 °F) oven for 10 minutes to revive the crispness.
Best Reheating Method
To reheat, place the stack on a baking sheet and bake at 150 °C (300 °F) for 5–7 minutes. Add a splash of water to the bottom of the pan to create steam, which will keep the crepes moist and prevent them from drying out. This simple trick brings the dish back to its original, buttery glory.