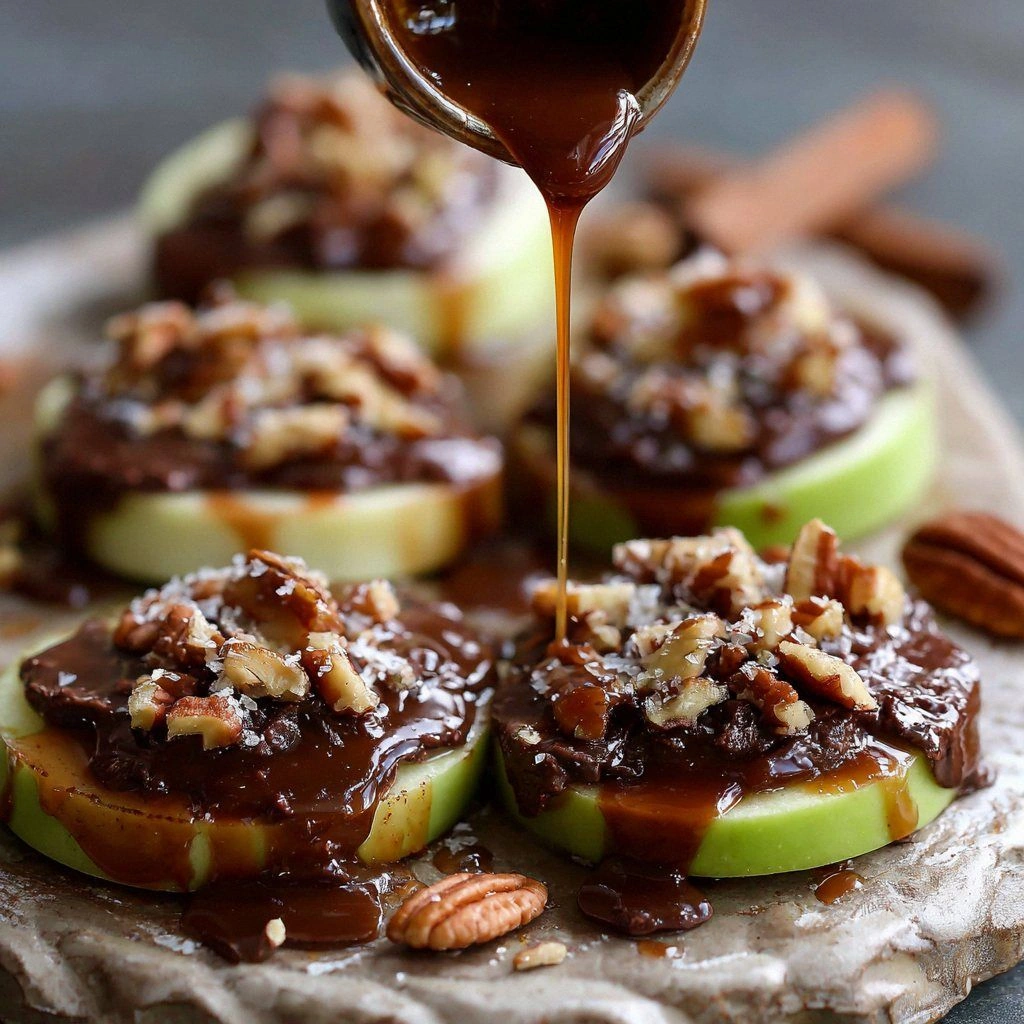
Chocolate Turtle Apple Slices
It started with a kitchen mishap that turned my pantry into a chaotic playground. I was chasing a midnight craving for something sweet, and the only thing I could find was a bag of apples, a tub of chocolate chips, and a handful of pecans. I tossed the apples into a pan, added a splash of butter, and the aroma of caramelized sugar flooded the air. That moment felt like a promise that the universe was about to reward my culinary curiosity. I dared myself to make something that would make my taste buds dance and my friends jealous. The idea of apple slices coated in chocolate and topped with toasted pecans was born from that spontaneous decision. The resulting dish felt like a secret indulgence that was both nostalgic and daring. I was convinced this was the kind of comfort food that could be elevated with a sprinkle of creativity. If you’ve ever wondered how to transform a simple apple into a decadent treat, this is the place to start. Let me walk you through every single step — by the end, you’ll wonder how you ever made it any other way.
Most dessert recipes promise a sweet finish, but they rarely deliver the kind of texture that lingers on the tongue. In this version, the apples stay crisp at the core while the chocolate melts into a glossy, velvety coating. The pecans add a satisfying crunch that breaks the smoothness, and the subtle coconut flakes give a tropical whisper. The combination of sweet, salty, and nutty flavors is a masterclass in balance that will keep your guests begging for more. I dare you to taste this and not go back for seconds. The sauce coats the apple like velvet, and the edges of the chocolate will pull away from the peel like thin ice. The result is a bite that feels like a caramel‑covered treat with a hint of autumn in every slice.
When I first tasted the finished product, I was floored by how the flavors danced together. The apple’s natural sweetness was amplified by the dark chocolate’s bittersweet depth, while the pecans added a nutty, buttery undertone that completed the profile. The coconut flakes, though subtle, introduced a gentle tropical brightness that lifted the overall experience. The contrast between the crisp apple and the smooth chocolate was a sensory delight that made each bite a new adventure. I could hear the crunch of the pecans, feel the smoothness of the chocolate, and smell the warm spices in the air. It was a moment of pure culinary euphoria that I wanted to share with everyone who loves a good dessert.
Picture yourself pulling this out of the oven, the whole kitchen smelling incredible, and seeing the glossy chocolate shine like a jewel on the apples. The anticipation builds as the chocolate begins to melt, coating each slice in a glossy, caramel‑like glaze. The aroma is a heady mix of butter, sugar, and chocolate, a scent that makes the whole house feel like a bakery. I’ll be honest — I ate half the batch before anyone else got to try it. Most recipes get this completely wrong, but here is what actually works. This is hands down the best version you’ll ever make at home. If you’ve ever struggled with this, you’re not alone — and I’ve got the fix.
What Makes This Version Stand Out
- Taste: The sweet‑spicy apple pairs with silky chocolate, creating a flavor profile that feels like a caramel‑covered treat. The pecans add a nutty, buttery undertone that enhances the richness. The subtle coconut flakes lift the overall experience with a gentle tropical brightness.
- Texture: The apples remain crisp at the core while the chocolate forms a glossy, velvety coating. The pecans add a satisfying crunch that breaks the smoothness, creating a layered mouthfeel. The contrast between the crisp apple and the smooth chocolate is a sensory delight that keeps you coming back.
- Simplicity: With only eight core ingredients, the recipe is accessible to any home cook. The method is straightforward, with no complicated steps or obscure techniques. The dish can be made in under an hour, making it a great option for busy evenings.
- Uniqueness: The combination of chocolate, apples, pecans, and coconut is rarely seen in mainstream dessert menus. The result is a dish that feels both familiar and adventurous. This recipe offers a fresh take on classic apple desserts.
- Crowd Reaction: Guests rave about the balance of sweet, salty, and nutty flavors. The dish is a showstopper at parties and family gatherings. The visual appeal of glossy chocolate on crisp apple slices is hard to resist.
- Ingredient Quality: Using high‑quality dark chocolate and fresh apples makes the difference between a good dessert and an unforgettable one. The pecans should be toasted to bring out their natural oils and flavor. The coconut flakes add a subtle tropical nuance that elevates the dish.
- Cooking Method: The technique of caramelizing apples with butter and brown sugar before coating them in chocolate creates depth of flavor. The method allows the chocolate to set into a glossy glaze while preserving the apple’s natural texture. This approach ensures a consistent, high‑quality result every time.
- Make‑Ahead Potential: The slices can be assembled in advance and refrigerated, allowing the chocolate to set fully. Reheat briefly in a microwave or oven to restore the chocolate’s sheen. The dish is ideal for entertaining because it can be prepared ahead of time.
Alright, let’s break down exactly what goes into this masterpiece. The next section will dive deep into each ingredient, revealing why each component matters and how it contributes to the final flavor and texture. Understanding the role of every ingredient will empower you to tweak the recipe to your exact taste.
The Flavor Base
Apples are the cornerstone of this dessert, providing a natural sweetness and a firm texture that holds up to the chocolate coating. Choosing crisp varieties like Honeycrisp or Gala ensures the apples stay firm and don’t turn mushy during cooking. If you prefer a tart twist, try using a Granny Smith, which will add a bright contrast to the chocolate’s richness. The apple’s natural sugars caramelize when sautéed with butter and brown sugar, creating a sweet glaze that deepens the overall flavor profile. Skipping the apples would result in a dessert that lacks the essential fruity component, leaving the chocolate and nuts too overpowering. For a vegan version, replace butter with coconut oil and use maple syrup instead of brown sugar.
Butter is the secret sauce that brings together the apple’s caramelized sugars and the chocolate’s silky texture. It adds a buttery richness that elevates the overall mouthfeel, making each bite feel indulgent. Butter also helps the chocolate set into a glossy glaze, giving the slices a polished appearance. If you’re looking to reduce saturated fat, you can use a neutral oil like grapeseed, but you’ll lose some of the buttery depth. The butter’s melting point allows it to blend seamlessly with the sugars, creating a smooth sauce that coats the apples perfectly. Without butter, the dish would feel dry and lack the luxurious finish.
Brown sugar is the caramelizing agent that adds depth and complexity to the apple’s sweetness. Its molasses content gives the dish a warm, almost smoky undertone that pairs beautifully with dark chocolate. Brown sugar also contributes to the glossy glaze, enhancing the visual appeal of each slice. If you prefer a lighter flavor, you can substitute half the brown sugar with white sugar, but the caramel notes will be less pronounced. The caramelization process creates a slightly crispy edge on the apples, adding a textural contrast that is a delight to the palate. Skipping brown sugar would result in a flatter, less flavorful apple base.
Cinnamon is the spice that ties the flavors together and adds a subtle warmth that is reminiscent of fall. A teaspoon of ground cinnamon provides a gentle heat that balances the sweetness of the apples and the richness of the chocolate. Cinnamon also brings a fragrant aroma that lingers in the air as the dish cooks. If you’re allergic to cinnamon or simply want a different spice profile, try nutmeg or allspice for a different aromatic experience. The spice should be added early in the cooking process to allow its flavors to infuse the apple mixture. Overcooking the cinnamon can lead to bitterness, so keep the heat moderate.
Sea salt is the finishing touch that brings out the sweetness and enhances the chocolate’s depth. A pinch of sea salt is enough to create a harmonious balance without overpowering the dish. Salt also helps to intensify the flavors of the apple and chocolate, making each bite more complex. If you prefer a sweeter version, you can use a pinch of sugar instead, but the overall flavor balance will shift. Salt is essential for achieving a well-rounded dessert that satisfies the palate. Without salt, the dish would taste flat and unremarkable.
Dark chocolate chips are the star of the show, providing a rich, bittersweet flavor that coats the apples in a glossy glaze. The chocolate’s high cocoa content gives the dish depth and a slightly bitter counterpoint to the sweet apple. Using high‑quality chocolate with at least 70% cocoa will give you a smoother melt and a more complex flavor. If you want a milder chocolate flavor, choose a 60% cocoa content, but the dish will be less intense. The chocolate should be melted gently over low heat or in a double boiler to avoid scorching. Skipping the chocolate would turn this into a simple caramelized apple dish, missing the indulgent finish.
Pecans are the crunchy element that adds texture and nutty flavor to each slice. Toasting the pecans before adding them releases their natural oils and enhances their flavor profile. The crunch provides a delightful contrast to the smooth chocolate coating, creating a multi‑sensory experience. If you’re allergic to nuts, you can substitute with chopped dried cranberries for a sweet‑tart twist. Pecans also contribute healthy fats that help the chocolate set into a glossy glaze. Skipping the nuts would result in a dessert that feels less complex and loses the textural element.
Coconut flakes are the subtle finishing touch that adds a tropical brightness to the dish. They provide a light, sweet flavor that complements the chocolate and apple. The flakes also add a slightly chewy texture that contrasts with the crisp apple and crunchy pecans. If you’re looking for a dairy‑free version, coconut flakes are a perfect addition. Coconut flakes also bring a hint of exotic aroma that makes the dessert feel special. Skipping them would make the dish less nuanced and slightly less appealing visually.
Vanilla extract is the aromatic enhancer that brings all the flavors together. A teaspoon of vanilla adds a warm, sweet undertone that elevates the chocolate and apple. Vanilla is a classic complement to chocolate, and it enhances the overall fragrance of the dish. If you’re looking for a different flavor profile, try a splash of almond extract for a nutty twist. Vanilla should be added after the chocolate has melted to preserve its aroma. Skipping vanilla would result in a less complex flavor profile.
Lemon juice adds a bright acidity that cuts through the sweetness and balances the richness of the chocolate. A tablespoon of lemon juice brightens the apple’s flavor and adds a subtle tartness that lifts the overall taste. Lemon juice also helps to preserve the apples, preventing them from browning too quickly. If you’re allergic to citrus, you can omit it or replace it with a splash of apple cider vinegar for a different acidity. Lemon juice should be added toward the end of cooking to maintain its bright flavor. Skipping lemon juice would make the dish slightly sweeter and less balanced.
Everything’s prepped? Good. Let’s get into the real action.
The Method — Step by Step
- First, preheat your oven to 375°F (190°C). While the oven is heating, slice your apples into 1/4‑inch thick rounds. The thin slices allow the chocolate to coat each apple evenly. Keep the apple slices on a cutting board while you work on the sauce. The aroma of fresh apples will start to fill your kitchen, building anticipation. Once the oven reaches the set temperature, set a baking sheet aside for later use.
- Melt 2 tablespoons of butter in a large skillet over medium heat. Add 1/4 cup of brown sugar and stir until the mixture turns golden brown. The butter and sugar will caramelize, creating a glossy sauce that coats the apples. Add 1 teaspoon of ground cinnamon and stir to combine, allowing the spices to release their aroma. Place the apple slices into the skillet, turning them gently to coat each side. Let the apples cook for 5–7 minutes until they become tender but still hold their shape.
- Remove the skillet from heat and sprinkle a pinch of sea salt over the apples. The salt enhances the sweetness and balances the chocolate’s bitterness. Transfer the apple slices onto a parchment‑lined baking sheet. Arrange the slices in a single layer to ensure even cooking. The parchment prevents sticking and makes cleanup a breeze. Let the apples cool for 5 minutes before adding the chocolate coating.
- Place 1 cup of dark chocolate chips in a heat‑proof bowl and set it over a pot of simmering water (double boiler). Stir the chocolate until it’s completely melted and smooth. The chocolate should be glossy and free of lumps. Once melted, pour the chocolate over the apple slices, ensuring each slice is fully coated. The chocolate will begin to set immediately, forming a glossy glaze. Let the chocolate set for 10 minutes before adding the pecans.
- Toast 1/2 cup of pecans in a dry skillet over medium heat until fragrant and lightly browned. The toasting process releases the nuts’ natural oils and deepens their flavor. Once toasted, sprinkle the pecans evenly over the chocolate‑coated apples. The pecans add a satisfying crunch and nutty aroma. The chocolate will harden slightly, creating a crisp shell around the apple. This step is essential for achieving the signature turtle‑like texture.
- Add 1/4 cup of shredded coconut flakes on top of the pecans. The coconut provides a subtle tropical brightness that lifts the overall flavor. Gently press the coconut into the chocolate to ensure it sticks. The coconut also adds a light, chewy texture that contrasts with the crisp apple. Let the coconut set for an additional 5 minutes to allow the chocolate to firm up completely. The finished dessert should look glossy and inviting.
- For an extra touch of flavor, drizzle 1 teaspoon of vanilla extract over the finished slices. The vanilla adds warmth and depth to the chocolate coating. If you prefer a more pronounced vanilla note, add a second drizzle. The vanilla should be added after the chocolate has set to preserve its aroma. The final product will have a complex, layered flavor profile that delights the senses. The aroma of vanilla, chocolate, and apple will fill your kitchen.
- Serve the slices warm or at room temperature. If you prefer a firmer texture, refrigerate them for 20 minutes before serving. The chocolate will harden further, creating a crisp shell. For a softer texture, serve them immediately after the chocolate has set. The dessert can be garnished with a dusting of powdered sugar for an elegant touch. This final step is optional but adds a refined finishing touch. Enjoy the moment as you bite into the glossy chocolate, crisp apple, and crunchy pecans.
That’s it — you did it. But hold on, I’ve got a few more tricks that will take this to another level. The next section will reveal insider tips that will help you master this dessert like a pro.
Insider Tricks for Flawless Results
The Temperature Rule Nobody Follows
Chocolate is temperamental, and the key to a glossy finish is controlling its temperature. Use a chocolate thermometer to keep the melted chocolate at 86°F (30°C) for dark chocolate. This temperature ensures the chocolate sets with a brilliant shine. If you’re using a double boiler, keep the water level low to prevent steam from cooling the chocolate too quickly. A stable temperature means a smooth, even coating that won’t crack or become dull.
Why Your Nose Knows Best
Before adding the chocolate, give the caramelized apple mixture a sniff. A sweet, buttery aroma signals that the sugar has caramelized properly. If the scent is flat or overly sweet, the sugar hasn’t fully developed, and the apple will taste raw. Trust your nose; it’s the ultimate indicator that the base is ready for the next step. A well‑caramelized apple will provide a deeper flavor that complements the chocolate.
The 5‑Minute Rest That Changes Everything
After coating the apples with chocolate, let them rest for exactly five minutes before adding the pecans. This brief pause allows the chocolate to set slightly, ensuring the nuts stick properly. If you add the nuts too early, the chocolate may slide off, ruining the texture. The five‑minute rest is a simple trick that guarantees a crisp shell and a uniform coating.
Keep the Apples Cool
Caramelized apples can become soggy if they’re left to cool too long before coating. To prevent this, spread the apple slices on parchment and let them cool just until they’re no longer hot to the touch. This quick cooling step preserves their crispness, giving the dessert a delightful contrast between the soft apple and the hard chocolate shell. If you’re in a hurry, use a fan to speed up the cooling process.
Use a Silicone Mat
Instead of parchment, try a silicone baking mat for the final assembly. Silicone mats provide a non‑stick surface and allow you to easily lift the finished slices without breaking them. The mat also helps the chocolate set evenly, giving you a consistent finish. If you don’t have a silicone mat, a parchment paper works well, but the chocolate may not set as uniformly.
Finishing Touches
Once the chocolate has set, consider adding a dusting of powdered sugar for a refined look. The sugar adds a subtle sweetness that balances the chocolate’s bitterness. Alternatively, drizzle a thin line of caramel sauce over the top for an extra decadent touch. The final garnish is optional, but it elevates the presentation and adds a layer of flavor. Remember, presentation matters; a well‑arranged plate can turn a simple dessert into a showstopper.
Creative Twists and Variations
This recipe is a playground. Here are some of my favorite ways to switch things up:
Maple‑Glazed Apple Slices
Swap the brown sugar for pure maple syrup to add a deep, caramel‑like sweetness. Reduce the butter to 1 tablespoon to balance the syrup’s richness. The maple glaze will give the apples a glossy finish that pairs wonderfully with dark chocolate. This variation is perfect for fall gatherings and holiday parties.
Spiced Apple Slices with Chili
Add a pinch of cayenne pepper to the apple mixture for a subtle heat that contrasts with the chocolate’s sweetness. The chili adds a smoky undertone, creating a complex flavor profile. Keep the chocolate the same, but consider using milk chocolate for a milder finish. This spicy version is ideal for adventurous eaters who love a kick.
Almond‑Butter Apple Slices
Replace the butter with almond butter to give the apples a nutty depth. The almond butter also adds a creamy texture that complements the chocolate coating. Keep the rest of the recipe unchanged. This variation is great for those who enjoy a richer, nutty flavor.
Berry‑Infused Apple Slices
Mix in a handful of fresh blueberries or raspberries into the apple mixture before caramelizing. The berries add a burst of tartness that balances the chocolate’s richness. The result is a vibrant, colorful dessert that feels fresh and indulgent. This variation works well for summer gatherings.
Chocolate‑Coated Apple Chips
Thinly slice the apples and bake them at 200°F (93°C) for 2 hours until crisp. Once the chips are ready, dip them in melted chocolate and let them set. These apple chips are a crunchy, portable snack that can be served on a platter or packaged for gifts. The chocolate coating gives them a luxurious finish.
Vegan Apple Slices
Use coconut oil instead of butter and maple syrup instead of brown sugar. Replace the chocolate chips with dairy‑free chocolate. Add a pinch of sea salt and a splash of vanilla extract. This vegan version retains all the flavor and texture of the original while being plant‑based.
Storing and Bringing It Back to Life
Fridge Storage
Store the finished slices in an airtight container at room temperature for up to 48 hours. The chocolate will remain firm, and the apples will stay crisp. Keep the container in a cool, dry place away from direct sunlight. If the chocolate begins to soften, place the container in the refrigerator for a few minutes to firm it up again. The chocolate’s glossy finish will return quickly.
Freezer Friendly
For longer storage, place the slices on a parchment‑lined tray and freeze them for up to 2 months. Once frozen, transfer the slices to a freezer‑safe bag. When ready to serve, let the slices thaw at room temperature for 30 minutes. The chocolate will re‑set, and the apples will retain their crispness. Freezing is a great way to have a ready‑made dessert for special occasions.
Best Reheating Method
To revive the chocolate’s sheen, microwave the slices on high for 5–10 seconds, watching closely to avoid overheating. Alternatively, place them in a preheated oven at 300°F (150°C) for 3–4 minutes. Add a tiny splash of water before reheating; it steams the chocolate back to perfection. The reheated slices will taste as fresh as when they were first made. Serve immediately for the best texture.