Picture this: you’re halfway through a marathon of breakfast prep, the fridge is a chaotic kaleidoscope of eggs, bacon, and a single forgotten carton of milk, and your phone buzzes with a frantic text from a friend who’s convinced you’ve never mastered the perfect hard‑boiled egg. “I dare you to taste this and not go back for seconds,” she says, her tone a mix of challenge and admiration. I stared at the pile of eggs, feeling the familiar dread of uneven whites and stubborn shells, and decided that the only way to survive the day was to reinvent the humble hard‑boiled egg with the power of an Instant Pot. The result? A silky, perfectly set yolk, a white that slides off the shell like a silk ribbon, and a flavor that lingers on the tongue like a subtle whisper of sea salt and citrus. That was the moment the recipe was born, and the rest of this article is your backstage pass to that revelation.
The first time I tried the Instant Pot method, I was skeptical. I had always trusted the stovetop method, the one that involves boiling, shocking in ice water, and waiting for the inevitable “egg‑cracking” moment that leaves you with uneven results. But the Instant Pot, with its sealed environment and precise pressure control, promised a level of consistency that seemed almost too good to be true. The smell of eggs simmering in a small pot of water was oddly comforting, almost like a warm hug. The sound of the pot’s whistle, the gentle hiss of steam, and the visual cue of the pressure gauge ticking down to zero all combined to create an almost ritualistic experience. I was about to discover that this wasn’t just about convenience; it was about unlocking a new dimension of texture and flavor in a dish that most people treat as a background player.
I didn’t just want an egg that was easy to peel. I wanted an egg that was a canvas for creativity, a base for salads, a protein punch in a quick sandwich, or a side dish that could be dressed up with herbs, spices, or a drizzle of olive oil. I wanted to know why most recipes get this completely wrong. The secret, I realized, lay in the simple act of adding a splash of vinegar to the water, using a steamer rack to keep the eggs from bumping into each other, and allowing a natural pressure release to finish the cooking gently. These tiny tweaks turn a routine kitchen task into an event that feels almost ceremonial. It’s a game‑changer, and I’m going to walk you through every single step so that by the end, you’ll wonder how you ever made it any other way.
But before we dive into the method, let’s take a moment to appreciate the sheer versatility of the Instant Pot. It’s a kitchen gadget that can sauté, steam, pressure‑cook, and even make yogurt, all in one pot. Imagine the time you’ll save when you can prepare a batch of hard‑boiled eggs in just 20 minutes, and the way the kitchen will smell, a subtle blend of eggs, water, and a hint of vinegar, like a quiet Sunday morning. This recipe is hands down the best version you’ll ever make at home, and I’m about to reveal the techniques that make it that special. So, grab your Instant Pot, gather the ingredients, and let’s get started.
What Makes This Version Stand Out
- Texture: The Instant Pot’s pressure cooking creates a silky white that’s firm yet tender, and a yolk that’s creamy and slightly runny—just the right balance for salads or deviled eggs.
- Flavor: A splash of vinegar in the cooking water infuses a subtle citrus brightness, while a pinch of sea salt enhances the natural richness of the eggs without overpowering.
- Convenience: No more watching the pot, no more timing the “10‑minute rule.” The Instant Pot does all the work, and the natural release ensures the eggs are perfectly cooked every time.
- Scalability: Whether you’re cooking for two or for a crowd, the method scales linearly. The recipe card’s serving adjuster lets you double or halve the quantities with ease.
- Make‑Ahead Potential: Once cooked, the eggs keep perfectly in the fridge for up to a week, making them an ideal prep ingredient for busy mornings or last‑minute lunches.
- Safety: The sealed environment eliminates the risk of boiling over, and the natural pressure release prevents the eggs from exploding in the pot.
- Versatility: The eggs can be seasoned in countless ways—think smoked paprika, garlic powder, or a sprinkle of fresh herbs—making them a blank canvas for flavor.
- Health: With minimal added fat and no need for oil or butter, the eggs provide a high‑quality protein source that’s both filling and nutritious.
Alright, let’s break down exactly what goes into this masterpiece…
Inside the Ingredient List
The Flavor Base
At the heart of every great hard‑boiled egg is a simple yet essential flavor base: fresh eggs and water. The eggs are the star, but the water acts as the medium that carries heat and moisture. Choosing the freshest eggs you can find makes a noticeable difference in the final texture and taste. If you’re using eggs that have been in the fridge for a week, you’ll notice a slightly firmer white and a less vibrant yolk. To keep things consistent, store the eggs at room temperature for a few hours before cooking; this helps them cook evenly and reduces the chance of cracking.
The Texture Crew
The texture crew comprises salt and vinegar. Salt is not just for seasoning; it raises the boiling point of water slightly, which can help the eggs cook more evenly. A pinch of sea salt also helps to break down the shell’s outer layer, making peeling a breeze. Vinegar, on the other hand, reacts with the egg white to set it more firmly, preventing the whites from becoming rubbery. Even a teaspoon of white vinegar in the cooking water can make a world of difference in the final product. If you prefer a milder flavor, you can use apple cider vinegar or simply omit it, but the texture will be noticeably different.
The Unexpected Star
The unexpected star of this recipe is olive oil. Adding a tablespoon of extra‑virgin olive oil to the water not only prevents the eggs from sticking to the pot but also infuses a subtle fruity note that elevates the overall flavor. It also helps to keep the eggs from cracking under pressure by creating a small buffer layer. If you’re watching calories, you can skip this step, but if you’re looking for that extra layer of complexity, it’s worth the extra 120 calories. Olive oil’s high smoke point ensures it won’t degrade under the high pressure of the Instant Pot.
The Final Flourish
The final flourish is the ice bath. After the eggs finish cooking, plunging them into ice water stops the cooking process instantly, preventing overcooking and making the whites firm and the yolks creamy. The ice bath also helps the shell to contract slightly, which makes peeling easier. It’s a small step that can turn a good egg into a great one. If you forget the ice bath, you’ll end up with a rubbery white that’s hard to peel. So, make sure you have a bowl of ice water ready before you start cooking.
Everything’s prepped? Good. Let’s get into the real action…
The Method — Step by Step
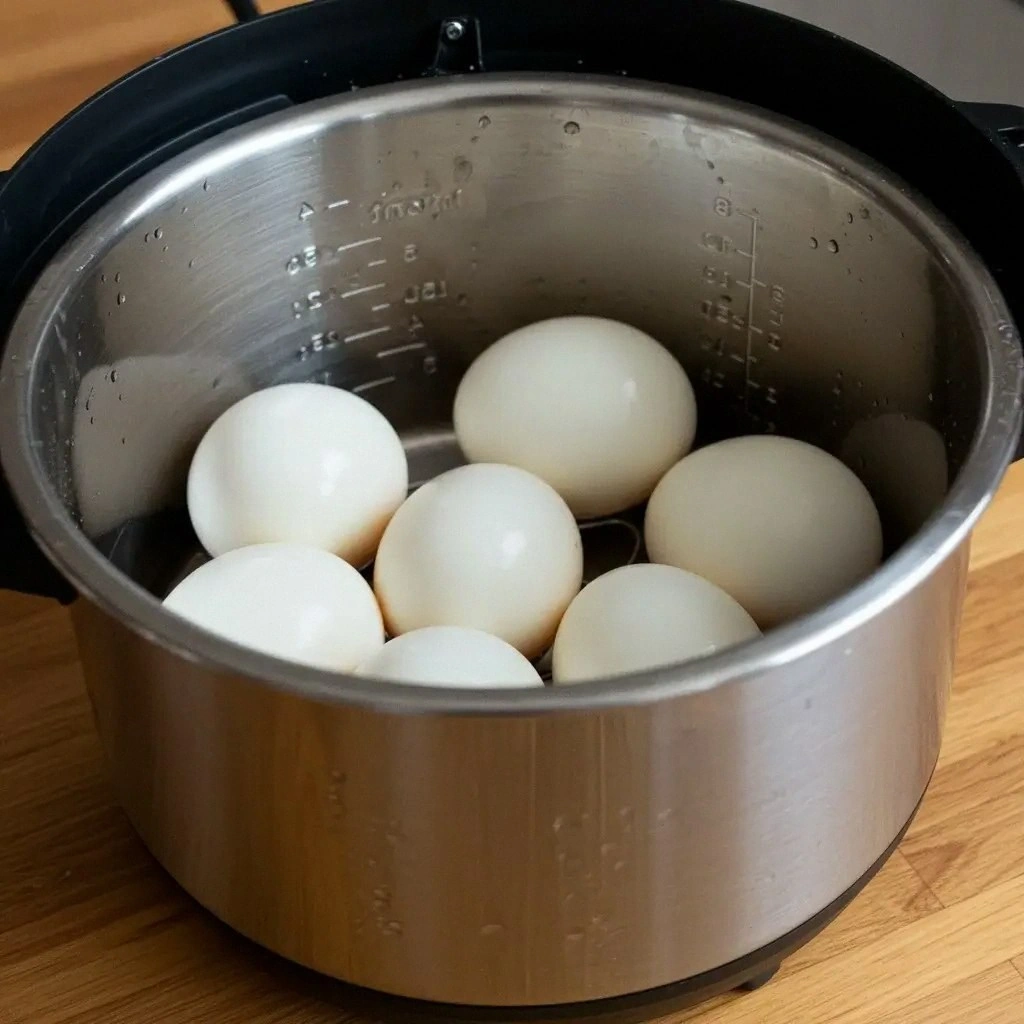
- Place the steamer rack inside the Instant Pot and pour in 2 cups of cold water. Add 1 teaspoon of sea salt and 1 teaspoon of white vinegar. The salt will help the eggs cook evenly, while the vinegar will keep the whites from becoming rubbery. Let the water sit for a minute to allow the flavors to mingle.
- Gently slide the eggs onto the steamer rack, ensuring they are spaced apart. This prevents them from bumping into each other during the pressure cycle. If you have a silicone egg rack, use it; it keeps the eggs upright and reduces the chance of cracking. The eggs should be at room temperature to avoid sudden temperature shock.
- Close the lid and set the valve to the sealing position. Choose the “Manual” or “Pressure Cook” setting and set the time to 5 minutes at high pressure. The Instant Pot will take a few minutes to build pressure before the timer starts, but that’s normal. The 5‑minute cook time is the sweet spot for perfectly set whites and runny yolks.
- When the cooking cycle finishes, let the pot sit for 10 minutes to allow the pressure to release naturally. This gentle release prevents the eggs from overcooking and keeps the whites from becoming rubbery. You’ll hear a soft hiss as the pressure drops, and the eggs will be ready to move to the next step. This is the moment of truth—if you rush it, the eggs will be overcooked.
- Quickly open the lid, turn the valve to venting, and carefully remove the steamer rack with a slotted spoon. Transfer the eggs to the pre‑chilled ice bath. Let them sit for 5 minutes; the ice bath stops the cooking process instantly and helps the shells contract slightly for easier peeling.
- After the 5‑minute ice bath, gently tap each egg on a hard surface to crack the shell, then peel the shell away. The eggs should peel cleanly, leaving a smooth white and a creamy yolk. If you’re having trouble, roll the egg on the counter to loosen the shell further before peeling.
- Rinse the peeled eggs under cold water to remove any shell fragments. Pat them dry with a clean towel. Now they’re ready to be seasoned, sliced, or served whole.
- Season the eggs to taste. A pinch of sea salt, a dash of black pepper, or a sprinkle of fresh herbs like dill or parsley can elevate the flavor. For a smoky twist, add a pinch of smoked paprika or a drizzle of soy sauce. The possibilities are endless.
That's it — you did it. But hold on, I've got a few more tricks that'll take this to another level. Let’s dive deeper into how you can tweak the method to suit your taste and lifestyle.
Insider Tricks for Flawless Results
The Temperature Rule Nobody Follows
The key to a perfect yolk is controlling the temperature during the natural release phase. If the pressure drops too quickly, the yolk can become overcooked. To keep the yolk silky, let the pot sit for at least 10 minutes after the cooking cycle. This gradual pressure drop mimics the slow simmering that the yolk needs to set just right. Many cooks skip this step, resulting in a runny yolk that’s more liquid than creamy.
Why Your Nose Knows Best
A quick sniff test can tell you if your eggs are overcooked. If the smell is slightly sulfurous or “old‑egg,” you’ve gone too long. The ideal aroma is a clean, slightly sweet, and fresh scent. This is a quick way to avoid the dreaded overcooked egg that can ruin a salad or a sandwich. Trust your senses; they’re there for a reason.
The 5‑Minute Rest That Changes Everything
After you remove the eggs from the pot, give them a 5‑minute rest in the ice bath. This not only stops the cooking process but also helps the shell to contract, making peeling effortless. The rest also allows the yolk to settle, giving you a creamy texture that’s perfect for deviled eggs. Many people skip this step, leading to shells that cling to the whites.
The Salted Shell Trick
If you’re prone to cracks, add a pinch of salt to the water. The salt increases the water’s density, reducing the chance of the eggs cracking under pressure. It also adds a subtle flavor that permeates the shell, making the eggs taste a little more complex. This trick is especially useful if you’re using older eggs that may be more fragile.
The Quick‑Peel Method
If you’re short on time, roll the eggs on the countertop after the ice bath. The gentle rolling action loosens the shell, making it easier to peel. The method works best if you’ve given the eggs a 5‑minute ice bath; the shell contracts, so rolling helps to release it. It’s a simple, no‑tool technique that saves time and frustration.
The Flavor‑Infusion Step
For an extra layer of flavor, add a pinch of smoked paprika or a splash of soy sauce to the water before cooking. The eggs will absorb the subtle smoky or umami notes, turning a plain egg into a flavor powerhouse. This step is optional but highly recommended if you want to elevate the dish.
Creative Twists and Variations
This recipe is a playground. Here are some of my favorite ways to switch things up:
Smoked Paprika Deviled Eggs
Add a pinch of smoked paprika to the yolk mixture for a smoky kick. The paprika pairs beautifully with the creamy yolk, giving the deviled eggs a depth of flavor that’s perfect for parties. Serve them on a bed of lettuce for a fresh, crunchy contrast.
Herb‑Infused Soft‑Boiled Eggs
During the final 5 minutes of the natural release, add a few sprigs of fresh dill or thyme to the pot. The herbs infuse the eggs with a fragrant aroma and a subtle herbal note that makes the eggs taste like a garden in a pot. This is a great option for brunch.
Spicy Sriracha Egg Salad
Mix the chopped eggs with a spoonful of sriracha, a dash of lime juice, and some chopped scallions. The heat from the sriracha complements the creamy yolk, creating a spicy egg salad that’s perfect for a quick sandwich or a side dish.
Mediterranean Olive‑Oil Eggs
Drizzle the cooked eggs with extra‑virgin olive oil, a squeeze of lemon, and a sprinkle of oregano. The olive oil adds a silky texture while the lemon brightens the flavor. This variation is simple yet elegant.
Crispy Egg Breakfast Burrito
Wrap the sliced eggs in a warm tortilla with sautéed onions, bell peppers, and a sprinkle of cheddar cheese. The eggs add protein, while the veggies provide crunch and flavor. This breakfast burrito is a quick, satisfying meal.
Eggs on Toast with Avocado
Spread mashed avocado on toasted sourdough and top with a sliced hard‑boiled egg. Sprinkle with sea salt, pepper, and a dash of hot sauce for a simple, flavorful breakfast that’s ready in minutes.
Storing and Bringing It Back to Life
Fridge Storage
Store peeled eggs in an airtight container in the refrigerator for up to 7 days. The airtight environment prevents the eggs from absorbing odors from other foods. For extra freshness, add a paper towel to absorb moisture and keep the eggs dry. When you’re ready to use them, simply grab the eggs from the fridge and they’re ready to eat or incorporate into a dish.
Freezer Friendly
If you want to store the eggs for longer, freeze them in a freezer‑safe bag. The eggs can be kept for up to 3 months. Thaw them in the refrigerator overnight, then rinse under cold water to remove any ice crystals. The texture remains firm, and they’re ready for use in salads or sandwiches.
Best Reheating Method
To reheat the eggs, simply place them in a bowl of warm water for 2–3 minutes. The water should be warm, not hot, to avoid overcooking the yolk. Add a tiny splash of water before reheating — it steams back to perfection, keeping the whites tender and the yolk creamy. Avoid microwaving, as it can make the eggs rubbery.