Picture this: I was standing in my kitchen, the smell of sizzling pork chasing the scent of fresh basil from the garden, when the timer beeped and I realized I'd accidentally left the chops on high heat for too long. The once‑juicy pork had turned into a dry, charred slab that could barely hold its shape. My friends laughed, but I was determined to rewrite that story. I grabbed a fresh cut of pork loin, a handful of garlic cloves, and a generous splash of butter. I thought, if I could turn a kitchen mishap into a culinary triumph, I could share that secret with anyone who loves a good pork chop. And so this recipe was born, a humble yet powerful combination that turns ordinary pork into a showstopper.
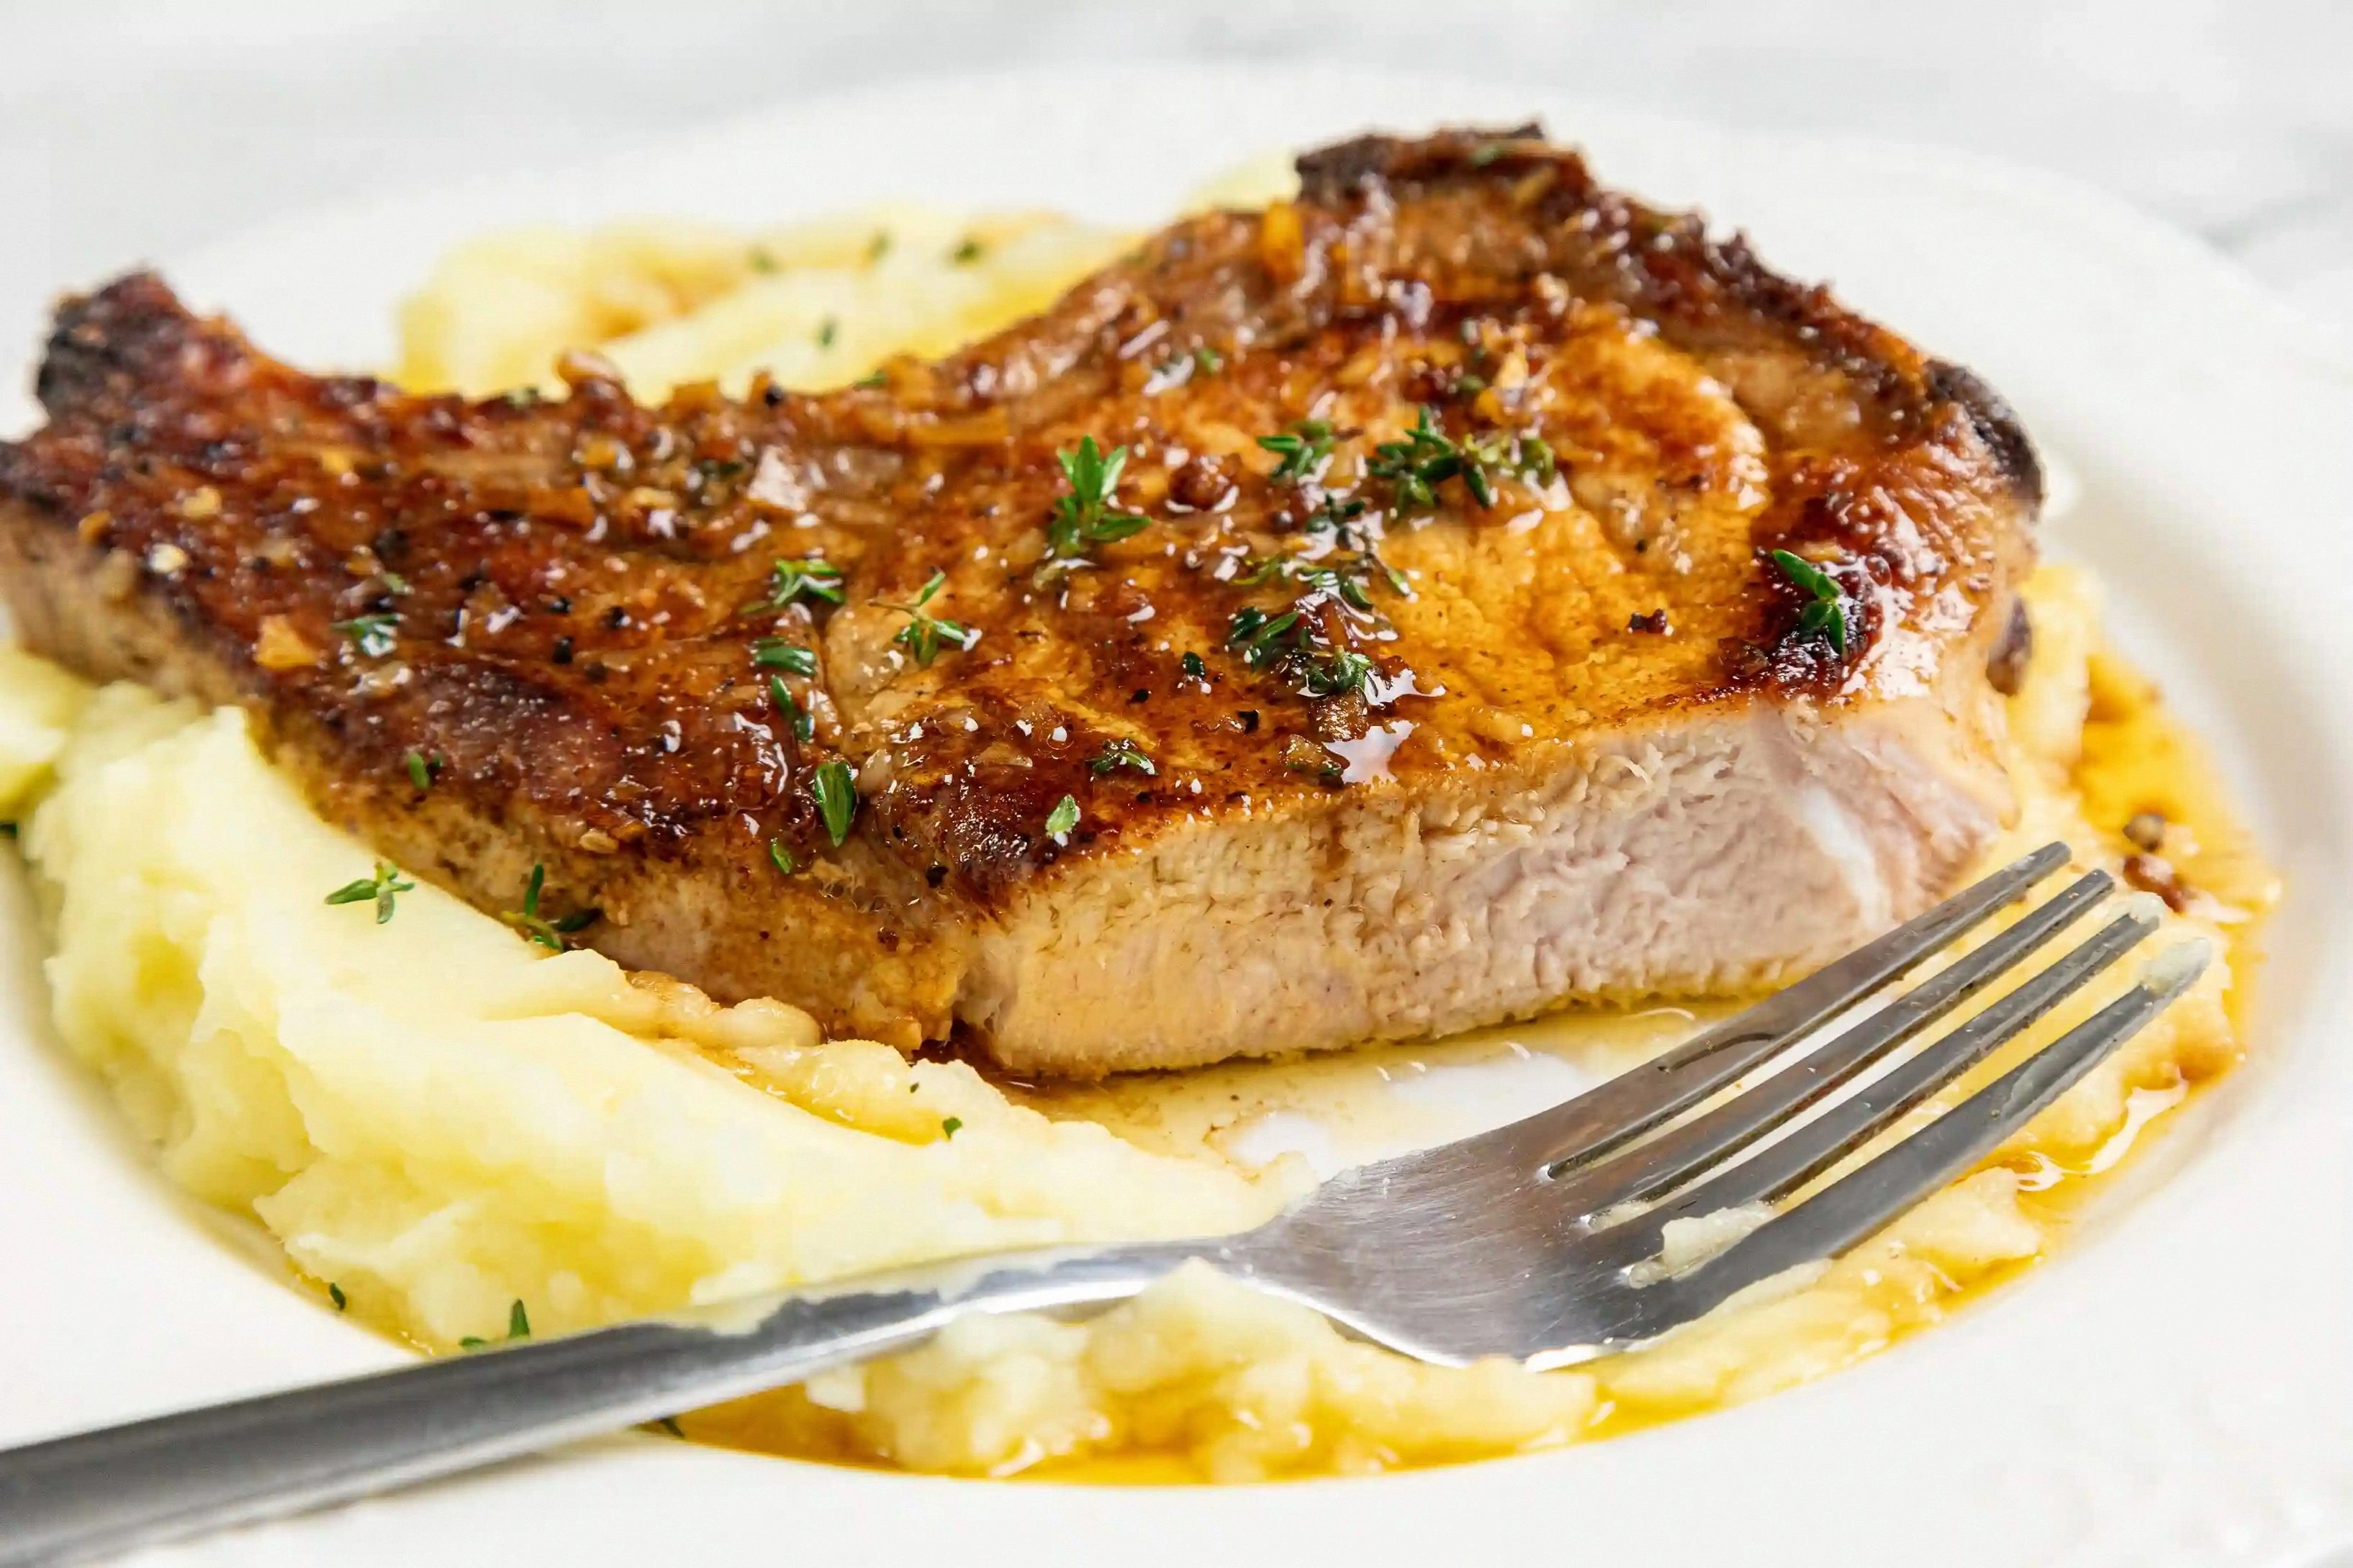
From the first glance, the chops gleam like polished silver, their edges crisped to a golden hue that promises crunch. When I break the butter and garlic together, a fragrant steam rises, filling the air with a buttery, garlicky aroma that makes your mouth water before the first bite. The sound of the pan is a satisfying hiss, a tiny symphony of sizzling that signals the searing process is in full swing. On the palate, the pork delivers a savory bite, followed by a buttery finish that lingers like a soft velvet ribbon. The texture is a delightful contrast: a firm, juicy interior wrapped in a crisp, caramelized crust that cracks under your teeth. The aroma lingers in the kitchen, turning a simple dinner into an edible invitation.
This version stands out because it marries the smoky heat of paprika with the earthy richness of garlic, creating a flavor profile that is both bold and comforting. Unlike other pork recipes that rely on heavy sauces, this dish uses a lean butter glaze that enhances the natural taste of the meat without overpowering it. The technique of searing at high heat followed by a gentle finish in butter locks in moisture, ensuring each bite is succulent. The fresh herbs finish it off with a bright, aromatic lift that balances the richness. The result is a dish that feels both indulgent and wholesome, a rare combination that makes every bite worth savoring. And the best part? It can be whipped up in under twenty minutes, perfect for a busy weeknight or an impromptu dinner party.
Now, here’s the kicker: the secret to that irresistible crust isn’t just the butter; it’s a simple trick of letting the pork rest on a wire rack after searing to let the steam escape, keeping the exterior crisp. And there’s a hidden gem in the recipe—smoked paprika, which adds depth without the need for a smoke gun or a grill. If you’re wondering how to get that smoky flavor, I’ll show you how to infuse it in a pinch using a dry rub. The combination of olive oil and butter creates a double‑layered sear that gives the pork a golden, caramelized finish. Trust me, once you taste the first bite, you’ll understand why I’ve labeled this as the ultimate pork chop recipe.
Let me walk you through every single step, from selecting the perfect cut to plating it with a flourish that will make your guests swoon. By the end, you’ll wonder how you ever made it any other way. I dare you to taste this and not go back for seconds. If you’ve ever struggled with pork chops that dry out, you’re not alone—this recipe is the fix you’ve been looking for. Picture yourself pulling this out of the pan, the whole kitchen smelling incredible, and the family gathering around the table. And now, let’s dive into the details and make this masterpiece your new kitchen staple.
What Makes This Version Stand Out
- Taste: The combination of smoked paprika, garlic, and fresh herbs creates a flavor profile that is bold yet balanced. The paprika adds a subtle smokiness that pairs perfectly with the savory pork. The herbs finish the dish with a bright, aromatic note that lifts every bite.
- Texture: The searing technique locks in juices, producing a tender interior while the butter glaze forms a crisp, caramelized crust. The crust cracks like thin ice when you bite into it, revealing a juicy center. The result is a satisfying contrast that keeps you coming back for more.
- Speed: In just twenty minutes you can transform a simple pork chop into a restaurant‑grade dish. The quick sear and butter finish require minimal prep, making it ideal for busy evenings. You’ll spend less time cooking and more time enjoying the meal.
- Ingredient Quality: Using fresh, high‑quality pork and fresh herbs ensures the flavor shines through. The butter adds richness that no artificial sauce can match. The simplicity of the ingredient list keeps the focus on the meat itself.
- Versatility: This recipe scales easily for any number of servings, whether you’re cooking for two or a crowd. It works with different cuts of pork, from loin to tenderloin. The basic technique can be adapted to other proteins like chicken or fish.
- Presentation: The golden crust and vibrant herbs make the plate look as good as it tastes. A drizzle of the buttery glaze adds a glossy finish that looks professional. The dish is ready to serve straight from the pan, saving you time on plating.
Alright, let’s break down exactly what goes into this masterpiece. Each ingredient plays a role that extends beyond its basic function, weaving together a tapestry of flavors and textures that elevate the dish. From the aromatic foundation of garlic and paprika to the silky butter that ties everything together, every element is essential. Understanding why each component matters will help you tweak the recipe to suit your taste or dietary preferences. The next section will give you a closer look at each ingredient group, so you can appreciate the science behind the magic. By the end of this, you’ll be able to confidently swap or upgrade any component without compromising the integrity of the dish.
Everything’s prepped? Good. Let’s get into the real action. Remember, the key to success lies in the timing and the right heat. Keep an eye on the pan, and don’t be afraid to adjust the temperature as you go. The aroma will guide you, and the sound of sizzling is a reliable indicator that you’re on the right track. With these insights, you’ll master the art of pan‑seared pork chops in no time.
Inside the Ingredient List
The Flavor Base
Three cloves of garlic are the heart of this dish, releasing a deep, savory aroma that permeates the pork as it cooks. Olive oil serves as the medium that transfers heat evenly, preventing the garlic from burning while allowing the paprika to bloom. The smoked paprika adds a gentle smokiness that elevates the pork without overpowering its natural flavor. Skipping any of these would leave the dish feeling flat, lacking the layered complexity that makes it memorable.
The Texture Crew
Two tablespoons of unsalted butter are the secret to that buttery, caramelized crust that sings when you bite into it. The butter melts into the meat, creating a glossy sheen that locks in juices and adds a luxurious mouthfeel. If you replace the butter with a non‑dairy alternative, the flavor depth will diminish, and the crust may not achieve the same golden crispness. Using a high‑smoke‑point oil like avocado could work, but it will alter the buttery finish.
The Unexpected Star
Fresh herbs—such as thyme, rosemary, or parsley—add a burst of color and a bright, aromatic finish that balances the richness of the butter and the depth of the paprika. They also provide a subtle herbaceous note that cuts through the fattiness of the pork, creating a harmonious flavor profile. If you’re short on fresh herbs, a pinch of dried herbs can substitute, but the aroma will be less vibrant. Using herbs that are wilted or overripe will introduce bitterness and compromise the dish’s overall appeal.
The Final Flourish
While the core ingredients are minimal, a splash of lemon juice or a drizzle of honey can add a hint of acidity or sweetness that elevates the dish. These optional additions are not required, but they provide an extra layer of complexity for adventurous cooks. If you decide to experiment, keep the additions subtle; you don’t want to overpower the primary flavors. The final flourish is the finishing touch that transforms a simple pork chop into a memorable entrée.
Everything’s prepped? Good. Let’s get into the real action. The next step is where the magic truly begins, and it’s all about timing, heat, and patience. With the ingredients ready, you’ll be able to create a dish that impresses even the most discerning palates. Keep your eyes on the pan and trust the process—this is where the flavors come together. Now, let’s dive into the cooking steps that will bring this recipe to life.
The Method — Step by Step
- First, season both sides of the pork chops generously with salt, pepper, and smoked paprika, ensuring an even coating. Let the seasoned chops sit at room temperature for about five minutes; this allows the flavors to penetrate the meat. If you’re in a hurry, you can skip the resting time, but the chops will benefit from the extra minute. While the chops rest, preheat a large skillet over medium‑high heat until it shimmers. The pan must be hot enough to sear the meat without sticking.
- Add the tablespoon of olive oil to the pan, swirling to coat the surface. The oil should start to smoke lightly, indicating that the pan is ready for the pork. Gently place the pork chops into the skillet, laying them flat and away from each other to avoid steaming. You should hear a satisfying sizzle that signals the searing process has begun. Press down lightly with a spatula to ensure even contact.
- Sear the chops for about 3 minutes on the first side until a golden crust forms and the edges begin to pull away from the pan. Flip the chops carefully with tongs, keeping them flat against the pan. The second side should also develop a beautiful golden crust in another 3 minutes. The goal is a crisp exterior with a juicy interior; do not rush this step. The aroma will start to intensify, giving you a preview of the finished dish.
- Reduce the heat to medium and add the butter to the pan. Let it melt and start to foam, then add the minced garlic, letting it sizzle for about 30 seconds until fragrant. The garlic will release its oils and blend with the butter, creating a rich sauce. Stir occasionally to prevent the garlic from burning. The mixture should become glossy, indicating that it’s ready for the pork.
- Tilt the pan slightly so the butter pools on one side, then spoon it over the top of the pork chops repeatedly. This basting technique ensures that the chops remain moist and develop a buttery glaze. The butter should coat the meat evenly, creating a sheen that glistens in the light. Keep the temperature steady; if the pan gets too hot, the butter may burn. This step is crucial for achieving that melt‑in‑your‑mouth texture.
- After about 2 minutes of basting, sprinkle fresh herbs over the chops. The herbs will release their aroma, adding a bright note that counteracts the richness of the butter. If you prefer a stronger herb flavor, use a larger amount or add a pinch of dried herbs. The herbs should not be overused; they’re meant to complement, not overpower. This final touch elevates the dish to restaurant‑quality.
- Remove the pork chops from the skillet and let them rest on a cutting board for 5 minutes. Resting allows the juices to redistribute, ensuring each bite stays moist and flavorful. The surface temperature will rise slightly during this time, creating a warm, inviting plate. While the chops rest, you can plate them with a drizzle of the remaining butter sauce. This small step adds an extra layer of richness.
- Serve immediately, garnished with a sprig of fresh herbs or a squeeze of lemon for an extra burst of brightness. Pair the pork with roasted root vegetables or a crisp salad to balance the richness. The dish should look golden, the crust crisp, and the interior juicy. This is the moment of truth, and it’s worth every second of anticipation. Enjoy the symphony of flavors that dance across your palate.
- If you’re feeling adventurous, drizzle a thin layer of honey over the chops before serving. The sweetness will contrast the savory butter and paprika, creating a complex flavor profile. Alternatively, a splash of balsamic vinegar can add acidity that brightens the dish. Remember, the goal is balance; keep additions subtle to preserve the core flavors. The final plating should feel effortless yet refined.
That’s it—you did it. But hold on, I’ve got a few more tricks that will take this to another level. The next section will dive into insider tips that help you avoid common pitfalls and elevate the dish to perfection. Trust me, these small adjustments will make all the difference.
Insider Tricks for Flawless Results
The Temperature Rule Nobody Follows
Many cooks underestimate the importance of pan temperature. If the skillet is too hot, the pork will sear too quickly, leaving the interior undercooked. Conversely, a cooler pan leads to steaming rather than searing, resulting in a soggy crust. The ideal temperature is medium‑high—hot enough to create a sizzling sound but not so hot that the butter burns. Use a thermometer or a quick water drop test; if the water sizzles, the pan is ready. Adjusting the heat at the right moment ensures a crisp, golden exterior.
Why Your Nose Knows Best
Your sense of smell is the first indicator that the pork is ready. As the butter melts and garlic releases its oils, a sweet, nutty aroma will fill the kitchen. If the aroma becomes sharp or burnt, the butter has gone past its prime. Don’t rely solely on visual cues; the scent is a reliable guide to flavor. When the smell reaches a buttery, toasted note, the pork is near perfection.
The 5‑Minute Rest That Changes Everything
Resting the pork chops for five minutes after cooking is a game‑changer. It allows the juices to redistribute, preventing them from escaping when you cut into the meat. A common mistake is cutting too early, which results in a dry bite. Even a short rest can make a noticeable difference in moisture and taste. Think of it as giving the pork a moment to recover and shine.
The Butter Timing Trick
Adding butter at the right moment is key to a silky glaze. If you add it too early, it may burn before the pork is cooked. Adding it after the initial sear allows the butter to melt slowly, creating a rich sauce that coats the meat. Keep the butter in a small bowl if you need to hold it back; this prevents accidental splattering. The timing also affects the depth of flavor—early addition yields a deeper, more caramelized taste.
The Garlic Crushing Technique
Crushing garlic instead of mincing it releases more flavor and creates a smoother texture in the sauce. Use the flat side of a knife to press each clove, then finely chop. This method releases essential oils faster, enhancing the buttery glaze. If you prefer a milder garlic flavor, simply reduce the amount. The crushing technique is a simple tweak that elevates the dish.
The Herb Freshness Hack
Fresh herbs bring brightness, but they can wilt quickly. To preserve their color and aroma, chop them just before serving. If you’re prepping ahead, store herbs in a damp paper towel in the fridge; they’ll stay fresh longer. Avoid over‑chopping, as it releases too many oils and can make the dish taste bitter. Fresh herbs add a final flourish that completes the flavor profile.
Those are the top tricks that separate a good dish from a great one. Each tip is backed by experience and a desire to make your cooking as effortless and delicious as possible. Try them out, and you’ll notice a dramatic improvement in texture, flavor, and overall satisfaction. Remember, cooking is as much about technique as it is about ingredients.
Creative Twists and Variations
Spicy Chipotle Twist
Swap the smoked paprika for chipotle powder to add a smoky heat that pairs beautifully with pork. Use one teaspoon of chipotle for a mild kick, or double it for a more intense flavor. The peppery undertones will complement the buttery glaze, creating a complex profile. This version is perfect for those who enjoy a bit of heat in their meals. Pair it with a cooling yogurt sauce to balance the spiciness.
Herbaceous Lemon Zest
Replace the fresh herbs with a handful of lemon zest and a splash of fresh lemon juice. The citrus adds brightness and cuts through the richness of the butter. The zesty aroma will lift the dish, making it feel lighter and more refreshing. This variation is ideal for summer evenings or when you want a bright, vibrant plate. Serve with a cucumber salad for a complete meal.
Sweet Maple Glaze
Add two tablespoons of pure maple syrup to the butter sauce for a sweet, caramelized finish. The maple’s natural sugars complement the pork’s savory flavor, creating a balanced taste. Reduce the syrup by half if you prefer a less sweet profile. The glaze will give the pork a glossy, amber sheen. This version is great for a cozy, fall‑style dinner.
Crispy Parmesan Crust
Before searing, coat the pork chops in a mixture of grated Parmesan and breadcrumbs. The crust will become crispy and add a nutty flavor to the dish. Use a 1:1 ratio of Parmesan to breadcrumbs for the best texture. This variation adds a crunchy layer that contrasts with the buttery interior. Serve with a simple green salad to keep the meal balanced.
Asian Ginger Soy
Replace the butter with a mixture of soy sauce, ginger, and a splash of rice vinegar. Sauté the pork in this savory sauce for a quick, Asian‑inspired dish. The ginger adds a fresh kick, while the soy sauce deepens the umami. This version works well with steamed rice and sautéed greens. The result is a quick, flavorful meal that feels exotic.
Mediterranean Tomato Basil
After searing, add a handful of cherry tomatoes and fresh basil to the pan. Let the tomatoes soften slightly, releasing their juices into the sauce. The basil adds a fragrant finish, while the tomatoes bring a sweet, acidic note. This variation brings a Mediterranean vibe to the dish. Serve over couscous for a complete, wholesome plate.
These variations prove that this recipe is a playground for creativity. Swap in your favorite spices, herbs, or sauces to suit your mood or pantry. Each twist offers a new flavor journey while maintaining the core of the buttery, garlicky pork chop. Experiment with different combinations, and you’ll discover countless new favorites. The key is to keep the base technique intact and let your imagination guide the rest.
Storing and Bringing It Back to Life
Fridge Storage
Store leftover pork chops in an airtight container in the refrigerator for up to three days. Keep the container on the top shelf to avoid cross‑contamination. Wrap the chops loosely in parchment paper before sealing; this helps maintain moisture. When you’re ready to eat, reheat gently in a skillet to preserve the crust. Avoid microwaving, as it can make the meat rubbery.
Freezer Friendly
For longer storage, wrap each pork chop tightly in foil and place them in a freezer bag. Label the bag with the date to keep track of freshness. Frozen chops can stay good for up to two months. Thaw them overnight in the refrigerator before reheating. The freezer will preserve the flavor, but the texture may slightly change; a quick sear will restore crispness.
Best Reheating Method
To reheat, preheat a skillet over medium heat and add a splash of olive oil. Place the pork chops in the pan and heat for about 3 minutes per side, or until warmed through. If the chops are frozen, add a few extra minutes to the reheating time. A light drizzle of butter at the end will bring back the buttery finish. The key is gentle heat to avoid drying out the meat.
Storing and reheating are essential skills for making the most of your meal. By following these tips, you can enjoy the same delicious experience every time you reheat your pork chops. The flavors will stay vibrant, and the texture will remain satisfying. Keep your leftovers fresh and ready to serve whenever you need a quick, comforting meal.