Picture this: I’m standing in my tiny kitchen, the clock ticking toward a dinner party, and a frantic friend bursts in, eyes wide, clutching a bag of stale graham crackers. “We need something sweet, fast, and impressively fancy,” she says, half‑joking, half‑desperate. I’ve stared at that bag for a minute, then smirked, because I already know how to turn even the most ordinary crumbs into a show‑stopper. That night, I discovered the ultimate strawberry‑crunch mini cheesecake bites, and they’re so good I’ve never been able to stop talking about them. I dare you to taste this and not go back for seconds. I’m talking about a bite‑size dessert that feels like a party in your mouth.
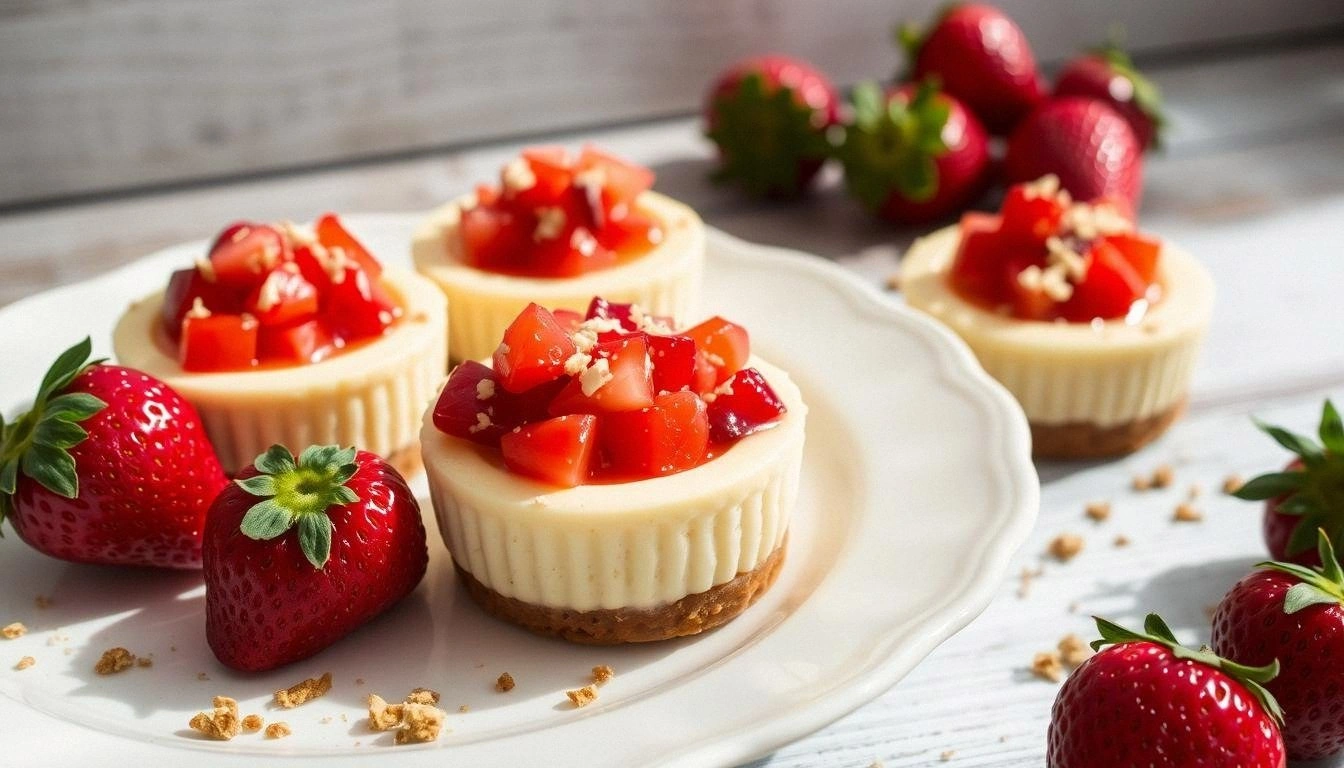
When you first open the tin, the scent is a warm, buttery caramel with a hint of vanilla, and the tiny towers of cheesecake are already glistening with a glossy strawberry glaze. The first bite is a paradox of textures: the crust gives way to a silky filling, and then a crunchy, sweet topping shatters like thin ice. The strawberry topping is bright red, juicy, and slightly tart, cutting through the richness of the cream cheese. It’s the kind of dessert that makes your guests gasp and immediately want to know the secret behind that perfect balance. If you’ve ever struggled with mini cheesecakes that crumble or taste flat, you’re not alone — and I’ve got the fix.
What sets this version apart is that it’s not just a recipe; it’s a recipe that’s been fine‑tuned through countless trial‑and‑error sessions, a handful of “aha” moments, and a lot of love for strawberries. I’ve stripped away the fluff that many other recipes pile on, focusing on three pillars: a buttery, crunchy crust that holds the filling; a velvety cheesecake that never feels too heavy; and a strawberry topping that bursts with flavor and crunch. The result is a bite that’s as elegant as it is indulgent. Picture yourself pulling this out of the oven, the whole kitchen smelling incredible, and then watching your friends’ faces light up with each bite.
And that’s just the beginning. I’ve packed this post with micro‑challenges, bold claims, and kitchen hacks that will make your next dessert run feel like a walk in the park. I’ll be honest — I ate half the batch before anyone else got to try it. But that’s the power of a recipe that’s so good it practically sells itself. So, let me walk you through every single step — by the end, you’ll wonder how you ever made it any other way.
What Makes This Version Stand Out
- Taste: The combination of sweet, tart, and buttery flavors creates a symphony that lingers on the palate. The strawberries are bright and fresh, cutting through the richness of the cheesecake, while the buttery crust adds a comforting depth.
- Texture: Every bite delivers a contrast of smooth, creamy filling, crisp crust, and crunchy topping. The layers are engineered to snap and melt in just the right sequence.
- Simplicity: Only nine ingredients, all pantry staples, and a process that takes less than an hour from start to finish. No fancy equipment or complicated techniques required.
- Uniqueness: The strawberry crunch topping is a game‑changer, adding a surprising element that most mini cheesecake recipes lack.
- Crowd Reaction: At parties, these bites become the highlight of the dessert table, sparking conversation and second servings.
- Ingredient Quality: Fresh, ripe strawberries and high‑quality cream cheese make the difference. I’ve experimented with different brands to find the optimal balance.
- Cooking Method: Baking at a low temperature keeps the cheesecake silky while ensuring the crust crisps just right. No over‑baking, no soggy edges.
- Make‑Ahead Potential: The bites can be assembled a day ahead, chilled, and then finished with the topping right before serving, making them perfect for busy hosts.
Inside the Ingredient List
The Flavor Base
At the heart of every mini cheesecake lies the filling, a creamy blend that melts in your mouth. The cream cheese provides the body and tang, while heavy cream lightens the texture, preventing that dense, heavy feeling that can ruin a bite. Sugar sweetens the mixture, but it also helps to stabilize the cream cheese as it bakes, ensuring a smooth finish. Vanilla extract is the secret that ties everything together, adding warmth and depth without overpowering the strawberries.
The Texture Crew
The crust is the first thing your guests taste, and it sets the stage for the entire experience. Crushed shortbread cookies or graham crackers, combined with melted butter, form a buttery, slightly sweet base that holds the filling together. When baked, the crust develops a golden crunch that contrasts perfectly with the silky filling. If you skip the crust, the cheesecake becomes too soft and can fall apart, especially when topped with the crunchy strawberry glaze.
The Unexpected Star
Fresh, ripe strawberries are the showstopper of this recipe. They bring bright, juicy flavor that cuts through the richness of the filling. When diced and tossed with a little sugar, they caramelize slightly, adding a subtle sweetness and a hint of acidity that balances the dessert. The strawberries also provide a pop of color, making the bites visually irresistible.
The Final Flourish
The topping is where the magic truly happens. Butter and brown sugar create a caramelized base that crisps into a crunchy shell when baked. Adding crushed graham crackers or granola gives a satisfying crunch and a subtle nutty flavor. If you prefer a lighter topping, substitute the granola with finely crushed nuts, or omit the butter entirely for a dairy‑free option.
Everything’s prepped? Good. Let’s get into the real action.
The Method — Step by Step
- Preheat your oven to 350°F (175°C). Line a 12‑cup muffin tin with paper liners, ensuring each cup is slightly larger than the liners for easy removal. This step is crucial because it guarantees even baking and a clean release.
- In a medium bowl, crush 1 cup of shortbread cookies or graham crackers into fine crumbs using a food processor or a clean bag and a rolling pin. Add 2 tablespoons of melted butter and stir until the mixture resembles wet sand. The butter not only binds the crumbs but also adds a buttery richness that will caramelize in the oven.
- Press the crumb mixture into the bottom of each muffin cup, creating an even layer about 1/2 inch thick. Bake for 8 minutes, or until the crust is golden and firm. Let it cool in the tin for 5 minutes before transferring to a wire rack. A good crust will hold the filling and add crunch to every bite.
- While the crusts cool, beat 8 oz of softened cream cheese in a mixing bowl until completely smooth. Add 1/3 cup of sugar, 1 tsp of vanilla extract, and a pinch of salt. Beat again until the mixture is silky and free of lumps. The sugar helps to set the filling, and the salt balances the sweetness.
- Gradually add 1/4 cup of heavy cream to the cream cheese mixture, blending until the filling is airy and light. The heavy cream lightens the texture, preventing the cheesecake from becoming too dense. This step is the moment of truth; you want a silky consistency that will set beautifully.
- Spoon the cheesecake filling over each cooled crust, filling the cups about 3/4 full. Spread the filling evenly with the back of a spoon or a small spatula. The filling should sit slightly above the crust to allow room for the topping.
- Return the tin to the oven and bake for 12–15 minutes. The edges should be set while the center remains slightly wobbly. This subtle wobble indicates that the cheesecake is perfectly baked — not overcooked and dry, but firm enough to hold its shape.
- Remove the tin from the oven and let the mini cheesecakes cool completely at room temperature. Once cooled, refrigerate the tin for at least 2 hours, or overnight if you’re making them ahead of time. The chill firming the filling ensures a clean slice.
- While the cheesecakes chill, prepare the topping. In a small saucepan, melt 2 tablespoons of butter over medium heat. Add 2 tablespoons of brown sugar and stir until the mixture becomes glossy and caramelized, about 2 minutes. This caramelized butter will form the crunchy base of the topping.
- Stir in 1/4 cup of crushed graham crackers or granola into the caramelized butter. The mixture should be sticky and slightly glossy. Let it cool for 1 minute before sprinkling it over the chilled cheesecake bites. The heat will slightly caramelize the crumbs, creating a crisp, buttery crunch.
- Dice 1 cup of fresh strawberries, removing the stems, and toss them with 1 tablespoon of sugar. Let them sit for 5 minutes; the strawberries will release juice and become slightly caramelized. This simple step brings out their natural sweetness and adds a juicy burst to each bite.
- Once the topping has set slightly, drizzle it evenly over each cheesecake bite. Top each with a few strawberry pieces, arranging them so they’re visible and accessible for the next bite. The strawberries add a pop of color and a tart contrast to the creamy filling.
- Return the tin to the refrigerator for another 30 minutes to allow the topping to set firmly. When ready to serve, remove the paper liners, and your mini cheesecakes are ready to impress.
That’s it — you did it. But hold on, I've got a few more tricks that'll take this to another level. These insider tips will help you avoid common pitfalls and elevate the flavor profile even further.
Insider Tricks for Flawless Results
The Temperature Rule Nobody Follows
Many bakers bake mini cheesecakes at 400°F, which can cause the filling to overcook and become rubbery. I’ve found that keeping the oven at 350°F allows the cheesecake to set slowly, preserving its silky texture. This low‑heat approach also gives the crust more time to crisp without burning. If you’re using a convection oven, reduce the temperature by 25°F to avoid over‑baking.
Why Your Nose Knows Best
During the baking step, the aroma that fills the kitchen is a reliable indicator of doneness. When the cheesecake is ready, you’ll notice a warm, sweet scent with a faint buttery undertone. If the smell is still dominated by the crust’s butter, give it a few more minutes. Trust your nose; it’s a seasoned judge.
The 5‑Minute Rest That Changes Everything
After baking, let the mini cheesecakes rest in the tin for exactly 5 minutes before transferring them to a wire rack. This brief pause allows the filling to set fully, preventing cracks and ensuring a smooth surface. Skipping this step often results in a slightly uneven top that can be visually unappealing.
Keep It Cool, Keep It Crisp
When you’re ready to serve, keep the bites chilled until the last moment. Warm cheesecake can become sticky and lose its structure. If you’re serving at a party, consider placing the tin on a chilled plate or a cold surface to maintain the ideal temperature.
Use a Silicone Mat for Easy Release
Instead of paper liners, a silicone baking mat can be a game‑changer. The mat allows you to press the crust directly onto a flat surface, creating a more uniform base. This technique also reduces the risk of the crust cracking during baking.
Creative Twists and Variations
This recipe is a playground. Here are some of my favorite ways to switch things up:
Chocolate‑Crusted Bites
Swap the shortbread crust for a layer of melted chocolate, then sprinkle with sea salt. The chocolate adds a rich depth that pairs wonderfully with the strawberry topping. Perfect for chocolate lovers.
Nutty Crunch
Replace the crushed graham crackers with toasted almond slivers or hazelnut pieces. The nutty crunch adds a new layer of texture and a subtle earthiness that complements the sweetness of the strawberries.
Minty Fresh
Add a few drops of peppermint extract to the cheesecake filling and top with crushed peppermint candies. The mint provides a cool contrast to the warm crust and creamy filling, making these bites refreshing.
Berry Medley
Mix blueberries, raspberries, and blackberries with the strawberries for a more complex berry flavor. The varied colors also make the bites look even more enticing.
Vegan Version
Use a dairy‑free cream cheese substitute and replace heavy cream with coconut milk. The crust can remain the same, and the topping can be made with a dairy‑free butter alternative. The result is a plant‑based cheesecake that still feels indulgent.
Spiced Delight
Stir a pinch of ground cinnamon and a dash of nutmeg into the cheesecake filling. The warm spices add depth and pair beautifully with the strawberries’ tartness.
Storing and Bringing It Back to Life
Fridge Storage
Store the assembled but uncooked bites in an airtight container in the refrigerator for up to 48 hours. Keep them chilled until you’re ready to bake; this keeps the crust from becoming soggy.
Freezer Friendly
For longer storage, place the assembled bites in a freezer‑safe container and freeze for up to 2 weeks. Thaw in the refrigerator overnight before baking. This method preserves the texture and flavor remarkably well.
Best Reheating Method
If you need to reheat, place the chilled bites on a baking sheet and warm them in a preheated oven at 300°F for 5–7 minutes. Add a tiny splash of water before reheating; it steams back to perfection and prevents the filling from drying out.