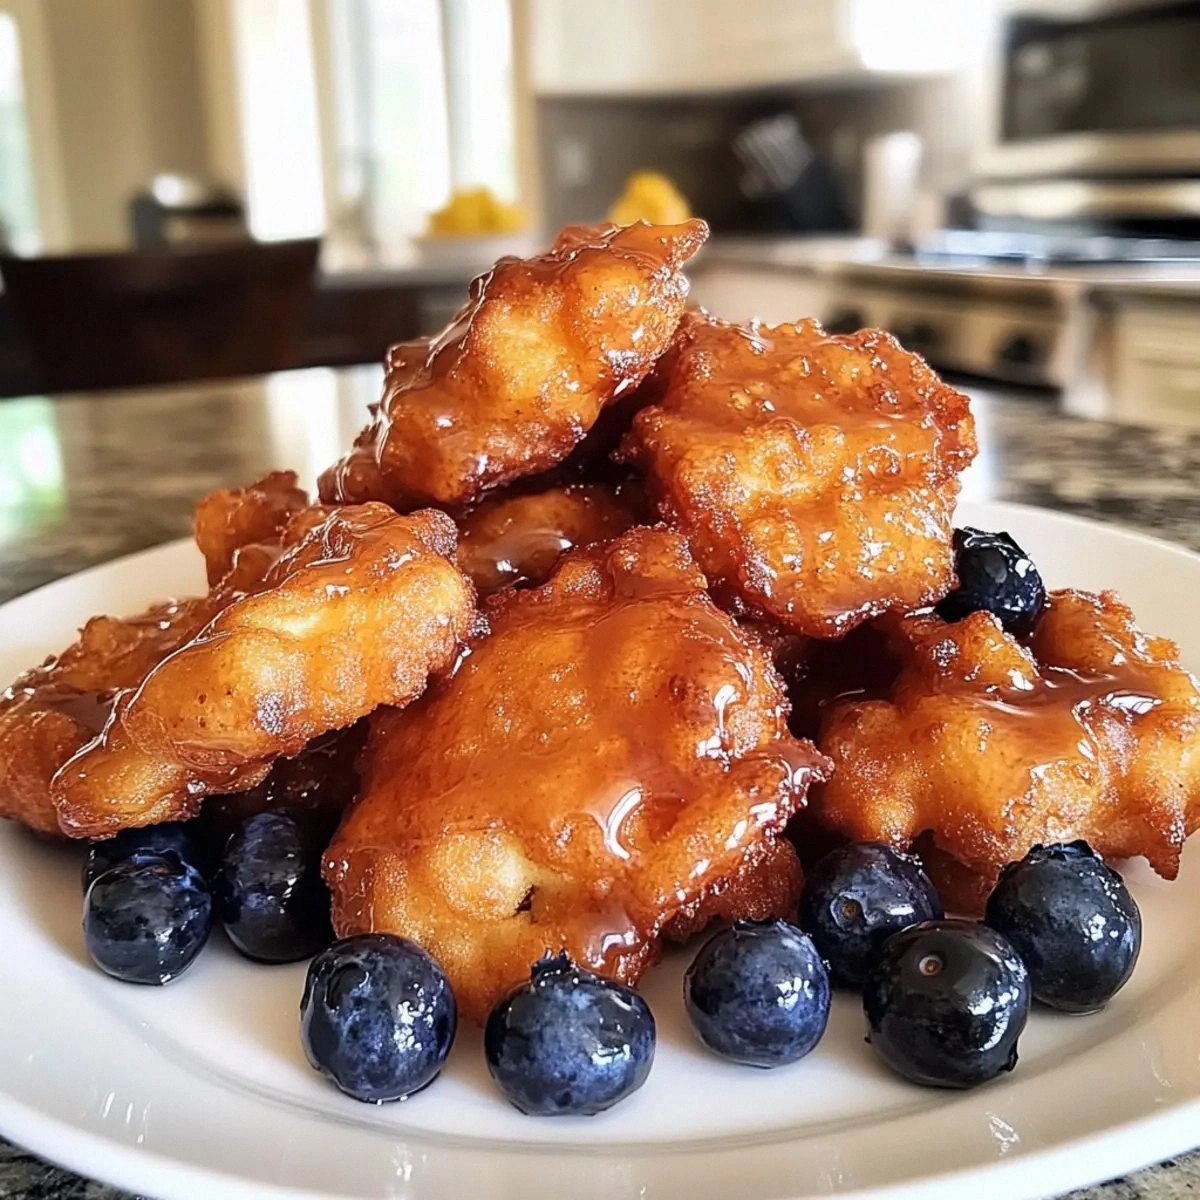
Picture this: a Saturday afternoon, the kitchen humming with the low buzz of a blender, a half‑baked batch of fish fingers drifting in the air, and a friend daring you to taste them before you finish the last bite. That was the moment I discovered the recipe that turned ordinary cod into a crunchy, melt‑in‑your‑mouth masterpiece. The aroma of lightly fried batter, the sizzle that crackles like a campfire, and the sight of golden edges that shatter like thin ice all combine into a sensory experience that feels like a culinary fireworks show. I was skeptical at first—how could a simple batter beat a store‑bought version? But the first bite silenced the doubt: the fish was flaky, the coating was crisp, and the flavor was a perfect balance of savory and citrusy.
That single, triumphant taste set a new personal standard. I realized that the secret wasn't just the ingredients, but the method: a precise layering of flour, beaten eggs, and seasoned breadcrumbs that creates a barrier against moisture while still letting the fish breathe. I was also struck by the way the batter’s texture changes from a silky slurry to a light, airy coating with just the right amount of salt and pepper. And the best part? It’s a recipe that you can tweak for any occasion—kids, adults, or a fancy dinner party—without losing that signature crunch.
If you’ve ever tried a fish finger that turned out soggy or too greasy, you’re not alone. Most recipes get this completely wrong by over‑mixing the batter or using stale breadcrumbs that absorb too much oil. I’ve spent hours in the kitchen testing different ratios, and I’m ready to share the exact tweaks that guarantee a crunchy exterior and a tender interior every single time. This isn’t just a recipe; it’s a culinary revelation that will change the way you think about fish fingers forever.
I dare you to taste this and not go back for seconds. I’ve already eaten half the batch before anyone else had a chance, and the rest were devoured in record time. Let me walk you through every single step—by the end, you’ll wonder how you ever made it any other way.
What Makes This Version Stand Out
- Flavor: The subtle citrus from fresh lemon zest lifts the mild fish flavor, creating a bright, fresh profile that cuts through the richness of the batter. This simple addition turns ordinary cod into a dish that feels like it belongs on a seaside terrace.
- Texture: The double‑dipping technique—first in flour, then in egg, and finally in breadcrumbs—creates a multi‑layered crust that remains crisp for minutes, even when reheated. The result is a crunch that’s both satisfying and airy.
- Ease: The method requires only three bowls and a few basic kitchen tools, making it a breeze for beginners and a quick win for seasoned cooks alike. No fancy gadgets, no complicated steps.
- Versatility: Swap cod for haddock, tilapia, or even a plant‑based fish alternative, and the recipe still works. The seasoning blend can be tweaked to suit any palate, from smoky chipotle to sweet maple.
- Crowd‑pleaser: Whether you’re feeding a family or hosting a potluck, these fingers are guaranteed to disappear in seconds. Their golden, mouth‑watering appearance is impossible to resist.
- Quality: Fresh, wild‑caught fish is the foundation—nothing else can match that clean, buttery taste. The breadcrumbs are made from a mix of panko and regular breadcrumbs for that perfect crunch.
- Make‑ahead: The batter can be prepared up to 24 hours in advance; just keep the coated fingers chilled and bake when ready. This makes it an ideal option for busy evenings.
- Health‑friendly: By baking instead of deep‑frying, you cut the fat content dramatically while still achieving a crispy finish. Pair it with a homemade tartar sauce for a balanced meal.
Inside the Ingredient List
The Flavor Base
Fresh cod fillets form the heart of this dish. Choose fillets that are firm, translucent, and free of any brown spots. If you’re feeling adventurous, swap for haddock or a mild white fish; the flavor profile stays consistent. A small amount of salt and pepper enhances the natural taste without masking it.
The Texture Crew
All-purpose flour, beaten eggs, and a blend of panko and traditional breadcrumbs create the signature crispness. The flour forms a barrier that locks in moisture, while the eggs bind the coating and give it a golden sheen. Panko’s airy structure keeps the crust light, but if you prefer a denser crunch, use regular breadcrumbs instead. Skipping any of these steps will result in a soggy or uneven coating.
The Unexpected Star
A splash of freshly squeezed lemon juice and a dash of paprika add a bright, smoky undertone that elevates the dish. The lemon not only brightens the flavor but also helps to keep the fish tender. Paprika gives a subtle heat and a deep amber hue that makes the fingers look irresistibly golden.
The Final Flourish
A light drizzle of olive oil before baking ensures a crisp exterior without the greasiness of deep‑frying. For a more indulgent option, finish with a pat of butter on top of the hot fingers; the melt will coat the edges with a buttery glaze. If you’re watching calories, simply omit the butter and rely on the olive oil alone.
Everything's prepped? Good. Let's get into the real action.

The Method — Step by Step
- Prep the Fish: Pat the cod fillets dry with paper towels to remove excess moisture. This step is critical; a wet surface will cause the coating to stick and become soggy. Season the fillets lightly with salt and pepper, then slice each into 1‑inch thick strips. I swear, the first time I forgot to dry them, the batter clung like a stubborn coat of glue.
- Set Up Your Dredging Station: Place the flour in a shallow bowl. In a second bowl, whisk the eggs with a splash of cold water until frothy. In a third bowl, combine the panko, regular breadcrumbs, lemon zest, paprika, and a pinch of baking soda. The baking soda is a secret to a lighter crust; it reacts with the lemon to create tiny bubbles.
- First Coat – Flour: Lightly dust each fish strip in the flour, shaking off any excess. This initial coating traps moisture and prevents the batter from becoming too wet. Don’t rush—give each piece a quick, even coat.
- Second Coat – Egg: Dip the floured strips into the egg mixture, ensuring they’re fully submerged. The egg binds the flour and breadcrumbs together. If you notice any clumps, pat them dry with a paper towel before moving to the next step.
- Final Coat – Breadcrumbs: Roll the egg‑soaked strips in the breadcrumb mixture, pressing gently to adhere. Make sure every surface is covered; the crust is what makes or breaks the dish. If you’re short on time, you can skip the flour step, but the result will be less crisp.
- Arrange on Baking Sheet: Line a baking sheet with parchment paper and place the coated strips on it, leaving a small gap between each piece. This spacing allows hot air to circulate, ensuring even crisping. If you have a wire rack, place it over the sheet for extra airflow.
- Light Oil Brush: Using a pastry brush, lightly coat the tops of the fingers with olive oil. This not only enhances browning but also seals the coating, preventing it from drying out. I always use a thin layer—too much oil will make the crust greasy.
- Bake: Preheat your oven to 200°C (400°F). Bake the fish fingers for 12–15 minutes, turning once halfway through. The internal temperature should reach 63°C (145°F). The edges should pull away from the parchment, and the coating will be golden and crisp.
- Optional Butter Finish: While the fingers are still hot, drizzle a small amount of melted butter over them. The butter will melt into the crust, giving it a rich, glossy finish. This step is optional but highly recommended if you’re serving a crowd.
- Serve Immediately: Serve the fish fingers hot with your choice of dipping sauce—tartar, aioli, or a simple squeeze of fresh lemon. The best flavor and texture come straight from the oven; any delay will soften the crunch.
That’s it—you did it. But hold on, I’ve got a few more tricks that’ll take this to another level.
Insider Tricks for Flawless Results
The Temperature Rule Nobody Follows
Many cooks bake at 180°C, but that temperature is too low to create that perfect crunch. Elevating the oven to 200°C (400°F) ensures the exterior crisps up before the interior cooks through. If you’re using a convection oven, lower the temperature by 20°C to avoid over‑browning.
Why Your Nose Knows Best
Before you open the oven door, pause and inhale the aroma of the batter. A fragrant, slightly caramelized scent is a sign that the coating is forming correctly. If it smells more like raw flour, you’re baking too slowly—raise the heat slightly.
The 5‑Minute Rest That Changes Everything
After baking, let the fish fingers rest on a wire rack for five minutes. This allows steam to escape, preventing the crust from becoming soggy. It also lets the flavors settle, making the bite more cohesive.
Use a Paper Towel to Keep the Oil Dry
If you’re using a light oil brush, place a paper towel on the baking sheet to soak up excess oil. This trick keeps the coating from becoming greasy and helps maintain the crunch.
The Secret to a Crunchy Bottom
Place a second sheet of parchment paper on the baking sheet and press a weight—like a small baking dish—on top of the fish fingers. This keeps them flat and ensures even browning on all sides.
Add a Splash of Vinegar
A teaspoon of white wine vinegar in the breadcrumb mix brightens the flavor and cuts through the richness. It also helps the coating adhere better by slightly altering the pH of the batter.
Creative Twists and Variations
This recipe is a playground. Here are some of my favorite ways to switch things up:
Spicy Sriracha Crunch
Add a teaspoon of sriracha to the breadcrumb mixture for a fiery kick. The heat pairs well with the mild fish, and the sauce can be served on the side for extra zing.
Herbed Mediterranean
Replace paprika with dried oregano and add chopped fresh parsley to the breadcrumb blend. Finish with a drizzle of olive oil and a squeeze of lemon for a Greek‑inspired flavor.
Sweet & Smoky Maple
Incorporate a tablespoon of maple syrup into the egg wash and sprinkle a pinch of smoked paprika into the breadcrumbs. The sweetness balances the smoky undertone, creating a complex taste profile.
Coconut‑Infused Coconut‑Crunch
Swap regular breadcrumbs for desiccated coconut and add a pinch of curry powder. This tropical twist works wonderfully with a coconut‑lime dipping sauce.
Vegan Fish Fingers
Use a plant‑based fish substitute or a firm tofu cut into strips. The coating process stays the same, but the texture will be slightly denser. Pair with a vegan aioli for a complete meal.
Cheesy Parmesan Finish
Sprinkle grated Parmesan on top of the coated fingers before baking. The cheese melts into the crust, giving it a golden, savory crust that’s irresistible.
Storing and Bringing It Back to Life
Fridge Storage
Cool the fish fingers completely before placing them in an airtight container. Store them in the refrigerator for up to 2 days. The crust will remain crisp for a short time, but you’ll notice a slight softening after 24 hours.
Freezer Friendly
Arrange the cooled fingers on a parchment‑lined tray and freeze until solid. Transfer them to a freezer bag for longer storage—up to 2 months. This method keeps the coating intact and prevents freezer burn.
Best Reheating Method
Preheat the oven to 190°C (375°F). Place the frozen or refrigerated fingers on a parchment paper–lined sheet and bake for 8–10 minutes, flipping halfway through. Add a tiny splash of water to the bottom of the pan to create steam; this keeps the interior moist while the crust crisps back to perfection.