I still remember the day I ruined a whole tray of cinnamon rolls. The dough was tough, the filling leaked everywhere, and I ended up with a sticky mess that tasted like disappointment. I sat on my kitchen floor, flour in my hair, thinking I'd never attempt anything cinnamon-related again. But then something magical happened — I wondered what if I took everything I loved about those warm, spicy spirals and transformed them into something foolproof? Something that wouldn't require yeast, rising time, or the patience of a saint? These cinnamon roll cupcakes with swirl frosting were born from that kitchen disaster, and they've become my most-requested treat ever since.
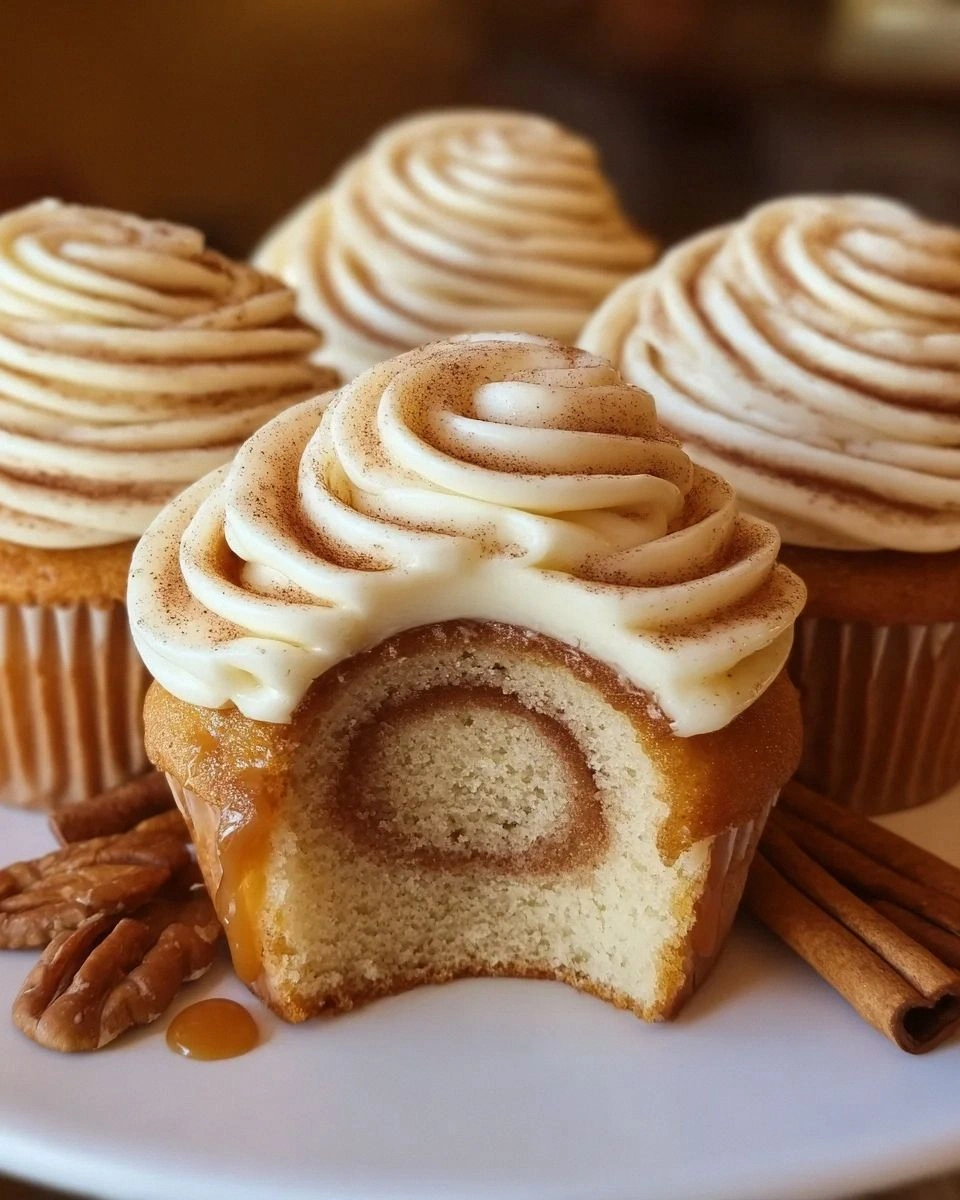
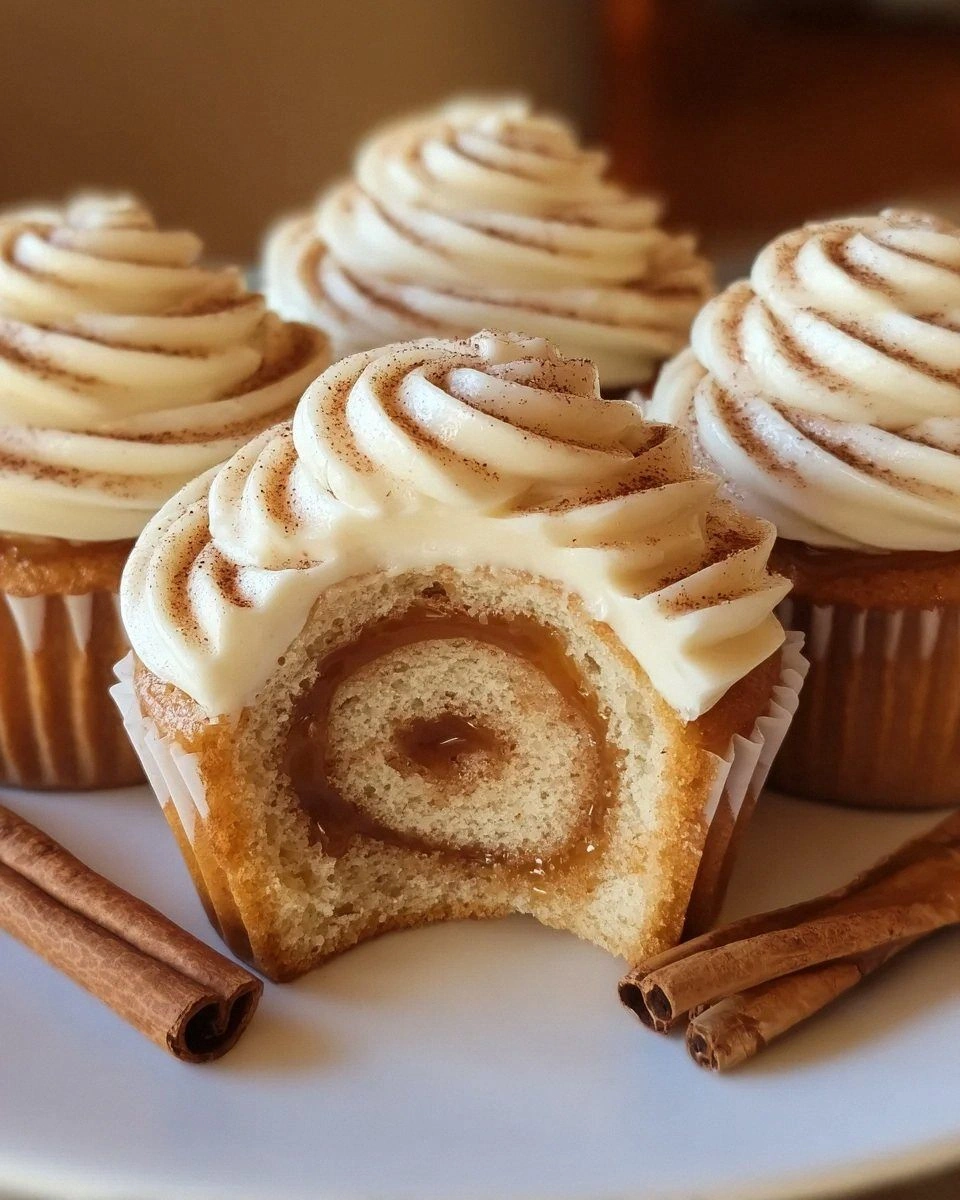
Picture this: it's 6 AM on a Saturday, your coffee's brewing, and you're pulling these beauties from the oven. The scent hits you first — that intoxicating blend of cinnamon, brown sugar, and butter that makes your neighbors knock on your door. But here's the kicker — these aren't your average cinnamon rolls. They're tender, moist cupcakes with a cinnamon-sugar ribbon running through the center, topped with a cream cheese frosting that I've been told is "dangerously addictive" by at least three people who then asked if I'd make them again the very next day.
What makes these special? They capture everything you love about cinnamon rolls — the warm spices, the sweet swirl, the creamy frosting — but they're ready in under an hour. No waiting for dough to rise, no rolling pins, no special equipment. Just pure, unadulterated cinnamon roll flavor in cupcake form. I've made these for brunches, birthdays, and midnight cravings. I've watched grown adults close their eyes when they take the first bite, and I've seen kids lick the frosting off first (then ask for another). This is the recipe that turns skeptics into believers and makes you the hero of any gathering.
The secret? We'll swirl cinnamon sugar right into the batter, creating those gorgeous ribbons that look like they took hours to achieve. Then we'll top them with a frosting that's part cream cheese, part cloud, part dream. Stay with me here — this next part is worth it. Let me walk you through every single step — by the end, you'll wonder how you ever made it any other way.
What Makes This Version Stand Out
- Speed: Traditional cinnamon rolls take 3-4 hours. These cupcakes? 45 minutes from mixing to mouth. That means you can satisfy that cinnamon craving without setting aside your entire morning.
- Texture Perfection: The cupcake base stays tender and moist for days, unlike traditional rolls that go stale quickly. The secret is in the buttermilk and the precise ratio of brown sugar to white sugar.
- Swirl Technique: Instead of just mixing cinnamon into the batter, we create a cinnamon-sugar paste that ribbons through each cupcake, giving you those Instagram-worthy spirals in every bite.
- Frosting Game-Changer: Most cream cheese frostings are too heavy. Mine incorporates whipped cream, making it light, pipeable, and stable at room temperature for hours.
- Make-Ahead Magic: These freeze beautifully, both frosted and unfrosted. I always keep a dozen in my freezer for emergencies (and by emergencies, I mean Tuesdays).
- Crowd Pleaser: Everyone loves cinnamon rolls, but not everyone loves the mess. These are portable, finger-friendly, and party-perfect. I dare you to taste this and not go back for seconds.
Alright, let's break down exactly what goes into this masterpiece...
Inside the Ingredient List
The Flavor Base
All-purpose flour forms the backbone here, but not just any flour will do. You want the protein content of regular AP flour, not cake flour, because these need enough structure to support the swirl. The buttermilk is non-negotiable — it tenderizes the crumb and gives that tangy backdrop that makes the cinnamon pop. If you absolutely must substitute, use 3/4 cup milk mixed with 2 tablespoons white vinegar, but promise me you'll try it with real buttermilk at least once. The brown sugar isn't just for sweetness; its molasses content deepens the flavor and keeps everything moist.
Butter quality matters more than you think. Use the good European-style butter here — the higher fat content creates those tender, almost melt-in-your-mouth edges. I've tested this with cheap butter, and while it works, the flavor difference is like comparing a symphony to a kazoo. The eggs should be large and at room temperature — cold eggs don't incorporate properly and can leave you with dense, sad cupcakes.
The Texture Crew
Baking powder and baking soda work together here — the soda neutralizes the acid in buttermilk while the powder provides lift. Don't skip the salt — it amplifies all the other flavors and balances the sweetness. Vanilla extract isn't just background noise; it bridges the gap between the warm spices and the sweet base. Use real vanilla, not the imitation stuff. Your taste buds will thank you, and so will anyone lucky enough to eat these.
The oil in this recipe is my secret weapon. While most cupcake recipes use all butter, I add a touch of neutral oil (like canola or grapeseed) to keep them impossibly moist. Oil coats flour proteins better than butter, preventing gluten formation and giving you that tender crumb. Don't worry — you won't taste it, but you'll definitely notice the difference in texture.
The Unexpected Star
Here's where I get a little controversial — I use a blend of cinnamon in these cupcakes. Regular cinnamon for the base flavor, plus a touch of Vietnamese cinnamon for that extra punch. Vietnamese cinnamon (also called Saigon cinnamon) is stronger and spicier than regular cinnamon, giving you that bakery-style flavor. If you can't find it, use all regular cinnamon, but reduce the amount slightly so it doesn't overwhelm.
The cornstarch in the swirl mixture isn't a mistake — it prevents the sugar from dissolving completely, giving you that slightly crunchy, crystallized texture in the swirl. It's like finding little pockets of cinnamon candy in your cupcake. Most recipes skip this and end up with a gummy, dissolved swirl. Not here, friends.
The Final Flourish
Cream cheese for the frosting should be full-fat and cold when you start. I know most recipes say to use room temperature, but starting cold prevents the frosting from becoming too runny. We'll whip it with heavy cream, creating a stable, pipeable frosting that holds its shape for days. The powdered sugar amount might seem high, but trust the process — we're making a frosting that can stand up to the bold flavors of the cupcake without disappearing.
Heavy cream gets whipped separately and folded in, giving us the lightness of whipped cream with the stability of cream cheese frosting. This technique, borrowed from Japanese-style cream frosting, creates something magical. Don't substitute with milk or half-and-half — you need the fat content to stabilize the frosting.
Everything's prepped? Good. Let's get into the real action...
The Method — Step by Step
- Preheat your oven to 350°F (175°C) and line a 12-cup muffin tin with paper liners. This temperature is crucial — too hot and the edges will burn before the center is done, too cool and you won't get that beautiful domed top. While the oven heats, let's make the cinnamon swirl mixture. In a small bowl, combine 1/3 cup brown sugar, 2 tablespoons white sugar, 2 teaspoons cinnamon, 1/2 teaspoon cornstarch, and a pinch of salt. Mix this with your fingers, breaking up any brown sugar lumps. The mixture should feel like damp sand and smell like heaven. Set this aside — this is what creates those gorgeous ribbons.
- In a medium bowl, whisk together 1 3/4 cups all-purpose flour, 1 teaspoon baking powder, 1/2 teaspoon baking soda, and 1/2 teaspoon salt. This might seem basic, but whisking aerates the flour and ensures even distribution of leavening agents. I've seen too many cupcakes with bitter spots where the baking soda didn't mix properly. Set this aside and let's move to the wet ingredients. In a large bowl, beat 1/2 cup softened butter with 3/4 cup brown sugar and 1/4 cup white sugar until light and fluffy — about 3 minutes with an electric mixer. The mixture should be pale and doubled in volume. Don't rush this step — proper creaming incorporates air, giving you tender cupcakes.
- Add 2 large eggs, one at a time, beating well after each addition. Then add 1 teaspoon vanilla extract and beat until combined. The batter might look slightly curdled — that's normal and will come together when we add the flour. Add 2 tablespoons vegetable oil and mix until incorporated. Now, here's the game-changer: add the dry ingredients in three additions, alternating with 3/4 cup buttermilk, beginning and ending with the dry ingredients. Mix just until combined after each addition. Overmixing develops gluten, leading to tough cupcakes. The batter should be thick but pourable, like a milkshake.
- Time for the fun part — creating the swirl. Fill each muffin cup about 1/3 full with batter. Sprinkle about 1 teaspoon of the cinnamon-sugar mixture over the batter in each cup. Use a toothpick to gently swirl it into the batter, creating a marbled effect. Don't overmix here — you want distinct ribbons, not a muddy mess. Add another layer of batter to fill the cups about 2/3 full, then top with another teaspoon of cinnamon-sugar mixture. Swirl again, this time using a figure-eight motion to create those beautiful spirals.
- Bake for 18-22 minutes, or until a toothpick inserted into the center comes out with just a few moist crumbs. The tops should be golden brown and spring back when lightly touched. Watch them closely after 18 minutes — every oven is different, and these can go from perfect to overbaked quickly. While they're baking, your kitchen will fill with the most incredible aroma. That sizzle when the cinnamon sugar hits the hot pan? Absolute perfection. Cool in the pan for 5 minutes, then transfer to a wire rack to cool completely. Resist the urge to frost them while warm — the frosting will slide right off.
- While the cupcakes cool, let's make the frosting. In a cold bowl (I stick mine in the freezer for 10 minutes), beat 8 ounces cold cream cheese until smooth and creamy — about 2 minutes. Add 1/2 cup powdered sugar and beat until combined. In a separate bowl, whip 1 cup heavy cream with 1 teaspoon vanilla extract until stiff peaks form. This is crucial — underwhipped cream will make runny frosting, overwhipped cream will make butter. Gently fold the whipped cream into the cream cheese mixture in three additions, being careful not to deflate the cream. The result should be light, fluffy, and hold peaks.
- Transfer the frosting to a piping bag fitted with a large star tip. Pipe tall swirls on each cooled cupcake, starting in the center and working outward in a spiral. If you don't have a piping bag, use a zip-top bag with the corner snipped off — it won't be as pretty, but it'll taste the same. Dust with a little extra cinnamon for that bakery look. These are best served immediately, but they'll keep in an airtight container in the refrigerator for up to 3 days. Bring to room temperature for 30 minutes before serving for the best texture and flavor.
That's it — you did it. But hold on, I've got a few more tricks that'll take this to another level...
Insider Tricks for Flawless Results
The Temperature Rule Nobody Follows
Room temperature isn't just a suggestion — it's the difference between success and frustration. Cold eggs don't incorporate properly, leading to dense cupcakes. Cold cream cheese won't whip smoothly, giving you lumpy frosting. But here's what most recipes don't tell you: over-softened butter is just as bad. If your butter is greasy and practically melted, it can't trap air during creaming. The sweet spot is butter that's soft enough to leave an indentation when pressed, but still holds its shape. I set everything out 30 minutes before baking, except the cream cheese for the frosting — that stays cold until I'm ready to use it.
Why Your Nose Knows Best
Don't trust the timer alone — your nose is the best indicator of doneness. When these cupcakes are perfectly baked, your kitchen will smell like a cinnamon roll factory. If you start to smell a hint of toastiness, check them immediately. That aroma is the Maillard reaction happening — the sugars caramelizing and creating those complex, nutty flavors. But catch it right at the peak, because 30 seconds too long and you'll have dry cupcakes. I've developed a sixth sense for this after years of baking, but you can too — just start paying attention to the aromas in your kitchen.
The 5-Minute Rest That Changes Everything
After you take the cupcakes out of the oven, let them rest in the pan for exactly 5 minutes — no more, no less. Too short and they'll fall apart when you try to remove them. Too long and they'll develop a gummy texture from steam trapped in the pan. During these 5 minutes, the carryover cooking finishes the centers, the structure sets, and the flavors meld. It's like a magic window where everything comes together. Use a timer — this isn't the time to get distracted by your phone or start washing dishes.
The Swirl Secret
Here's what separates amateur cinnamon swirl from professional-looking spirals: don't overmix the swirl. When you add the cinnamon-sugar mixture, use a gentle hand. Think of it like marbleizing — you want distinct ribbons, not a uniform color. The best tool is a thin wooden skewer or a chopstick. Insert it about halfway down and make 2-3 gentle figure-eight motions. If you stir too much, you'll end up with brown cupcakes instead of beautiful swirls. Less is definitely more here.
The Frosting Fix-All
If your frosting is too sweet (and let's be honest, most are), add a pinch of salt and a squeeze of lemon juice. The salt enhances the cream cheese flavor and balances the sweetness, while the lemon brightens everything up. Start with just a pinch of salt and 1/4 teaspoon of lemon juice — you can always add more, but you can't take it out. This trick works for almost any frosting, by the way. A friend tried skipping this step once — let's just say it didn't end well.
Creative Twists and Variations
This recipe is a playground. Here are some of my favorite ways to switch things up:
Maple Bacon Bliss
Replace the white sugar in the swirl with maple sugar, and add 1/4 teaspoon maple extract to the batter. Top the frosted cupcakes with candied bacon crumbles — just bake bacon strips at 400°F with a brown sugar glaze until crispy. The sweet-salty-smoky combination is breakfast perfection. These disappear faster than regular ones at brunch — I've seen people hoard them.
Apple Pie Remix
Add 1/2 cup finely diced, peeled apple to the batter (pat dry first). Replace the cinnamon in the swirl with apple pie spice. Top with the cream cheese frosting and a drizzle of caramel sauce. The fruit adds moisture and those little bursts of apple flavor make people ask "what's the secret ingredient?" Use Honeycrisp or Fuji apples — they hold up best during baking.
Chocolate Cinnamon Heaven
Add 2 tablespoons cocoa powder to the swirl mixture and reduce the cinnamon to 1 teaspoon. The chocolate deepens the flavor and creates these gorgeous dark ribbons. Top with chocolate cream cheese frosting by adding 2 tablespoons cocoa powder to the frosting. This version tastes like a cinnamon mocha in cupcake form — perfect for afternoon coffee breaks.
Pumpkin Spice Dreams
Replace 1/4 cup of the flour with pumpkin puree and add 1 teaspoon pumpkin pie spice to the batter. The pumpkin keeps them incredibly moist and adds that autumn flavor everyone loves. These are my go-to for fall gatherings — people go absolutely wild for them. The pumpkin flavor is subtle but present, like a whisper of fall in every bite.
Salted Caramel Swirl
Replace the brown sugar in the swirl with caramel sauce (homemade or store-bought) and add 1/2 teaspoon flaky sea salt to the batter. Top with the cream cheese frosting and a drizzle of caramel. The salt enhances all the other flavors and makes these dangerously addictive. I brought these to a potluck once and had to share the recipe with twelve people.
Lemon Raspberry Bright
Add 1 tablespoon lemon zest to the batter and replace the cinnamon swirl with raspberry jam. Drop small spoonfuls of jam into the batter and swirl gently. The tart berries and bright lemon create a fresh, summery version that's perfect for baby showers or spring brunches. Use good quality jam — it makes all the difference.
Storing and Bringing It Back to Life
Fridge Storage
These cupcakes keep remarkably well in the refrigerator for up to 3 days. Store them in an airtight container — I like to place a piece of parchment paper between layers if I'm stacking them. The cold actually helps set the frosting and intensifies the flavors. Bring to room temperature for 30 minutes before serving for the best texture. If they've been in the fridge longer than a day, add a tiny splash of water before reheating — it steams back to perfection.
Freezer Friendly
Here's where these really shine — they freeze beautifully for up to 2 months. I like to freeze them unfrosted in a single layer on a baking sheet, then transfer to a freezer bag once solid. When you're ready to serve, thaw overnight in the refrigerator, then bring to room temperature. Frost fresh for best results, though you can freeze frosted ones too — just wrap individually in plastic wrap first. The texture stays almost identical to fresh-baked.
Best Reheating Method
For that fresh-from-the-oven experience, warm individual cupcakes in the microwave for 8-10 seconds. Any longer and you'll have hot frosting soup. If you want to reheat several, wrap them in foil and warm in a 300°F oven for 5-7 minutes. The gentle heat brings back that just-baked texture without drying them out. Add a tiny splash of water to the container before reheating — it creates steam that brings back the moisture.