I still hear the hiss of that over‑cooked skillet in my head, the way the chicken turned from pink to a sad, pale gray that had no place on my plate. I was halfway through a dinner for three, the air thick with the scent of onions and garlic, when I realized I’d forgotten the most crucial seasoning—jalapeños. The moment that realization hit, I was on a mission to rescue the meal, and the result was a revelation that would forever change how I think about cheesy, spicy chicken.
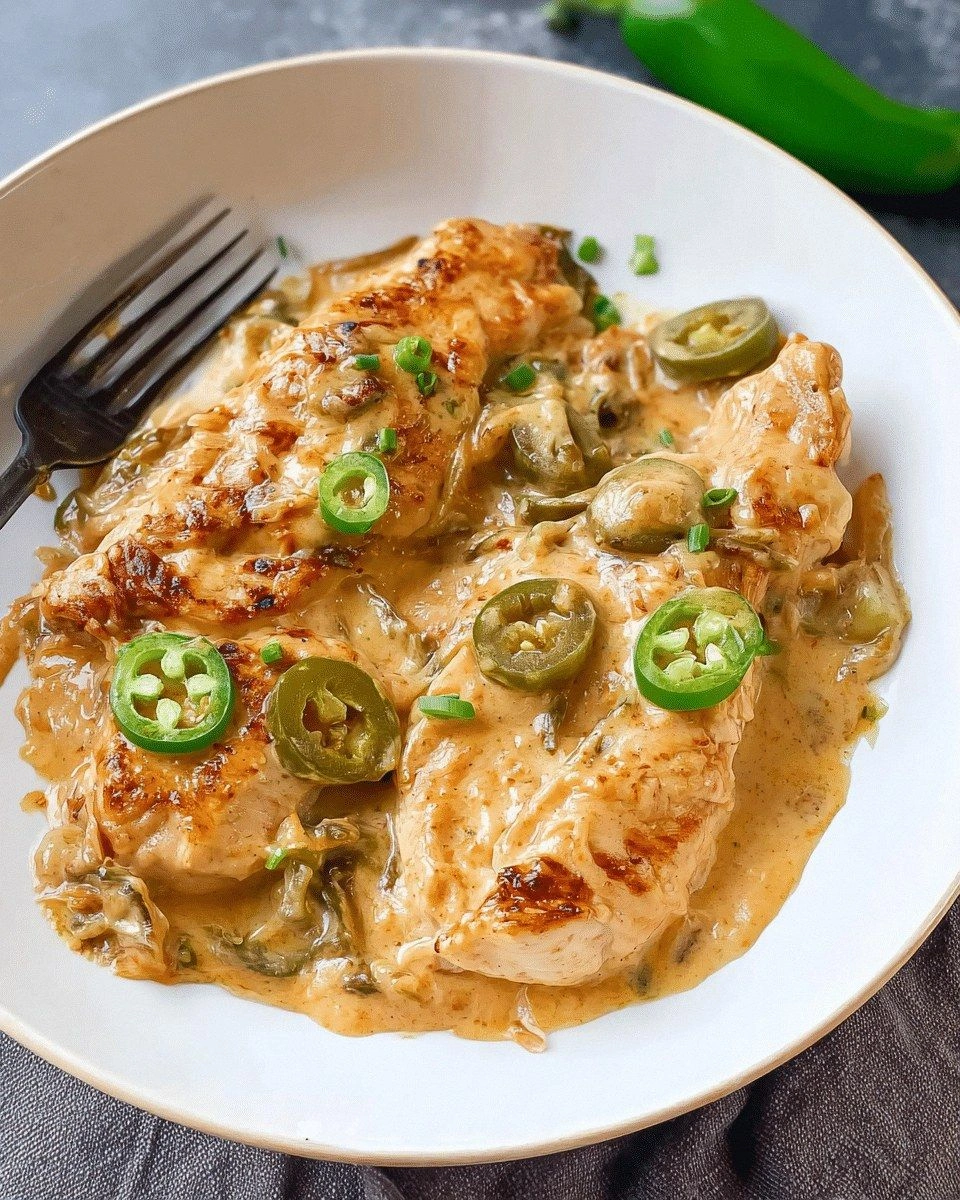
Picture this: a sizzling pan, the bright green jalapeños popping into the oil with a sharp, almost electric pop. The aroma that follows is a blend of smoky paprika and fresh pepper, a heady perfume that makes your stomach growl with anticipation. The chicken, golden and crisp on the outside, releases a steam that carries the savory notes of cheddar and mozzarella. Each bite is a contrast of hot and cool, the creamy cheese melting into the tender meat while the jalapeños deliver a bite that lingers on the tongue. The texture is a harmonious dance—crunchy edges, silky interior, and a buttery coating that feels like a warm hug.
What makes this version stand out is not just the flavor but the philosophy behind it. I’ve spent years experimenting with the classic jalapeño chicken, but this iteration is a culmination of a few simple yet powerful tweaks: a secret blend of cheeses, a touch of cream cheese for depth, and a final breadcrumb crust that adds a satisfying crunch. It’s the kind of dish that turns a regular weekday into an instant celebration. I dare you to taste this and not go back for seconds. Trust me, it’s hands down the best version you’ll ever make at home.
The twist that sets this apart is the unexpected use of panko breadcrumbs mixed with a dash of smoked paprika. That small addition gives the crust a smoky, airy crunch that feels like a crunchy snowstorm on your palate. And the finish—an extra sprinkle of fresh parsley—adds a burst of color and a subtle herbaceous brightness that balances the heat. Picture yourself pulling this out of the oven, the whole kitchen smelling incredible, and knowing you’ve just created something that will make everyone ask for the recipe.
Let me walk you through every single step—by the end, you’ll wonder how you ever made it any other way. Ready? Let’s dive in.
What Makes This Version Stand Out
The secret sauce behind this dish is a blend of textures and flavors that work together like a well‑orchestrated symphony.
- Cheese Fusion: Combining cheddar, mozzarella, and cream cheese creates a gooey, creamy center that melts into the chicken, delivering a rich, velvety mouthfeel.
- Heat Control: The jalapeños are finely diced and sautéed just enough to release their heat without overpowering the dish, allowing a balanced spicy kick.
- Crunch Factor: The panko breadcrumb coating, lightly toasted, gives a satisfying crunch that contrasts the soft interior.
- Smoky Depth: Smoked paprika and cumin add an earthy undertone, elevating the dish beyond plain jalapeño chicken.
- Easy Prep: The ingredients are pre‑measured and ready to go, making this a quick and stress‑free dinner.
- Make‑Ahead Friendly: The assembled dish can be refrigerated and baked later, ideal for busy weeknights.
- Family Friendly: The heat level is mild enough for kids but still satisfies adults who love a spicy bite.
- Versatile Pairings: It pairs beautifully with rice, quinoa, or a simple green salad, making it adaptable to any meal plan.
Alright, let's break down exactly what goes into this masterpiece…
Inside the Ingredient List
The Flavor Base
The foundation of this dish is the aromatic base that brings everything together. The minced garlic and diced onion sauté in olive oil until translucent, releasing a sweet, savory aroma that sets the stage for the rest of the ingredients. This step is critical; if you rush it, you’ll miss the depth that comes from caramelizing those aromatics. If you skip it, the dish will feel flat, lacking that comforting warmth that makes a meal memorable. For a subtle twist, try substituting garlic powder for fresh cloves if you’re short on time.
The Texture Crew
The texture crew is what turns this dish from ordinary to unforgettable. The panko breadcrumbs provide a light, airy crunch that contrasts with the creamy cheese filling. The cream cheese, when melted, creates a silky, velvety center that coats each bite. The flour and butter help bind the mixture, ensuring the coating sticks to the chicken without falling apart. If you’re watching calories, swap the all‑purpose flour for a gluten‑free alternative; just make sure it’s still thick enough to hold the coating together. The result is a multi‑sensory experience: crunchy, creamy, and utterly satisfying.
The Unexpected Star
The jalapeños are the unexpected star of this dish. They’re diced finely and sautéed with the aromatics so that their heat is distributed evenly. The heat level is controlled by removing the seeds and membranes, which contain the majority of the capsaicin. If you prefer a hotter bite, leave the membranes in or add a splash of hot sauce. The jalapeños also add a pop of color that makes the dish look as good as it tastes. Their bright green hue is a visual cue that this is a dish that’s both flavorful and fresh.
The Final Flourish
The final flourish ties everything together. A sprinkle of fresh parsley adds a burst of herbal brightness that cuts through the richness. The smoked paprika and cumin infuse a smoky depth that elevates the dish beyond a standard spicy chicken. If you’re looking for a dairy‑free version, replace the cheese blend with a plant‑based alternative; the flavor profile will remain robust. This finishing touch not only enhances the taste but also adds an appealing visual contrast.
Everything's prepped? Good. Let's get into the real action…
The Method — Step by Step
- Prep the chicken: Pat the chicken breasts dry with paper towels. Season both sides generously with salt, pepper, smoked paprika, and cumin. Let them rest for 10 minutes to absorb the flavors; this step ensures the meat stays juicy during cooking. If you’re short on time, you can season them just before cooking, but the extra rest makes a noticeable difference.
- Sauté the aromatics: Heat 2 tablespoons of olive oil in a large skillet over medium heat. Add the diced onion and minced garlic, cooking until the onion turns translucent and fragrant—about 3–4 minutes. The sizzle here is the first hint that the dish is about to get delicious. Keep stirring to avoid burning the garlic, which would give a bitter note.
- Cook the jalapeños: Add the diced jalapeños to the skillet and sauté for 2 minutes. The jalapeños should soften slightly but still retain a bit of bite. If you prefer a milder heat, you can sauté them longer to break down more of the capsaicin. This step is crucial for distributing the heat evenly throughout the dish.
- Blend the cheese mixture: In a medium bowl, combine 1 cup shredded cheddar, 1 cup shredded mozzarella, 4 oz cream cheese, and ½ cup sour cream. Mix until smooth, ensuring no lumps remain. The cream cheese adds a silky texture that helps the cheese blend melt perfectly into the chicken. If you find the mixture too thick, add a splash of milk to reach the desired consistency.
- Form the coating: In a separate bowl, whisk ½ cup all‑purpose flour, 1 cup panko breadcrumbs, 1 tsp smoked paprika, and 1 tsp garlic powder. Toss the flour mixture until the breadcrumbs are evenly coated. This dry layer will create the crisp crust when baked. A quick tip: lightly toast the breadcrumbs in a dry pan before mixing for an extra crunch.
- Coat the chicken: Pat each seasoned chicken breast with the flour mixture, pressing gently to adhere. Then, spread a generous spoonful of the cheese blend over the top of each breast. Finally, coat the cheese layer with the breadcrumb mixture, pressing firmly to ensure a solid crust. This layered approach guarantees a creamy interior and a crunchy exterior in every bite.
- Bake to perfection: Preheat your oven to 375°F (190°C). Place the coated chicken breasts on a greased baking sheet or a cast‑iron skillet. Bake for 25–30 minutes, or until the internal temperature reaches 165°F (74°C) and the crust is golden brown. The final sizzle as the cheese melts into the chicken is pure bliss. Keep an eye on the cheese; if it starts to brown too quickly, cover the dish loosely with foil.
- Finish with parsley: Remove the chicken from the oven and let it rest for 5 minutes. Sprinkle freshly chopped parsley over the top, allowing the residual heat to wilt the herbs slightly. The parsley adds a burst of color and a fresh, herbal note that cuts through the richness. Serve immediately while the cheese is still molten and the crust still crisp.
That's it — you did it. But hold on, I've got a few more tricks that'll take this to another level…
Insider Tricks for Flawless Results
The Temperature Rule Nobody Follows
Many cooks assume that a higher oven temperature always yields a crispier crust, but that’s not always true. Baking at 375°F (190°C) gives the cheese enough time to melt and the breadcrumbs enough time to crisp without burning. If you crank the heat up to 425°F (220°C), you’ll get a darker crust but risk over‑browning the cheese. The sweet spot is a moderate temperature that balances moisture retention with crispness.
Why Your Nose Knows Best
The aroma of the chicken as it bakes is a reliable indicator of doneness. When the cheese begins to bubble and the breadcrumbs turn a golden brown, the dish is almost ready. If you’re still uncertain, use a meat thermometer; the internal temperature should read 165°F (74°C). Trust your nose, but double‑check with a thermometer for safety.
The 5‑Minute Rest That Changes Everything
Letting the chicken rest for at least five minutes after baking allows the juices to redistribute throughout the meat. This simple step ensures each bite is juicy, not dry. It also gives the cheese a chance to set slightly, making the crust easier to cut and preventing the cheese from oozing out of the edges.
The Right Pan Makes a Difference
Using a cast‑iron skillet or a non‑stick baking sheet ensures even heat distribution. A heavy pan retains heat better, creating a consistent crust. If you’re using a glass baking dish, be mindful that it can heat up more slowly and may result in uneven cooking. The choice of pan can subtly alter the texture profile of the final dish.
The Secret Ingredient Swap
If you want a subtle smoky flavor without adding extra spices, try using smoked cheese instead of regular cheddar. It adds depth while keeping the dish simple. A quick experiment: replace the mozzarella with provolone for a slightly sharper, more complex cheese profile. These small swaps can transform a familiar dish into something new and exciting.
Creative Twists and Variations
This recipe is a playground. Here are some of my favorite ways to switch things up:
Mexican Street Food Style
Swap the breadcrumbs for crushed tortilla chips and add a drizzle of lime crema before serving. The chip coating gives a smoky crunch, while the lime crema adds a bright, citrusy note that feels like a taco stand in your kitchen.
Mediterranean Flair
Replace the jalapeños with sun‑dried tomatoes and add a handful of chopped kalamata olives. Finish with a sprinkle of oregano and a splash of feta. The olives bring briny depth, and the feta adds tang, turning the dish into a Mediterranean‑inspired delight.
Breakfast Powerhouse
Serve the cheesy jalapeño chicken over a bed of fluffy scrambled eggs, topped with a dollop of avocado. The protein-packed combo is perfect for a hearty breakfast or brunch that feels indulgent without being overly heavy.
Low‑Carb Version
Use almond flour instead of all‑purpose flour and replace panko breadcrumbs with crushed pork rinds. This version keeps the crunch while dramatically cutting carbs, making it ideal for keto or low‑carb diets.
Vegan Delight
Swap the chicken for thick slices of portobello mushrooms, use a plant‑based cheese blend, and replace butter with coconut oil. The mushrooms absorb the flavors beautifully, and the plant‑based cheese gives a creamy texture that satisfies even the most skeptical vegan.
Spicy BBQ Twist
Brush the chicken with your favorite BBQ sauce before baking, and sprinkle a pinch of cayenne pepper over the top. The smoky BBQ undertones mingle with the jalapeño heat, creating a layered flavor profile that’s both sweet and spicy.
Storing and Bringing It Back to Life
Fridge Storage
Store leftover cheesy jalapeño chicken in an airtight container in the refrigerator for up to 3 days. Keep the chicken and cheese separate if you plan to reheat, as the cheese can become rubbery when reheated directly. When ready to eat, reheat in the oven at 350°F (175°C) for 10 minutes to restore crispness.
Freezer Friendly
For longer storage, wrap the chicken tightly in foil and place it in a freezer bag. The dish can be frozen for up to 3 months. Thaw overnight in the refrigerator, then bake at 375°F (190°C) for 15–20 minutes, or until heated through. The texture remains excellent when reheated properly.
Best Reheating Method
The key to reheating is to use the oven or a skillet to preserve the crispy crust. Avoid microwaving, which can make the chicken soggy. If you’re short on time, a quick 2‑minute blast on a toaster oven at 350°F (175°C) will revive the cheese without compromising texture.
Add a tiny splash of water before reheating—it steams the chicken back to a juicy, tender state while keeping the cheese from drying out.