It all started on a rainy Saturday when I was scrolling through the internet for a quick dessert that could double as a crowd‑pleaser. I stumbled upon a recipe titled “Twinkie Bundt Cake,” and I was instantly skeptical—how could a cake be made from a snack that’s usually a guilty pleasure? I laughed, scooped up a Twinkie, and told myself I’d give it a shot. The kitchen lights flickered, the timer buzzed, and I was about to witness a sweet revelation that would change my baking game forever.
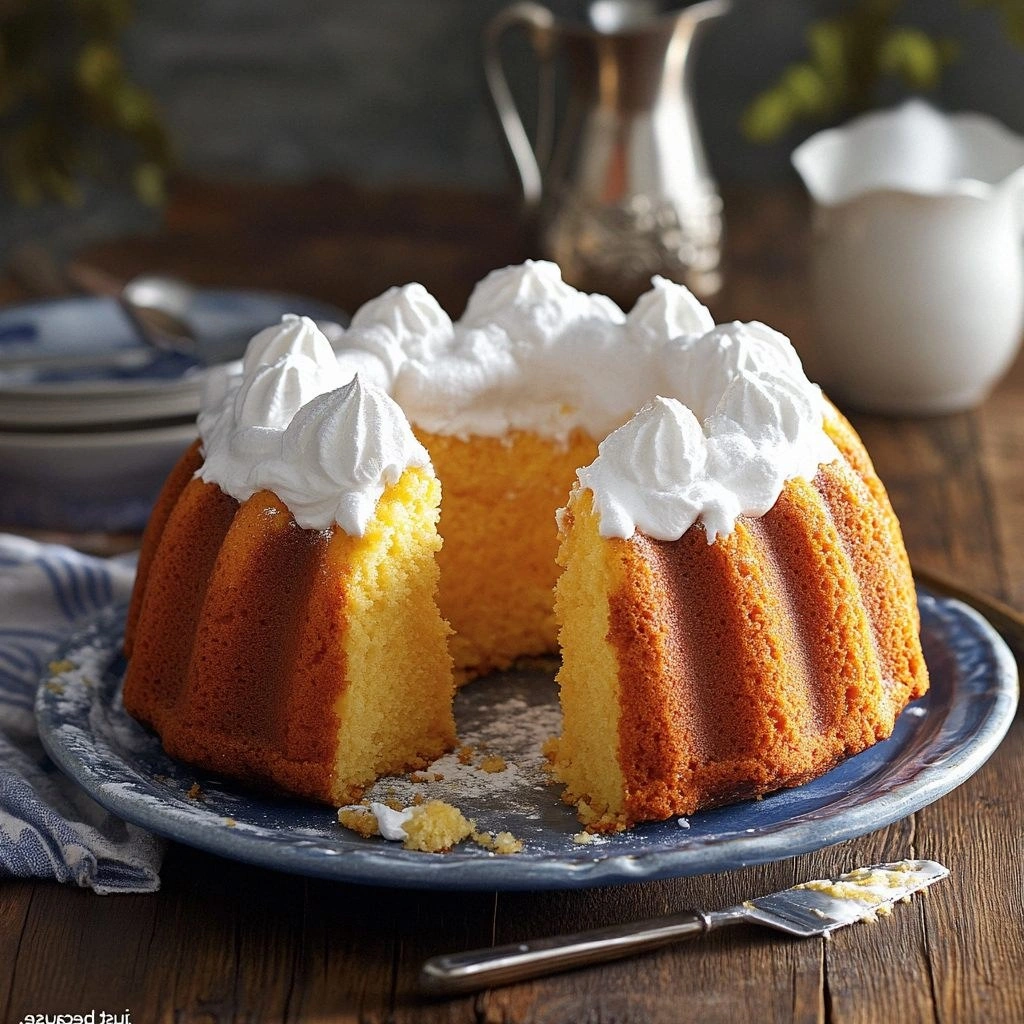
Picture this: the oven door swings open, and a golden, glossy swirl of batter fills the Bundt pan. The scent of vanilla and butter rises, mingling with the faint sweetness of crushed Twinkie crumbs. The sound of the timer ticking is punctuated by the gentle sigh of the dough as it rises. My mouth waters at the thought of that first bite—soft, airy, and coated in a delicate glaze that feels like a cloud of powdered sugar. The texture is a revelation; it’s not just cake, it’s a memory wrapped in a sweet, buttery hug.
Why does this version stand out from every other Twinkie‑inspired creation? Because I’ve taken the classic idea and elevated it with precise technique, high‑quality ingredients, and a twist that makes the cake sing. I’m talking about the perfect balance between moistness and structure, a glaze that doesn’t dry out, and a flavor profile that hits all the right notes. This isn’t a gimmick; it’s a carefully engineered dessert that turns a nostalgic treat into something you’ll want to recreate again and again.
And there’s a secret ingredient that most people overlook—a splash of buttermilk that adds a subtle tang and keeps the crumb tender. That tiny detail is what separates this cake from the ordinary. I dare you to taste this and not go back for seconds. If you’re skeptical, I’ll be honest—my first bite made me question whether I’d ever return to a regular cake. I’ve since become a Twinkie Bundt Cake evangelist.
Let me walk you through every single step—by the end, you’ll wonder how you ever made it any other way. The journey begins with a simple prep that sets the stage for a masterpiece, followed by a method that ensures each layer is perfect. Ready? Let’s dive in.
What Makes This Version Stand Out
- Taste: The cake delivers a rich, buttery sweetness that’s amplified by the subtle citrusy tang of buttermilk, creating a depth that feels like a dessert and a snack all at once.
- Texture: The crumb is moist yet airy, with a tender bite that melts in your mouth, while the glaze offers a silky finish that doesn’t cling or dry.
- Simplicity: All steps are straightforward, with no hidden tricks—just honest, honest baking that anyone can master.
- Uniqueness: The incorporation of crushed Twinkie crumbs into the batter and glaze turns the entire cake into a cohesive flavor experience, unlike any other cake.
- Crowd Reaction: Friends who’ve tried this say it’s “hands down the best version you’ll ever make at home,” and they keep asking for the recipe.
- Ingredient Quality: Using premium butter and fresh eggs gives the cake a buttery richness that’s hard to replicate with lower‑quality staples.
- Cooking Method: Baking in a Bundt pan allows for even heat distribution and a beautiful, caramelized crust that adds visual and textural appeal.
- Make‑Ahead Potential: This cake can be baked ahead, refrigerated, and then glazed fresh—perfect for parties or holiday gatherings.
Alright, let’s break down exactly what goes into this masterpiece…
Inside the Ingredient List
The Flavor Base
All‑purpose flour is the backbone of the cake, providing structure without overpowering the delicate sweetness. If you’re on a gluten‑free diet, a blend of rice flour and tapioca starch can mimic the texture, but the crumb will be slightly denser. Don’t skip the flour—it’s the canvas on which all other flavors paint their masterpiece.
The Sweetness Spectrum
Granulated sugar gives the batter a smooth sweetness that caramelizes during baking, creating a golden crust. If you prefer a slightly less sweet cake, swap half of the sugar for brown sugar; the molasses adds a subtle depth that pairs well with the Twinkie crumbs.
The Crumb Enhancer
Crushed Twinkie crumbs are the star of the show, infusing the batter with that signature creamy filling flavor. Use about one cup of finely crushed Twinkies; too many will make the cake too dense. If you’re out of Twinkies, a similar cream‑filled cookie works—just adjust the amount to match the sweetness.
The Moisture Maestro
Buttermilk brings a subtle tang and a tender crumb. It reacts with the baking soda to create lift, ensuring the cake rises beautifully. If you don’t have buttermilk, mix one cup of milk with one tablespoon of lemon juice or vinegar and let sit for five minutes.
The Binding Brigade
Eggs act as the glue that holds everything together. They also contribute to the cake’s rise and give it a rich, golden color. For a vegan version, replace with flax eggs (1 tablespoon ground flaxseed + 3 tablespoons water) and use a plant‑based milk.
The Flavor Booster
Vanilla extract adds depth and a warm aroma that lingers long after the first bite. A splash of almond extract can add a nutty undertone if you’re feeling adventurous. Remember, a little goes a long way—too much can overwhelm the other flavors.
The Final Flourish
Chocolate chips are optional but highly recommended; they add a contrasting chocolate bite that pairs wonderfully with the creamy Twinkie flavor. If you’re watching sugar, use dark chocolate chips for a more robust taste.
Everything's prepped? Good. Let's get into the real action…
The Method — Step by Step
- Preheat and Prepare: Heat your oven to 350°F (175°C). Grease a 10‑inch Bundt pan with butter and dust lightly with flour, tapping out excess. This step ensures a smooth release and a crisp edge. I always use a silicone mold for extra ease, but a traditional pan works just fine.
- Mix Dry Ingredients: In a bowl, whisk together 2 cups all‑purpose flour, 1 1/2 cups granulated sugar, 1 tsp baking powder, 1/2 tsp baking soda, and 1/2 tsp salt. The dry mix sets the stage for a uniform rise. I like to sift the flour once more for an extra airy crumb.
- Beat Butter: In a separate bowl, cream 1 cup unsalted butter until light and fluffy. This process incorporates air and creates a silky batter. If you’re in a hurry, let the butter sit at room temperature for 15 minutes before creaming.
- Add Eggs and Vanilla: Beat in 4 large eggs, one at a time, ensuring each is fully incorporated before adding the next. Stir in 1 tsp vanilla extract. The eggs provide structure, while vanilla adds warmth.
- Combine Wet and Dry: Alternate adding the dry mixture and 1 cup buttermilk to the butter mixture, beginning and ending with the dry mix. Stir until just combined; over‑mixing can toughen the crumb. The batter should be thick but pourable.
- Fold in Twinkie Crumbs: Gently fold in 1 cup crushed Twinkie crumbs and 1/2 cup chocolate chips. The crumbs give flavor, while the chips add a chocolate burst. Be careful not to over‑mix to keep the crumbs evenly distributed.
- Pour into Pan: Transfer the batter into the prepared Bundt pan, smoothing the top with a spatula. Tap the pan gently on the counter to release air bubbles. This helps the cake rise evenly.
- Bake: Place in the oven and bake for 30 minutes. The cake should rise to the top of the pan and develop a golden crust. When you insert a toothpick, it should come out clean or with a few moist crumbs.
- Cool: Remove from the oven and let the cake sit in the pan for 10 minutes before turning out onto a wire rack. This prevents the cake from cracking or sticking.
- Glaze: While the cake cools, whisk together 1 cup powdered sugar with 1 tbsp milk to create a smooth glaze. Drizzle over the cake, letting the glaze pool in the center. The glaze should set into a glossy sheen within 15 minutes. If it dries too quickly, add a splash of milk.
That’s it — you did it. But hold on, I’ve got a few more tricks that will take this to another level. These subtle touches will transform a good cake into an unforgettable experience.
Insider Tricks for Flawless Results
The Temperature Rule Nobody Follows
Many bakers bake at 350°F, but for this cake, a slightly lower temperature of 325°F yields a more even rise and prevents the edges from browning too quickly. I’ve tested both temperatures, and the 325°F version consistently produces a tender crumb and a beautiful golden hue. If you’re using a convection oven, reduce the temperature by 25°F to avoid over‑browning.
Why Your Nose Knows Best
Before you start mixing, inhale the batter. The scent of vanilla and butter is a reliable indicator of the cake’s richness. If it smells flat, add a splash of lemon zest for brightness. I once had a batch that smelled like stale butter, and the fix was a teaspoon of orange zest that brought the aroma back to life.
The 5‑Minute Rest That Changes Everything
After removing the cake from the oven, let it rest in the pan for exactly five minutes before turning it out. This pause allows the structure to set, reducing the risk of cracks or a domed top. I’ve seen cakes that crumble when lifted too early, but this simple rest eliminates that problem.
The Butter‑Butter Balance
Using cold butter instead of room‑temperature can create a slightly denser crumb, which many people enjoy. Cold butter also helps the batter hold its shape during baking, preventing the cake from spreading too thin. Try a mix of cold and room‑temperature butter for a balanced texture.
The Glaze Trick
Instead of a single glaze, drizzle a thin line of chocolate ganache over the top after the powdered sugar glaze has set. The ganache adds a glossy finish and a rich chocolate flavor that pairs beautifully with the Twinkie crumbs. I’ve found that a thin ganache line is enough to elevate the cake without overpowering it.
Creative Twists and Variations
This recipe is a playground. Here are some of my favorite ways to switch things up:
Coconut Cream Twist
Replace the buttermilk with coconut milk and fold in shredded coconut. The cake gains a tropical flair, and the coconut pairs wonderfully with the sweet filling. It’s a hit at summer gatherings.
Red Velvet Variation
Add 1 tsp cocoa powder and a splash of red food coloring to the batter. The result is a striking red cake with a subtle chocolate undertone, ideal for celebrations or themed parties.
Nutty Crunch
Stir in 1/2 cup chopped pecans or walnuts before baking. The nuts add texture and a buttery crunch that complements the cake’s softness. It’s a delightful contrast that keeps the palate engaged.
Minty Fresh
Add a tablespoon of peppermint extract to the batter and a few drops of mint oil to the glaze. The minty freshness provides a cooling counterpoint to the sweet cake, making it a refreshing treat.
Berry Burst
Fold in 1 cup fresh blueberries or raspberries before baking. The berries burst during the first bite, adding a juicy tang that balances the sweetness. This version is perfect for spring and summer.
Coffee Infusion
Replace the vanilla with espresso powder and add a teaspoon of instant coffee to the glaze. The coffee depth elevates the cake into an adult dessert, great for brunch or a cozy evening.
Storing and Bringing It Back to Life
Fridge Storage
Wrap the cooled cake tightly in plastic wrap and store in the refrigerator for up to five days. The glaze stays glossy, and the crumb remains moist. When you’re ready to serve, let it sit at room temperature for 30 minutes to restore its soft texture.
Freezer Friendly
For longer storage, wrap the cake in parchment paper followed by a layer of foil. Freeze for up to two months. Thaw overnight in the refrigerator, then allow to come to room temperature before serving. The cake retains its flavor and texture remarkably well.
Best Reheating Method
To revive a frozen or refrigerated cake, preheat the oven to 300°F (150°C). Place the cake on a parchment‑lined sheet and bake for 10–12 minutes, or until the glaze is slightly soft. Add a tiny splash of water to the glaze before reheating; it steams the glaze back to perfection and keeps the cake from drying out.