Introduction
Picture this: a Sunday afternoon, the kitchen smells like burnt toast, and your friends are staring at the empty fridge like it’s a crime scene. I was on a mission to rescue a ruined pot roast and a handful of stale rolls, and I stumbled upon the idea of turning them into sliders that would make the whole house smell like a Hawaiian BBQ. I swear, the first bite of that improvised slider had me shouting, “This is insane, but it works!” I had never thought a simple sweet roll could become the hero of a cheeseburger, but it did. That moment sparked a culinary obsession I can’t stop sharing.
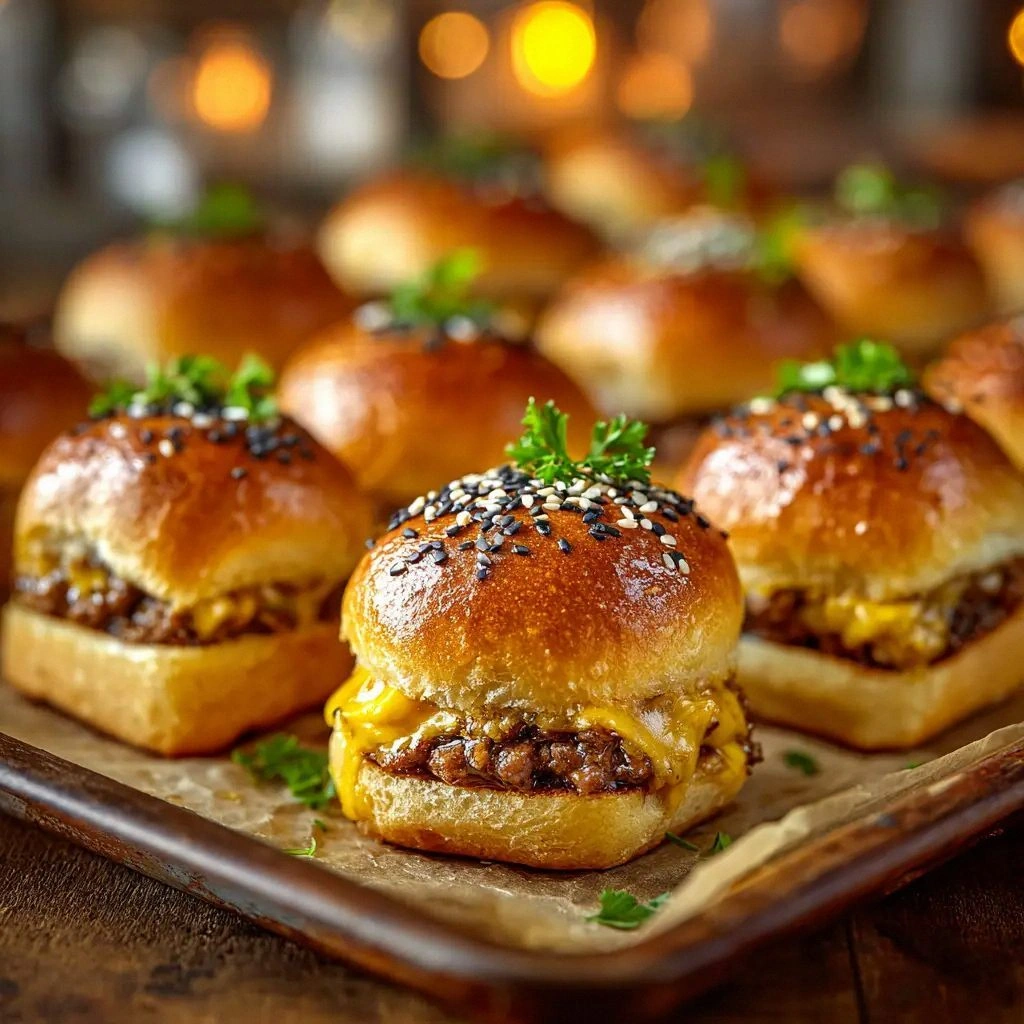
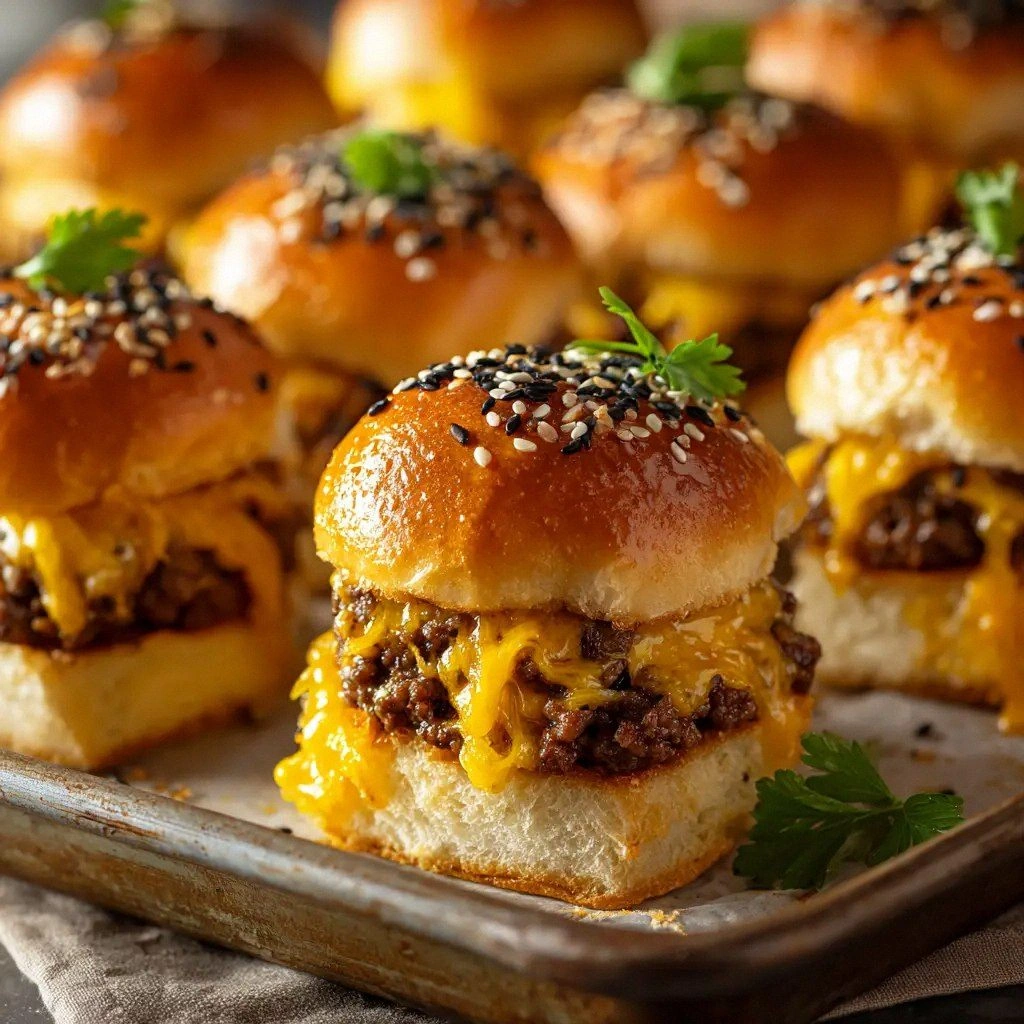
Fast forward a few weeks, and I refined that recipe into what I now call the Hawaiian Roll Cheeseburger Sli. The name itself sounds like a party anthem, and it’s because each slider is a bite‑sized explosion of flavor. I added a splash of Worcestershire to give the beef a depth that feels like a slow‑cooked secret, and a hint of Dijon mustard to balance the sweetness of the rolls. The poppy seeds on the buns give a subtle crunch that echoes the Hawaiian vibe, while the dill pickles add that sharp, green bite that cuts through the richness. By the time I served them at a backyard barbecue, everyone was asking for the recipe like it was a rare gem.
What makes this version stand out from every other cheeseburger slider you’ve tried is the perfect marriage of textures and flavors. The buns are toasted to a golden crisp, the beef stays juicy thanks to a careful blend of spices, and the cheddar melts into a silky sauce that coats the interior like velvet. The poppy‑seed crust adds a surprising crunch that shatters like thin ice when you bite. The dill pickles provide a bright, acidic counterpoint that lifts the entire dish. And the whole thing is served on a sweet roll that feels like a tropical vacation in every bite.
I dare you to taste this and not go back for seconds; I’ve been known to finish an entire batch before anyone else even gets a taste. The secret is a simple technique: letting the beef rest after cooking before assembling, so the juices redistribute and the sliders stay moist. Most recipes get this completely wrong by cooking the meat too long or stuffing the rolls with too much cheese, which results in a soggy mess. Picture yourself pulling these from the oven, the whole kitchen smelling incredible, and your guests erupting into applause. Stay with me here—this is worth it, and by the end of this post, you’ll wonder how you ever made them any other way.
What Makes This Version Stand Out
- Flavor Fusion: The blend of savory beef, sweet rolls, and tangy pickles creates a taste profile that feels like a tropical beach party. This combination is rare in sliders, making each bite a surprise.
- Texture Contrast: The crisp poppy‑seed crust on the buns gives a satisfying crunch, while the melted cheddar forms a silky interior that coats the tongue.
- Ingredient Simplicity: You only need a handful of pantry staples—no exotic spices or hard‑to‑find items are required.
- Make‑Ahead Friendly: Assemble the sliders a few hours before serving, and they’ll stay fresh and flavorful, making them perfect for gatherings.
- Visual Appeal: The golden buns, bright green pickles, and glossy mustard glaze create an Instagram‑ready look that impresses guests.
- Crowd‑Pleaser Factor: Even the pickiest eaters love the sweet‑savory balance, so it’s guaranteed to be a hit at parties.
Alright, let's break down exactly what goes into this masterpiece...
Inside the Ingredient List
The Flavor Base
At the heart of any great slider is the meat, and here we use a lean 1‑lb ground beef that keeps the sliders juicy without excess fat. The 1/2 cup of diced yellow onion adds a sweet bite that caramelizes as it cooks, creating a subtle depth that balances the beef’s richness. Worcestershire sauce, just a tablespoon, injects umami and a hint of tang that transforms the simple meat into a savory masterpiece. Garlic powder and onion powder each at 1/2 teaspoon bring aromatic warmth; skip them and the sliders will feel flat and uninspired.
Salt and pepper are the unsung heroes of flavor. With 1/2 teaspoon of salt and 1/4 teaspoon of black pepper, you achieve a balanced seasoning that lets the other ingredients shine. If you prefer a different pepper profile, try smoked paprika for a smoky undertone, or replace the salt with a pinch of sea salt for a briny twist. The key is to season just enough so the beef remains succulent without overpowering the delicate sweetness of the rolls.
Choosing the right beef is essential. A 90/10 blend offers a good balance of tenderness and flavor, but if you’re craving a leaner option, 93/7 works just fine. When you’re buying, look for a fresh cut that’s slightly pink in the center—this indicates proper handling and ensures a juicy finish. A quick tip: let the beef sit at room temperature for 10 minutes before cooking; this helps it brown evenly.
The Texture Crew
The Hawaiian sweet rolls are the backbone of these sliders. Their soft, slightly sweet interior provides a buttery canvas that soothes the palate, while the outer crust becomes a golden, crisp shell when toasted. If you can’t find Hawaiian rolls, brioche or challah are excellent substitutes that offer similar sweetness and chewiness.
Cheddar cheese is the gooey element that ties everything together. Eight slices of sharp cheddar melt into a silky sauce that coats the beef and the bun, creating a creamy, savory layer that’s impossible to resist. For a milder flavor, try mozzarella or provolone, but be prepared for a different melt profile.
Poppy seeds, used in a teaspoon, give a subtle crunch and a nutty aroma that complements the sweet rolls. If you’re allergic or simply don’t have them on hand, a sprinkle of sesame seeds will provide a similar texture and a hint of nuttiness. Salted butter, 1/4 cup, is melted and brushed over the buns before toasting; this adds a rich, buttery flavor that enhances the overall mouthfeel.
The Unexpected Star
Dill pickle slices add a bright, acidic punch that cuts through the richness of the beef and cheese. A quarter cup of sliced pickles, roughly 50 grams, is enough to provide a tangy bite without overwhelming the other flavors. If you’re not a fan of dill, cucumber slices or pickled jalapeños can add a different zing.
Dijon mustard, one tablespoon, acts as a glossy glaze that brings everything together. The mustard’s subtle heat and sharpness enhance the sweetness of the rolls and balance the savory elements. If you prefer a milder glaze, substitute with whole‑grain mustard or a light honey mustard for a sweeter finish.
The Final Flourish
Once all the components are prepared, the final flourish is the assembly. Layer the beef, cheese, and pickles on the toasted rolls, then drizzle the mustard glaze. This step ensures every bite is cohesive, with the buttered crust, the melted cheese, and the tangy pickles all harmonizing. The poppy seeds on the top of the bun add a final crunch that’s simply irresistible.
Everything’s prepped? Good. Let’s get into the real action…
The Method — Step by Step
- Prepare the Beef: In a large skillet, heat a splash of oil over medium‑high heat. Add the 1 lb lean ground beef, breaking it apart with a wooden spoon. Cook until the beef is browned and crumbly, about 8 minutes. Sprinkle in the 1/2 cup diced onion, 1 tbsp Worcestershire sauce, 1/2 tsp garlic powder, 1/2 tsp salt, 1/4 tsp black pepper, and 1/2 tsp onion powder. Stir to combine, letting the flavors meld for 2 minutes before removing from heat. This creates a savory base that’s ready to layer.
- Rest the Meat: Allow the cooked beef to rest for 5 minutes; this helps the juices redistribute, ensuring each slider stays moist. While the meat rests, preheat your oven to 375°F (190°C) and prepare a baking sheet lined with parchment paper. Resting is a game‑changer—skipping it will leave the sliders dry.
- Toast the Buns: Brush each of the 12 Hawaiian sweet rolls with melted salted butter. Place them butter‑side down on the prepared baking sheet. Toast in the preheated oven for 5–7 minutes, or until the edges are golden and the tops are crisp. The buttery crust will contrast beautifully with the soft interior.
- Layer the Cheese: While the buns are still warm, place a slice of cheddar cheese on each roll. The residual heat will start to melt the cheese, creating a gooey layer that holds everything together. If you prefer a different cheese, try a sharp Gouda for a caramelized finish.
- Assemble the Sliders: Spoon a generous portion of the seasoned beef onto each bun, ensuring a thick, juicy layer. Top the beef with 1/4 cup dill pickle slices, then drizzle a tablespoon of Dijon mustard over the top. Sprinkle a teaspoon of poppy seeds for crunch and a final touch of flavor.
- Bake to Perfection: Return the assembled sliders to the oven for an additional 5 minutes, or until the cheese is fully melted and the tops are golden. This final bake melds the flavors and ensures a cohesive, satisfying bite.
- Let Them Rest: Once out of the oven, let the sliders rest for 3 minutes. This pause allows the juices to settle, preventing a soggy bottom and ensuring every bite is as juicy as the first.
- Serve Immediately: Plate the sliders on a platter, garnish with a few extra poppy seeds, and serve with your favorite dipping sauce. The aroma alone will have your guests lining up for a taste.
That’s it — you did it. But hold on, I’ve got a few more tricks that’ll take this to another level…
Insider Tricks for Flawless Results
The Temperature Rule Nobody Follows
Many people cook the beef at the highest heat, which dries it out. Instead, cook the meat over medium‑high until browned, then reduce to medium for the remaining seasoning steps. This keeps the interior juicy while still developing a flavorful crust. I once tried the high‑heat method and ended up with sliders that felt like a dry sandwich—lesson learned.
Why Your Nose Knows Best
Before you even taste the first slider, inhale the aroma of the buttered buns and the sizzling beef. Your nose can tell you if the meat is over‑seasoned or if the butter is too hot. If the scent feels too strong, let the pan cool a bit before adding the final seasonings.
The 5‑Minute Rest That Changes Everything
Resting the beef for 5 minutes after cooking allows the juices to redistribute, ensuring each bite remains moist. Skipping this step is like skipping the handshake before a big deal—everything feels off. I’ve seen sliders that crumble when you bite because the meat was still moving around.
Use a Meat Thermometer for Precision
Ground beef can vary in moisture content. A quick dip of a meat thermometer into the center of the meat should read 160°F (71°C) for safety, but you can pull it out at 155°F (68°C) if you want a slightly pink center that stays juicy. This small step saves you from overcooking.
Keep the Buns Warm Until Serving
Serve the sliders on a heated platter or wrap them in foil. Warm buns release steam that keeps the interior soft and prevents the cheese from hardening. I’ve seen sliders lose their bite when they sit too long on a cold plate—warmth is key.
Creative Twists and Variations
Grilled Pineapple & BBQ Sliders
Swap the dill pickles for grilled pineapple rings and brush the beef with smoky BBQ sauce. The sweet, caramelized pineapple pairs beautifully with the savory beef, creating a tropical twist that’s perfect for summer gatherings.
Spicy Chipotle Sliders
Add a tablespoon of chipotle mayo to the beef mixture and sprinkle crushed red pepper on the buns. The heat from the chipotle balances the sweetness of the rolls, while the creamy mayo adds a silky texture.
Vegan Edition
Replace the ground beef with crumbled tempeh seasoned with soy sauce and smoked paprika. Use a dairy‑free cheddar alternative and vegan butter to keep the sliders plant‑based yet indulgent.
Breakfast‑Style Sliders
Swap the cheddar for a slice of sharp cheddar and add a fried egg on top of each slider. The richness of the yolk adds a decadent breakfast twist that’s sure to impress.
Cheese Lover’s Delight
Layer two slices of cheddar on each roll and brush the top with a mixture of melted butter and grated parmesan. The extra cheese creates a gooey, cheesy crown that’s impossible to resist.
Storing and Bringing It Back to Life
Fridge Storage
Store the assembled sliders in an airtight container for up to 2 days. Keep them on a paper towel to absorb excess moisture and prevent sogginess. When you’re ready to eat, reheat in a toaster oven at 350°F (175°C) for 5 minutes.
Freezer Friendly
Wrap each slider individually in foil, then place them in a freezer bag. They’ll keep for up to 3 months. Thaw overnight in the refrigerator before reheating. A quick microwave burst at 30 seconds on high will melt the cheese without drying the buns.
Best Reheating Method
For the freshest taste, reheat the sliders on a skillet over medium heat. Brush the buns with a bit of butter and toast until golden. This method restores the crust’s crispness and keeps the interior moist.